Adding and Editing Entraguard Users in Doors.NET
1.0 Introduction
Each person to be granted access to secured areas using an Entraguard controller will need a User ID assigned to them. If a mixed PXL/Entraguard system is in use, each person may have assigned to them both a card and a User ID.
2.0 Manually Enrolling New Entraguard Users
1. From the Home tab click Cardholders.
2. Click the Add button to add a new cardholder record or open an existing record.
3. For new records; enter a First Name, Last Name and (optionally) a middle name then click the save icon.
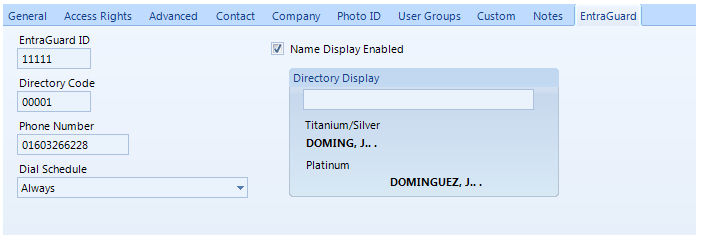
4. Click on the Entraguard tab.
5. Enter an Entraguard ID - This number will be used by the tenant to gain access at the Entraguard.
6. Enter a Directory Code - The directory code is the set of numbers used by visitors at the Entraguard controller to dial up the person they wish to contact.
7. Enter the tenant's phone number - This is the number that will be called from the Entraguard unit.
8. Select a Dial Schedule - This is the time that determines when visitors can call this particular tenant.
9. Place a checkmark against 'Name Display Enabled' - You can then enter how you would like the tenant's name to display on the LCD display. If no text is entered in the text field the last name, F. M. format will be used.
10. Click the save and the information will be written to the database and automatically sent out to the network.
11. To check at the Entraguard that the user has been successfully sent out, press one of the arrow keys on the Entraguard keypad, the new user should display on the LCD display. If there are other existing users already added you may need to scroll through the directory list to locate the new user.
12. You can also right-click the Entraguard unit in the hardware tree and 'Request Status' - The Controller Status grid should show an additional user in the Credential Count field.
Depending on what template was preselected when you added the cardholder, you may need to go to the Access Rights tab and select a valid access group for the cardholder...Entraguard units are automatically added to the Total Access group.
You can view the assigned Entraguard IDs, directory codes and phone numbers in the cardholder grid. The relevant Entraguard fields show by default whenever you click the Cardholders icon.
Note: The software will not allow you to assign the same Entraguard ID to two different cardholders. This is mainly to preserve accurate transaction information about who has gained access at the Entraguard units. The access granted events can then also be used to trigger the Photo Recall feature so a software operator can see at a client workstation who has entered. You can however assign the same directory code and phone number to two separate cardholders, this would allow for the possibility of room-mates sharing the same apartment who can be contacted on the same number.
3.0 Block Enrolling Entraguard Users
In Doors.NET it is not possible to enroll a block of Entraguard IDs, however it is possible to block enroll cardholders without credentials. You can then manually assign the Entraguard user information after the cardholder enrollment.
Block Enrolling Cardholders Without Credentials
- Ensure Advanced View is enabled, (otherwise the Block Enroll icon will be grayed-out).
- From the Home tab click Cardholders.
- Click the Block Enroll Icon.
- Enter default text or a character for the First Name field.
- Enter default text or a character for the Last Name field.
- Select a template from the drop down list or leave the default of ‘Unassigned’.
- Enter the number of records you wish to block enroll.
- Click start to perform the block enrollment process, then click OK.
- Once the block enrollment is finished click the Close button.
- The new records will then appear in the cardholder grid.
- You can then click to open any of the new records, go to the Entraguard tab and enter the Entraguard user information as explained previously.
4.0 How to Disable the Entraguard ID
If you need to disable the Entraguard ID (to prevent someone from gaining access at the Entraguard) this can be done by editing the user's assigned access group. The following steps explain how to edit the user's existing, assigned access group.
Important Note: The following steps will affect all Entraguard IDs which are assigned this edited access group. To disable a single Entraguard ID you would need to create a new access group that has the Entraguard added (with 'Never' as the assigned schedule) and then deselect the previous access group which still has the Entraguard added. You will also need to add to this new group all other doors that the cardholder/user will need to gain access at.
- In Doors.NET, open the cardholder record for the user which has the ID that you wish to disable.
- Click on the Entraguard tab - you will then be able to double-check the assigned Entraguard ID.
- Go to the access rights tab to verify the access group that is assigned to the cardholder/user.
- Click on Home >> Access Groups to display the list of all access groups on the system
- Click the + symbol to the left of the access group name (that you wish to edit). This will display the doors and schedules that are added to the group.
- Select the Entraguard controller that the user ID will no longer be active.
- Click the Unassign icon on the ribbon bar near the top of the screen.
- The Entraguard will be removed from the group.
- Next, click on the access group name.
- Select the Entraguard controller again from the readers list on the right.
- Select 'Never' as the schedule to assign.
- Click the Assign icon on the ribbon bar near the top of the screen.
- The Entraguard controller will now be assigned to the access group with a schedule of never. This means the Entraguard ID for any user that is assign this group will never be able to use their ID at this Entraguard controller.
You may, of course, assign a different time schedule to the group that will allow the ID to be used at the Entraguard during the times that are defined in the assigned schedule.
Note: You will still be able to call the tenant via the intercom function.
Related Articles
Block Enroll Entraguard Users in Doors.NET
In Doors.NET it is not possible to enroll a block of Entraguard IDs, however it is possible to block enroll cardholders without credentials. You can then manually assign the Entraguard user information after the cardholder enrollment. Block Enrolling ...Entraguard Controller Setup in Doors.NET
1.0 Introduction IMPORTANT NOTE: The PXL and Entraguard controller types are not supported with Doors.NET version 6 (v6.0.0) and future versions. Ongoing support and development for these products will be in Borealis. Doors.NET v5.4.0.8 was the last ...Entraguard Controller Setup in Visual Doors
Entraguard Setup 1.0 Introduction Visual Doors supports the Entraguard, Silver and Titanium Telephone Entry controllers functioning as a node on a PXL-500 network for seamless integration with a PXL system. The Entraguard can work as a single unit or ...Entraguard Autoconfiguration in Doors.NET
As well as detecting the primary controller type, all Entraguard secondary controllers (and PXL secondary controllers) are also detected and added to the system using auto-config. Converted databases will, of course, already have the controllers ...Entraguard Tenant Guide
1.0 Using the Entraguard Telephone Entry Controller The following guide is to assist users of an EntraGuard Silver, Titanium or Platinum Telephone Entry controller. The following information is covered in this guide: How to use your User ID A listing ...