BioSync B100-SA Setup Guide
1.0 Introduction
- BioManager Software Installation
- CNV-1000 Converter Setup (for connecting to the BioSync reader via ethernet)
- BioSync B100 -SA Reader Setup (this document)
This guide explains how to wire the B100-SA to the controller, connect to the B100-SA for the first time, configure the reader and then enroll new user fingerprints.
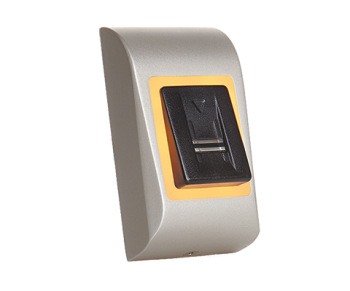
The B100-SA access control fingerprint reader is designed for easy management of users and configuration. The scanner is made with advanced capacitive sensing technology that provides many advantages over optical solutions, such as:
- Impossible to use duplicate copies of the users fingerprints
- Same performance in the different light conditions
- Good reading of fingerprints which are stained from daily jobs
- Built in strong scanning and matching algorithm provides excellent fingerprint reading tolerance - minimizing the need to repeat finger print enrollment. The reader can store up to 100 finger templates. One template is reserved as User Manager (Administrator), one template is reserved for Reader Configuration (Installer) and up to 98 templates are for Users.
The reader programming and fingerprint enrollment is very quick and easy. The reader has a integrated relay output and an exit button input. If secure installation is needed, the reader can be connected to a remote relay unit in a secured area, which also has an exit push button. Complete setup and programming is performed by scrolling on the sensor.
2.0 Mounting Instructions
- Use the backplate as a mounting template to mark four holes on the wall.
- Drill four holes in the wall then use the screws provided to mount the backplate to the wall.
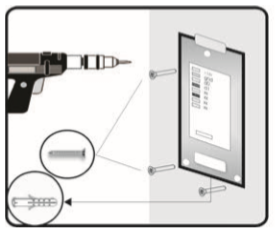
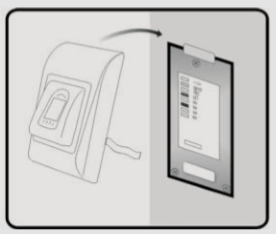
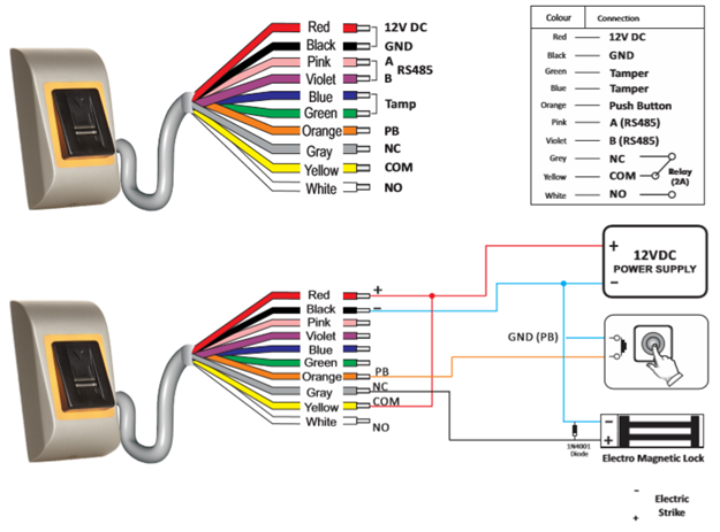
Important Note: On the reverse of the BioSync B100-S (under the mounting bracket), you will see a white label displaying a wiring diagram and the device ID/serial number - you should make a note of this serial number as it is required during setup. - Connect the BioSync reader to the backplate.
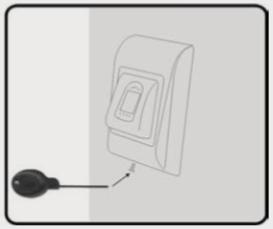
- Secure the reader to the backplate using the allen key provided.
3.0 Mounting Instructions
4.0 Pairing the B100-SA with the RTT (Remote Relay Unit)
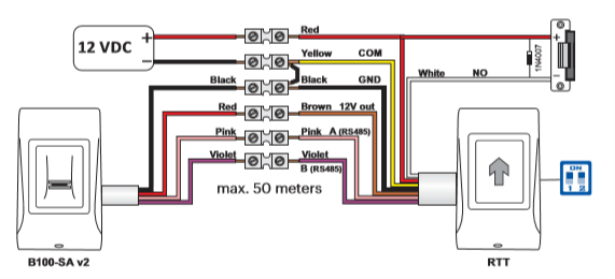
- On the RTT unit, put dip switch No.1 into the ON position. (RTT beeps continuously and the red led blinks).
Put Dip switch No.1 to the OFF position.
- Wait for a beep + OK beep (short + short + long beep).
- The device coupling is now complete.
5.0 Adding an Administrator Fingerprint
- Power down the B100-SA reader.
- Remove the outer cover (using the provided hex key).
- Put the dip switch No. 2 into the ON position.
- Power up the device.
- Wait for one long beep followed by multiple short beeps.
- While the reader is still beeping put the dip switch No. 2 into the OFF position (the beeping will stop).
- Wait for approximately 15 seconds until the LED starts to blink amber.

- Swipe the designated primary finger on the sensor a minimum of 6 times.

- When you hear the confirmation beep the admin finger will have been enrolled.
Note:
- This procedure also deletes any previously enrolled users or administrator fingerprints.
- This procedure will un-pair any connected relay unit (RTT, DINRTT or RU2).
6.0 User Programming
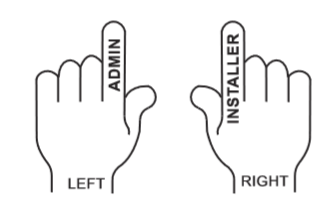
Use index fingers as Administrator and Installer. You can use other fingers as access fingers. Administrator finger is enrolled at the end of the system installation.
6.1 Enroll Fingerprint for Relay 1 (finger that will activate on-board relay 1)
- Swipe the admin fingerprint once - (backlight LED will be slowing flashing green and you will hear a short beep).
- Wait 5 seconds - (backlight LED will then be flashing quickly and another short beep will be heard).
- Swipe the designated user fingerprint a minimum of 6 times - (amber LED will be flashing quickly).
- Wait for a short beep then a long beep.
- The user fingerprint for relay 1 is now enrolled.
6.2 Enroll Fingerprint for Relay 2 (finger that will activate on-board relay 2)
- Swipe the admin finger twice - (backlight will be slowly flashing red and you will hear a short beep).
- Wait five seconds until the LED starts flashing quicker - again you will hear a short beep.
- Swipe the designated user fingerprint a minimum of 6 times. LED will be flashing quickly.
- Wait for a short beep then a long beep.
- The user fingerprint for relay 2 is now enrolled.
Note: Relay 2 is only available if the reader is used with an additional remote relay unit (DINRTT and RU2).
6.3 Enroll a Fingerprint for Relays 1 and 2 (finger that will activate both on-board relays)
- Swipe the admin finger twice - (backlight will be slowly flashing amber and you will hear a short beep).
- Wait five seconds until the LED starts flashing quicker - again you will hear a short beep.
- Swipe the designated user fingerprint a minimum of 6 times. LED will be flashing quickly.
- Wait for a short beep then a long beep.
- The user fingerprint for relay 2 is now enrolled.
6.4 Delete a User Fingerprint
- Swipe the admin finger 4 times - (backlight will be slowly flashing red and you will hear a short beep).
- Wait five seconds until the LED starts flashing quicker - again you will hear a short beep.
- Swipe the user finger once. LED will be flashing quickly.
- Wait for a short beep then a long beep.
- The user fingerprint is now deleted from the unit.
6.5 Delete all User Fingerprints
- Swipe the admin finger 4 times - (backlight will be slowly flashing red and you will hear a short beep).
- Wait five seconds until the LED starts flashing quicker - again you will hear a short beep.
- Swipe the admin finger twice - you will hear multiple short beeps.
6.6 Change Admin Fingerprint
- Swipe the admin finger 5 times - (backlight will be slowly flashing amber and you will hear a short beep).
- Wait five seconds until the LED starts flashing quicker - again you will hear a short beep.
- Swipe the new admin finger a minimum of 6 times - you will hear a short beep then a long beep.
6.7 Change/Enroll Installer Fingerprint
- Swipe the admin finger 6 times - (backlight will be slowly flashing green and you will hear a short beep).
- Wait five seconds until the LED starts flashing quicker - you will hear a short beep then a long beep.
- Swipe the new Installer fingerprint a minimum of 6 times - you will hear three short beeps.
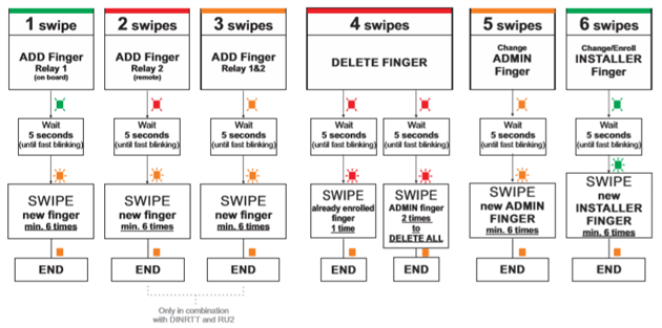
6.8 Administrator/User Programming Block Diagram
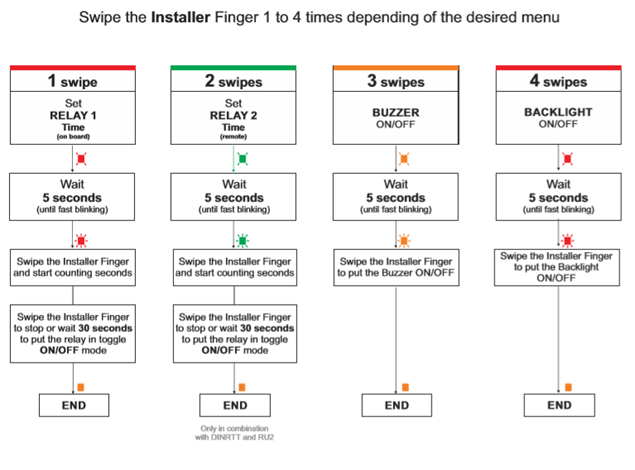
7.0 Installer Programming
7.1 Set Relay 1 Unlock Time
- Swipe installer finger once - the backlight LED will be slowly flashing red.
- Wait 5 seconds (until the LED starts flashing quicker).
- Swipe the installer finger then wait THE # of seconds you wish the unlock time to be.
- ... Swipe the installer finger again to set the new unlock time - or wait for a minimum of 30 seconds to configure the relay to toggle mode.
- Once complete, you will hear a short beep and then a long beep.
7.2 Set Relay 2 Unlock Time
- Swipe installer finger twice - the backlight LED will be slowly flashing green.
- Wait 5 seconds (until the LED starts flashing quicker).
- Swipe the installer finger then wait for however many seconds you wish to set the unlock time to (on relay 2)...
- ... Swipe the installer finger again to set the new unlock time - or wait for a minimum of 30 seconds to configure the relay to toggle mode.
- Once complete, you will hear a short beep and then a long beep.
7.3 Buzzer ON/OFF
- Swipe installer finger three times - the backlight LED will be slowly flashing amber.
- Wait 5 seconds (until the LED starts flashing quicker).
- Swipe installer finger once.
- Once complete, you will hear a short beep followed by a long beep.
7.4 Backlight ON/OFF
- Swipe the installer finger 4 times - the backlight LED will be slowly flashing red.
- Wait 5 seconds (until the LED starts flashing quicker).
- Swipe installer finger once.
- Once complete, you will hear a short beep followed by a long beep.
7.5 Installer Programming Block Diagram
Related Articles
BioSync KBF-3KP Setup Guide
1.0 Introduction Setting up a KBF-3KP reader on a new installation is a three step process. Each of these steps is covered in its own document: BioManager Software Installation CNV-1000 Converter Setup - (used to connect to the BioSync via ethernet) ...BioSync KBF-2SC Setup Guide
1.0 Introduction Setting up a KBF-2SC reader on a new installation is a three step process. Each of these steps is covered in its own document: BioManager Software Installation CNV-1000 Converter Setup - (used to connect to the BioSync via ethernet) ...BioSync B100-S Setup Guide
1.0 Introduction Setting up a B100-S reader as a new installation is a three step process. Each of these steps is covered in its own document: BioManager Software Installation CNV-1000 Converter Setup (used to connect to the BioSync via ethernet). ...BioSync KBF-ENR1 Setup Guide
The ENR-1 is a desktop card reader with fingerprint reader that allows you to quickly and easily enroll EM and Mifare Card Serial Number (CSN) credentials plus HID 125KHz and Keri NXT 125KHz cards into the BioManager software. It requires no drivers ...BioSync B100-SC Setup Guide
1.0 Introduction The B100-SC is a Wiegand biometric and proximity reader for indoor or outdoor access control applications. It has a programmable Wiegand output and offers storage of up to 100 fingerprints. It reads cards/tags and has a Mifare ...