Comelit Integration Setup Guide
Comelit Integration
| 1.0 | Introduction |
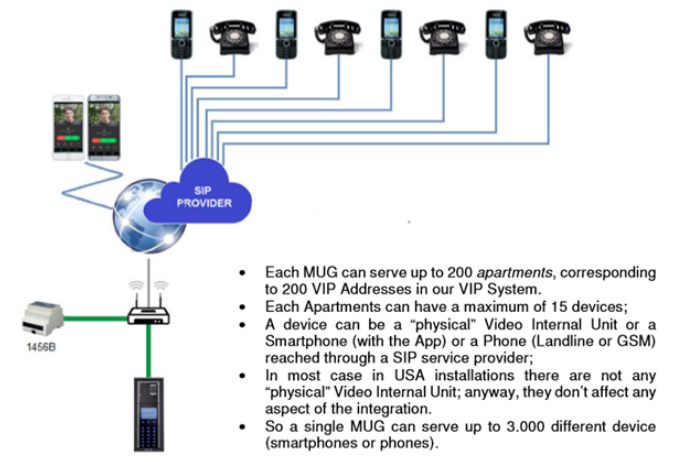
The Visual Doors and Comelit integration provides you with an easy-to-use interface to administer the relationship between cardholders and apartments. It is for 'VIP' Systems that use the '1456B' Multi-User-Gateway (MUG) - A 1456B is a device that forwards and receives calls from the VIP System to mobile or landline phones via Comelit Video Entry App or via Sip provider and it is the 1456B that Visual Doors interfaces with.
This setup guides assumes that the Comelit system has already been installed, licensed and configured. For further technical details about the Comelit VIP System, please refer to your Comelit integrator/installer.
| 2.0 | Integration Licensing |
- Visual Doors must be licensed for Comelit Integration.
- Visual Doors must also be licensed for the number of '1456B' (door entry gateways) that will be added.
Note: Licensing requires a clean, non-proxy internet connection. There is no offline license activation option. If you are unsure about any Internet access restrictions, please seek advice from your IT administrator.
| 2.1 | Licensing Comelit Integration |
Contact Keri Systems sales to obtain a Comelit Integration license key. The license key will be e-mailed to you.
Log into the Visual Doors client.
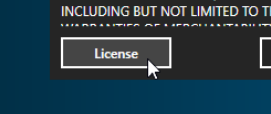
Click the About tile.
Click the License button.
Enter the End User Information and the Integrator/Installer's information.
Enter your license key.
Click the Activate button.
You should see a message indicating that activation has been successful.
The License Manager will state how many '1456B' (door entry gateways) the system is licensed for.
You can now close the license activation window.
Log out and relaunch Visual Doors.
| 3.0 | License Updating |
To update your license (i.e - to add additional gateway connections), contact your supplier with your existing license key details and additional connections required.
Once you have confirmation that your license key has been updated, click the Activate button again to commit these changes.
| 4.0 | Log into Visual Doors |
Once Visual Doors is licensed for Comelit integration, you MUST log in as a System Administrator to see the Comelit tiles on the home screen. This is a built-in security precaution to prevent non-administrative users from making unauthorized changes.
If you log in as a standard system operator, you will not see the Comelit tiles (even
though the feature is licensed).
Note: Please refer to the Visual Doors help file for further information about setting up system operators.
| 5.0 | Add the Door Entry Gateway (1456B) |
Log into the Visual Doors software as a system administrator.
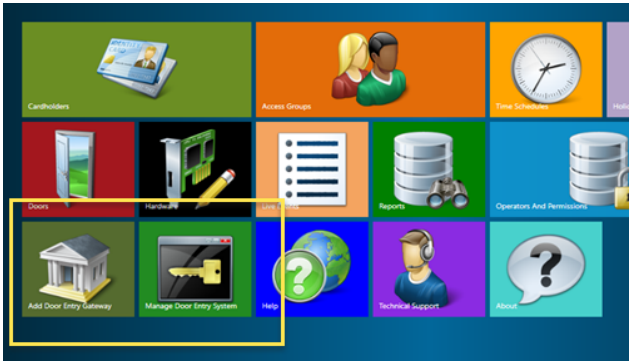
Click the Add Door Entry Gateway tile.
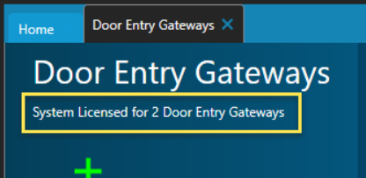
The Door Entry Gateway screen will appear.
Note: The screen will display how many gateways (1456B) the system is licensedfor.
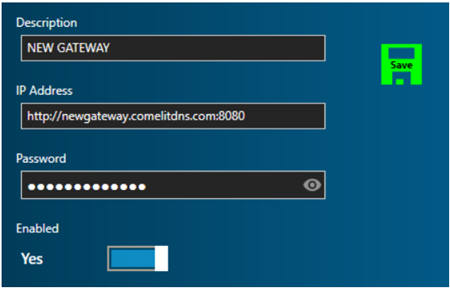
- Click the green Add button.
Select the default new entry.
- Enter a description for the new gateway.
Enter the full IP/URL of the gateway, including the communication port number. (The port # for the 1456B is normally 8080).
Examples:- http://anywhere.dns.com:8080
- Enter the password for the gateway.
Note: The URL and password in steps 7 and 8 are supplied by the door entry installation company. Click the enable button to enable communications.
Click the green save icon.
If all the details are correct, within a few seconds the status icon will be green.
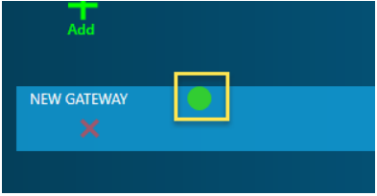
You are now ready to manage the door entry system.
| 6.0 | Manage the Gateway and Apartments |
Close the Door Entry Gateways screen and return to the home screen.
From the home screen, click the Manage Door Entry System tile.
The new gateway will be listed on the left and the list of apartments will be on the right. The apartment names are retrieved directly from the gateway (from the 1456B).
Note: The door entry system must be fully configured by the door entry installer prior to using this integration.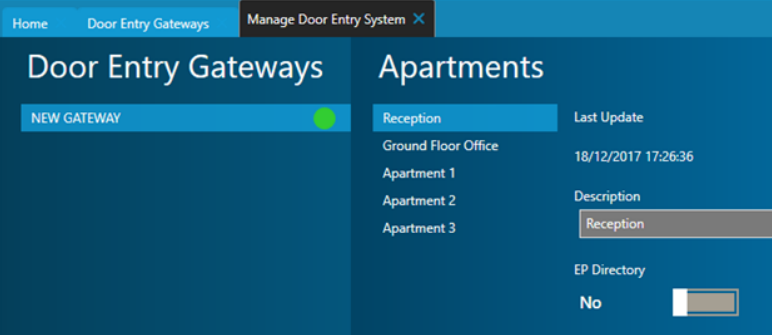
Note: A gateway can support a maximum of 200 apartments, but the number of visible apartments is determined by the 1456B license - please consult your door entry installer for further information about Comelit licensing.- Select an apartment.
You can disable or enable the display of the apartment for the external panel directory.
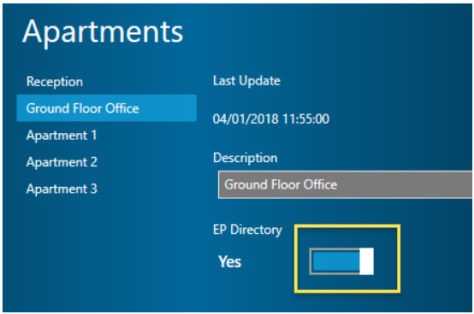
Click Save to commit your changes.
- You are now ready to manage the cardholders on the system.
Note: The apartment names shown in this integration are configured in the 1456B using Comelit's VIP manager software. Please refer to your door entry installer for further information about this.
| 7.0 | Manage Cardholder |
Close the Manage Gateway screen and return to the home screen.
Click the Cardholders tile.

Select an existing cardholder (or create a new card record).
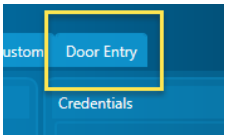
Note: Press the F1 key for further details about Visual Doors cardholder enrollment.- Click the Door Entry tab.
- The first column (1) will display the gateways which are enabled and added to the system. The second column (2) displays the apartments which are enabled on the gateway(s). The third column (3) displays all the device types which are available for each of the apartments. This information is configured by the door entry installation company (using Comelit's VIP Manager software).
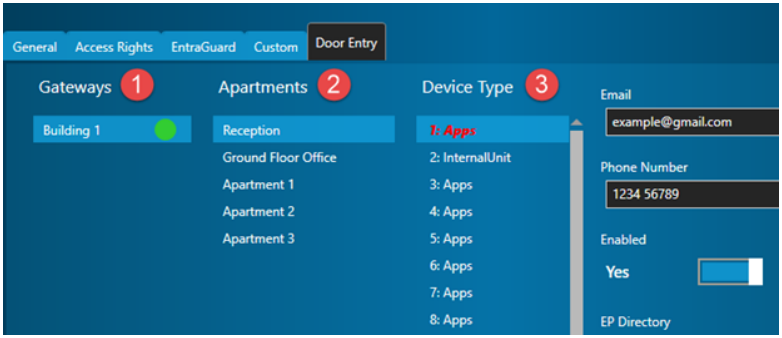
Notes:
- A device type can be Apps or a Phone (Apps refers to users who receive calls on their smart phone. Phones refers to users who receive calls on telephone-type handsets).
- Internal Unit refers to fixed hardware such as video monitor screens and cannot be administered by this package. - Select the relevant gateway.
- Select the apartment.
- Select the relevant user number slot to be assigned to the cardholder.
Note: Any used device types are displayed in red italic.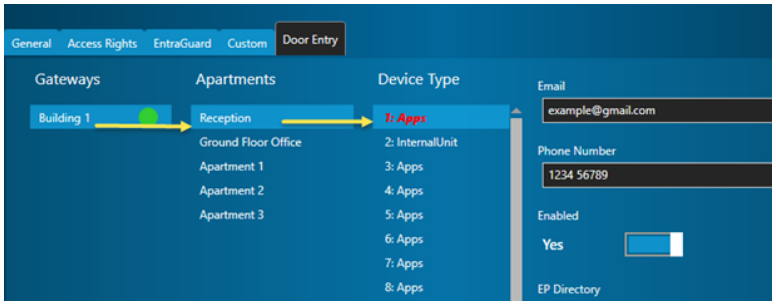
- If the cardholder will be an Apps user; you are required to enter the cardholder's e-mail address and phone number before you can save the record. Enable the record, then, if required, enable the record to be displayed in the Entry Panel (EP) (This is a VIP System option) - For further information, please contact your door entry installer.
If the cardholder is a Phone user you will require a phone number only to save the record.
| 8.0 | Activating App Users |
Each Apps user must be registered to the 1456B with a unique activation code. Activation codes are generated by the 1456B.
Ensure the cardholder record is saved.
- Click the GENERATE ACTIVATION CODE button.
A new window will open.
Click the GET ACTIVATION CODE button.
- A new code will be generated by the 1456B and will display in the window.
Click on EXPORT CODE TO EMAIL button - this will call the default mail client on the PC and prepare a new email message with the activation attachment for the Comelit smart phone app.
Please refer to the Comelit documentation for installing and activating the Comelit smart phone app.
Once correctly activated, Apps user records will display the green activated indicator in their record.
