Doors.NET - Port Forwarding
1.0 Introduction
One method of connecting to controllers over the Internet is to use Port Forwarding on the router that the controller is connected to.
Note:
- The controller's router needs to be set to a static IP address (a public, external IP address that does not change).
- The controller's router must support Port Forwarding and needs to have the ability to create custom port forwarding entries.
- The controller or the LAN-520 Ethernet module must be set to a static IP address.
- Port Forwarding does NOT work with standard NXT controllers (controllers using standard NXT firmware). It is only supported with PXL, Entraguard and NXT Mercury-Powered controllers.
- Be sure you do NOT open all ports on your router as this can allow hackers to easily access your computer.
2.0 How It Works
Port Forwarding allows you to connect to a Keri controller by opening the specific communication port on the router and then using NAT (Network Address Translation) to automatically route data to the TCP/IP address which has been assigned to the controller/module and is defined in the port forwarding section of the router.
3.0 To Setup Port Forwarding
- The first thing to do is to configure the LAN-520 or NXT-MSC controller with a static IP address and to check which port it is set to for communication. By default NXT Mercury Powered controllers and LAN-520 Ethernet modules are set to TCP/IP port 10001.
- Connect the controller or the LAN-520 module to the internet router using an RJ-45 cable.
- Ensure your PC is connected to the router and on the same network.
- Check that the router is set to a static, external IP address. You can use a command prompt - Type IPCONFIG then look for the address of the default gateway.
- Log into your router using a web browser and the username and password assigned to the router.
- Find the Port Forwarding section. This varies on each router but generally it will be found via a link named 'Security' or 'Advanced Settings'. Please consult the router's manual/ technical documentation is you cannot locate the Port Forwarding section.
- Within the Port Forwarding section you will need to add a Custom Service/Entry.
- Give the custom service a name, ensure it is set to TCP then enter the communication port # (such as 10001) in the Start and Finish Port fields.
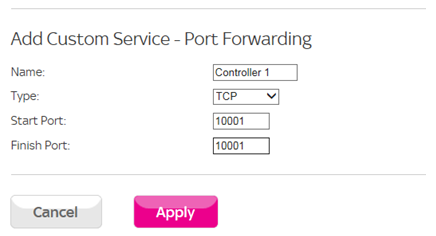
- Next, on the router you will need to specify the static IP that the MSC controller/LAN-520 is set to.
- If your router has a firewall you will also need to specify the custom port forwarding entry in the firewall rules and add it as an inbound and outbound service.
- Save the settings and exit.
- In Doors32 or Doors.NET you have to set the controller's IP address as the static, public-facing IP address of the router that the controller is connected to.
Note:
Port Forwarding can only route data to one controller at any specific time. For more than 1 controller you will need to set a different TCP/IP communication port on each controller and setup an additional custom port forwarding entry in the router.
4.0 Troubleshooting
If you are having trouble connecting after following the instructions above...
- Try temporarily disabling any firewall you have installed. Norton Anti-Virus and AVG can often be problematic when using Port Forwarding.
- If it is a new PXL controller, perform a full ram reset.
- When using a LAN-520 on a PXL controller, ensure the controller is addressed as #1 and check that the JP6 and JP7 jumpers are removed.