Doors.NET - Software Installation Guide
1.0 Introduction
Installing the Doors.NET software is very easy and straight-forward. There are just a few host PC requirements that should be met prior to performing the installation:
- The host PC must be fully up-to-date with the latest Windows security and performance updates. You should not install Doors.NET on a PC which has an unsupported version of Windows.
- When performing the software installation, we recommend disabling your anti-virus software to prevent it from blocking the installation of certain required software components. You can then re-enable the anti-virus software once installation is complete add then add Doors.NET as an exception.
- To download Doors.NET from the www.kerisys.com website you will need to register an account. Once you have verified your new account you will be able to log in and access the members area.
Important Notes
- The standard version of Windows 10 was made End of Life in October, 2025 so Windows 10 and older operating systems are no longer recommended for Doors.NET. Windows 10 LTSC (Long Term Service Channel) versions are supported as they will continue to be supported by Microsoft for several more years.
- Doors.NET v6.0 will install SQL Express 2019 on a new system where SQL Express is not installed. However, Doors.NET can also be used with SQL Express 2022 and SQL Express 2025 and the full versions of SQL Server 2022/2025.
- Support for PXL and Entraguard controllers officially ended for Doors.NET with version 5.4.0.8 - this is the last version that will support these controller types and our future developments of these controllers will be in Borealis - our Cloud-based access control platform.
This document assumes you have already followed the instructions for downloading the latest version of Doors.NET
- Double-click the downloaded installation file.
- The installation will initialize.
- If you have downloaded the full installer you will need to extract all the files from the compressed file and then click on the installation executable file.
- Once the installer has opened, for an existing system you will see the notification that the Doors.NET Windows services are still running. At this point you can go to Control Panel >> Administrative Tools >> Services, stop the Doors.NET services and then click retry, or you can just click the CLOSE button, the installer will continue but once you have completed the installation/upgrade you would then need to restart the PC.
- Otherwise the following notification will appear - advising you that the last supported version for PXL and Entraguard controllers was v.5.4.0.8.
Note: On this window you also have the option to not install the help files as this will speed up the installation time if the host PC happens to have a Hard-Disk-Drive (HDD) installed instead of a Solid-State-Drive (SSD). Keri recommends an SSD for optimum speed and performance.
You are also prompted to read the information that relates to anti-virus software on the host PC- then check the box to confirm. Click NEXT. - You will now see the Application Requirements screen - for an existing system you will see that an uninstall of the current version is required and you will also see the required firmware versions for any controller types that support a flash firmware upgrade. Click NEXT or START if you have an existing installation.
- For an existing system the current installed version will be uninstalled.
- You will now see the welcome screen which displays the version that will be installed. Click NEXT.
- Next, read through the Doors.NET license agreement then check the box to confirm the terms of the agreement. Click NEXT.
- You will now see the release notes for the version that will be installed. Click NEXT.
- The customer registration screen appears next. Enter a registration username and the name of your organization. This is just for registration purposes and is not the username for logging into the software. Click NEXT.
- The next screen allows you to select your Type of Installation.
- Full Installation - This will install all the required components for a standard installation of Doors.NET
- Basic Installation - installs only the user administrative client onto the computer.
- Custom Install - allows you to select additional applications to be installed. This can include optional licensed applications beyond those included in the standard installation package. - You will then see the Important Information screen. The list on the left in green displays all the items that will be installed. The list on the right in red displays the list of items that will not be installed. Confirm you have verified what will be installed then click NEXT.
- The Destination Folder information will now be displayed. This screen shows you the default location on the host PC where all the Doors.NET files and folders will be installed. As you can see in the following image the default location is C:\Keri\DoorsNET. Click NEXT to accept the default destination file location.
- The Shortcuts screen allows you to select if you wish Desktop, Start Menu or Quick Launch shortcuts to be installed on the host PC. Click NEXT.
- Select Database Location - this screen will display if an existing SQL Server has been detected on the host PC. For a new installation or a new PC you will see 'No SQL Server detected on this computer'.
- For a new single-PC installation you should also select the option to Install SQL Management Tools - you will be prompted to install this when Doors.NET install completes. It is the administration tool for accessing and viewing the database and is required if a Doors.NET database needs to be restored. Click NEXT.
- Click the INSTALL button and the software installation will begin.
Note: as previously mentioned, if the host PC has a Solid State Drive (SSD) it should take no longer than 20 minutes to complete the installation (including the help files and SQL Express 2019). - The installer will install SQL Express 2019 - the database engine for the access control database.
Once the software installation is complete you will be prompted to run the Licensing Wizard.
3.0 Install SQL Studio Manager
After installation completes and you are prompted to run the license manager you will also be asked if you wish to install SQL Studio Manager.
- Wait a few seconds for the installer to initialize and display the Studio Manager installation wizard.
- Select the Custom Install type and the installer will initialise.

- The progress bar to indicate when the installation will be complete.
- Once complete, click the RESTART button to restart the host PC.
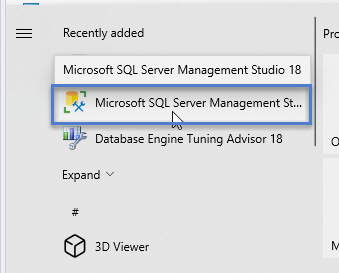
- When Windows has loaded, click on the start menu and SQL Studio Manager will be displayed as a recently added item.
Next Document
Related Articles
Doors.NET - Software Update
1.0 Introduction The following guide explains how to update the Doors.NET software and if you are using Visual Doors that will also be updated. Software upgrades are automatically handled by the installation program. The installation program ...Doors.NET Troubleshooting Guide
The following guide aims to assist you in troubleshooting and identifying some of the issues that may be encountered when setting up and using the Doors.NET software and supported hardware. Where there are multiple possible causes, the suggested ...Doors.NET and Anti-Virus Software
1.0 Introduction When installing the Doors.NET software, Keri systems requires you to temporarily disable any anti-virus software that is running on the PC. Failure to do this can cause the software installation to fail. Once the software ...Doors.NET - End User's Guide
Doors.NET user guide for the end-users (attached).Doors.NET - End Users Guide
Doors.NET End Users Guide (attached)