Doors.WEB Setup Guide
1.0 Introduction
This reference guide introduces you to Keri Systems new Doors.WEB™ web client setup. It follows on from the Doors.WEB™ installation guide.
IIS Security Concerns
- Doors.WEB uses Microsoft Internet Information Services (IIS). IIS is a web server software package designed for Windows Server. Organizations commonly use Microsoft IIS servers to host websites, files, and other content on the web.
- Microsoft IIS has vulnerabilities that can be used by bad agents to compromise your network infrastructure.
- Before installing Doors.WEB, Keri recommends involving your IT department in reviewing and installing IIS as well as Doors.WEB to ensure IIS is installed with the correct level of security.
- When using IIS, it is critical to ensure you keep your system up to date with all Microsoft OS security updates.
2.0 Create Application Pool
The following only needs to be done if the host PC/Server is running another web application and using the DefaultAppPool - It is an unlikely scenario but the scenario may
arise.
- Open Internet Information Services/IIS (on a Windows 10 PC type IIS into Cortana).
- Internet Information Services (IIS) Manager window will open.
- Right-click on Application Pool >> select Add Application Pool > set the name to
DoorsWebClient > press OK.
- Right-click the newly created DoorsWebClient application pool > select Advanced
settings > set enable 32-bit Applications: true > press OK.
-
You will see the Connections tree located on the left of the page.
- From the Sites list, right-click on DoorsWebClient.
- Select Basic Settings.
- Click the Select button, then select the DoorsWebClient as the target Application
Pool.
- Close IIS Manager.
3.0 Using Secure Sockets Layers
It is very likely that you would want to protect your Doors.WEB™ client connections in
the same method that is used when connecting to a bank's website (for online banking).
This section of the guide will walk you through the process of enabling Self-Signed Certificates and then using the certificate to create a Secure Socket Layer (SSL) connection
to the Doors.WEB™ Server).
The process is the same as certificates issued by a Certification Authority, except you do
not have to apply for the certificate and it does not have to be bound to a registered
domain, such as myowndomain.com or kerisys.com.
2.1 Important Information about Certified and Self-Signed Certificates
An SSL connection with a self-signed certificate creates an encrypted connection
between the server and web browser - to ensure the information flowing in between
can’t be intercepted or interpreted by a 3rd party. A self-signed certificate does not
guarantee the server is who they claim to be.
The highest level of security is achieved with a certificate provided from a 3rd party CA
(Certification Authority) such as Digicert and GlobalSign. Certificates must be registered
to a domain and require the domain owner to submit an application to the CA; however, this process is not covered in this document.
Requirements
- An existing installation of IIS with Doors.WEB™ (DoorsWebClient) added as a site.
- IIS8 (Internet Information Services).
- Windows 10 (or above) operating system.
4.0 Setup SSL With Certificate
- Open Internet Information Services (IIS) (Right-click Windows Start Menu >> Control Panel >> Administrative Tools >> Internet Information Services (IIS) Manager.
- From the Connections list on the left, select the top connections > run the Server
Certificates mode under IIS middle > Under Actions, choose Create Self-Signed Certificate.
- Name the certificate as DoorsWebCert > select Web Hosting as the certificate store
> press OK.
- Apply the certificate to the site by selecting DoorsWebClient under Sites > right
click and select Edit Bindings.
- From the list, choose https on port 443 > press Edit.
- From the SSL certificate dropdown, choose DoorsWebCert > press OK.
- Now every time a connection is made to the server, it can be made using a https
connection, such as https://localhost (note there is no :8080 at the end).
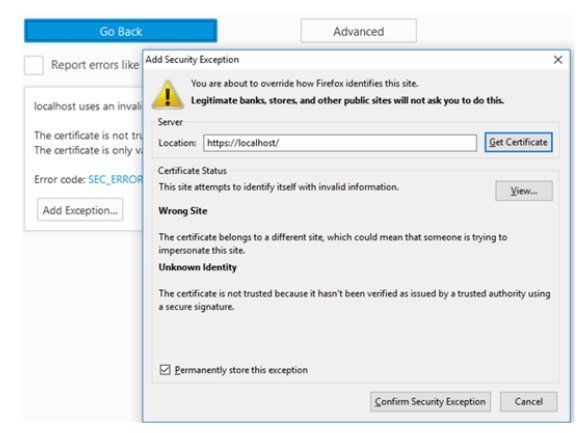
4.1 Accept Self-Signed Certificates on FireFox
The first time the browser connects to the server, the user will need to authorize the
self-signed certificate, this is not required for a CA issued certificate. On Mozilla FireFox the following message is shown:
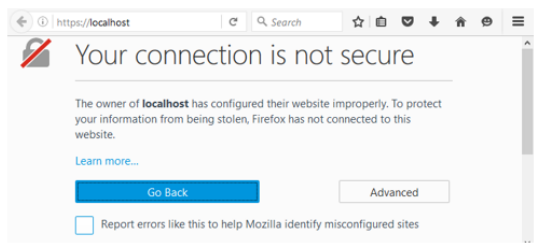
Accept the self-signed certificate by pressing Advanced >> Add Exception >> Confirm
Security Exception.
4.2 Accept Self-Signed Certificates in Microsoft Edge
In the Microsoft Edge browser, the following warning is given; select Continue to this
webpage.
5.0 Remove HTTP Connections
The default method of connecting to Doors.NET using Doors.WEB™ is via HTTP and port
8080. However, these connections are not using SSL. The following steps explain how to remove this port binding and
discontinue connections on port 8080:
- Right-click Windows Start menu.
- Select Control Panel.
- Click Administrative Tools.
- Select Internet Information Services (IIS) Manager.
- Expand the tree-view on the left of the screen.
- Expand Sites - you should see the Doors.WEB™ site.
- Right click on DoorsWebClient.
- Choose Edit Bindings.
- Select HTTP on port 8080.
- Click the Remove button.
6.0 Edit the HTTP Port Number
If you still wish to use an HTTP connection then Keri Systems strongly recommends changing the HTTP port number.
- Right-click Windows Start menu.
- Select Control Panel.
- Click Administrative Tools.
- Select Internet Information Services (IIS) Manager.
- Expand the tree-view on the left of the screen.
- Expand Sites - you should see the Doors.WEB™ site.
- Right-click on DoorsWebClient.
- Choose Edit Bindings.
- Select HTTP on port 8080.
- Click the Edit button.
- Change the HTTP port number from 8080 to something else.
Related Articles
Doors.Web Installation
1.0 Introduction This reference guide introduces you to Keri Systems' Doors.WEB™ web client. It explains the main features, functions and operation of the web client, plus pre-requisites for installation and the installation procedure itself. It can ...Doors.WEB User Manual
1.0 Using Doors.WEB™ on a Smart Phone To use the Doors.WEB™ client with a smart phone you have to be connected to the same wireless network as the host PC. The following information explains how to use the web client with a smart phone. Keri’s ...Doors.WEB Data Sheet
Doors.WEB Data Sheet (attached)