dormakaba Configuration and Options
1.0 Introduction
2.0 Setup the Correct Credential Type
Note: Credential Types must be enabled on your Doors.NET license. The selected credential type will match what is being used for the existing hardware. For example; when using Mercury LP series hardware you would select 'Standard 26-bit HID H103001' and add the facility code(s) to the format.
2.1 Using Mercury controllers (other LP controllers, for example):
This example uses HID 125KHz credentials:
- In Doors.NET, go to Setup >> Credential Types.
- Delete the existing, active credential types.
- Click the ADD ACTIVE FORMAT button.
- From the format drop-down list, select 'Standard 26-bit HID H103001'.
- Click the Save icon.
- In the facility code field, enter the facility code programmed in the credential(s).
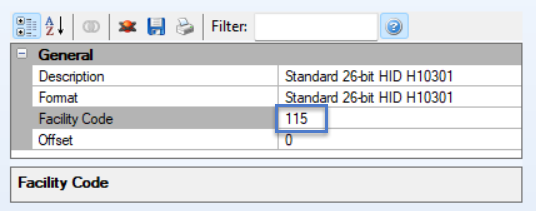
- Click the Save icon and the credential format will be sent out to the hardware.
3.0 Enrolling Credentials
After enrolling new credentials it will take a few seconds for the data to be sent to the WAC/WDC/WDCK units (the LP4502 controller does not directly update the locks/controllers) the data is sent out via the Wi-Q Gateway.
- From Doors.NET, go to Home >> Cardholders.
- Click the ADD icon.
- Enter a first name and a last name.
- In the Credentials section on the right, ensure 'Calculate Internal Number' is NOT selected.
- Set the status to Active.
- In the Cardnumber field, enter the Imprint (the number printed on the credential).
- Click the ADD CARD button.
- The imprint number will then appear in the white box.
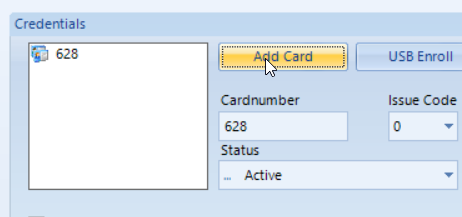
- Go to the access rights tab and assign a valid access group.
- Save the cardholder record.
- Wait a minute or so for the card data to be sent to the WAC unit(s).
- Present the card to the reader/keypad connected to the WAC unit, you should now be getting access granted.
- In live events you will see update events that indicate when the card data has been sent.

4.0 Cardholder Access Modes
4.1 Passage Mode
Allows you configure a cardholder to use the double-presentation function. When the cardholder present's their credential twice at the reader this will unlock the door. When the credential is presented twice a second time this will re-lock the door (so it provides a toggle function) but requires a very small amount of system programming. To use the passage mode function, the cardholder must be assigned user group 7.
- Enroll a cardholder (as defined in the previous section). Or open up an existing cardholder record.
- Go to User Groups tab.
- Locate user group 7.
- Use the drop-down list to assign Default User Group (or you can use Design Mode to change the name of this label).
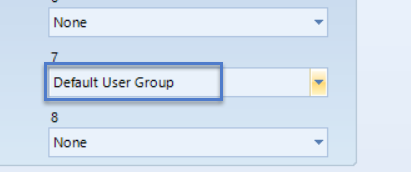
- Save the cardholder settings.
- Go to Setup >> Hardware Setup >> All.
- Navigate to the WAC controller on the hardware tree and select it.
- In the properties, locate the Options and set Passage Mode to Yes.

- Save the hardware properties.
- Double-present the card at the reader or keypad that's wired into the WAC unit. You will notice that the door remains unlocked.
- Double-present the card a second time and this will cause the door to re-lock.

4.2 Manager Mode
Provides different functionality of the lock for managers. For example, the keypad might be in Card OR PIN mode. The manager could then swipe their card and then enter 3333 on the keypad and that will put the reader back into Card-only mode. Or presenting the credential and entering 4444 can put the reader into Dual Verification mode. Or you could swipe the card, press 7777 and put the keypad into Facility Code only mode.
Manager Mode Options When Using a WDC or a WAC Unit:
| Item | WDC Code | WAC Code | Function Mode |
| Manager Code | Swipe | Swipe | Momentary Unlock. |
| Restore to Normal | Swipe + 0# | Swipe + 0000 | Return to normal operation from an override. |
| Toggle | Swipe + 1# | Swipe + 1111 | Places the lock in a toggle mode where it alternates between locked and unlocked. |
| Unlock | Swipe + 2# | Swipe + 2222 | Places the lock in an unlocked state. |
| Unlock with ID | Swipe + 3# | Swipe + 3333 | Card-only mode. |
| Unlock with Card + PIN | Swipe + 4# | Swipe + 4444 | Card + PIN mode. |
| ID Required | Swipe + 5# | Swipe + 5555 | Card OR PIN mode. |
| PIN Required | Swipe + 6# | Swipe + 6666 | PIN-Only mode. |
| Facility Card | Swipe + 7# | Swipe + 7777 | Facility Code Only mode. |
| Lockout | Swipe + 8# | Swipe + 8888 | Locked mode. REX active for a WAC. |
| Toggle with Card + PIN | Swipe + 9# | Swipe + 9999 | Toggle between locked and unlocked with a Card + PIN. |
Note: For this option the cardholder needs to be added to user group 6.
- Enroll a cardholder (as defined in the previous section). Or open up an existing cardholder record.
- Go to User Groups tab.
- Locate user group 6.
- Use the drop-down list to assign Default User Group (or you can use Design Mode to change the name of this label).
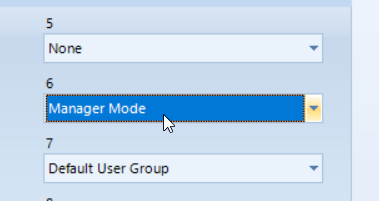
- Save the cardholder settings.
- Go to Setup >> Hardware Setup >> All.
- Navigate to the WAC controller on the hardware tree and select it.
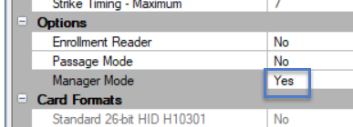
- In the properties, locate the Options and set Manager Mode to Yes.
- Save the hardware properties.
- Present the manager card at the reader or keypad that's wired into the WAC unit, then enter the keypad command to change the reader mode.
5.0 Wi-Q Controller Status Information
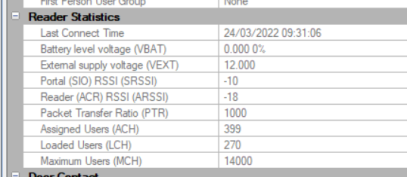
If you select the Wi-Q controller on the hardware tree you will see the hardware properties on the right. Locate the reader statistics and you will see various useful data (such as the input voltage level, the packet transfer ratio and the number of assigned users at the controller).
Note: To avoid potential packet-loss, the Packet Transfer Ratio (PTR) value should be 800, or greater.
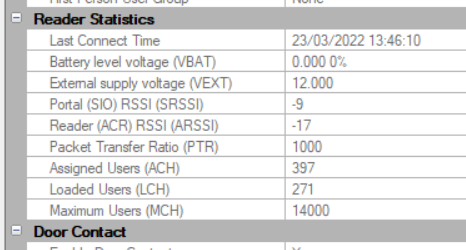
Note: The status information in the hardware properties is correct from when the WAC unit comes online. The current status of the WAC unit can be retrieved by performing a soft reboot. See next section.
6.0 Soft Reboot or Hard Reboot
The following steps explain how to perform a soft or hard reboot of the W-Q Gateway:
- In Doors.NET, enable Design Mode (by clicking the icon highlighted).

- The title bar will now include [Design Mode].
- In the hardware tree, navigate to and select the WAC unit (located in Readers).
- Right-click and choose Reboot >> then select Soft Reboot or Hard Reboot.
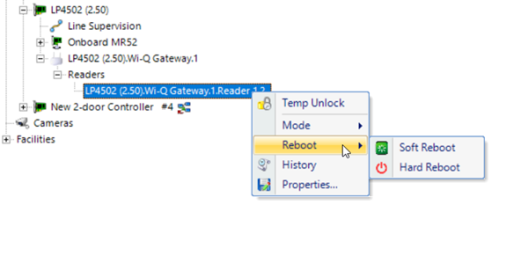
- After performing a soft reboot, wait until you see a Connect Pass message in live events. Fifteen minutes after that the WAC reader statistics should be up-to-date:
Important Note: Be very cautious about performing a hard reset and this will eraze all configuration from the unit. In addition, it will change the Wi-Q Gateway's sign-on key and you would have to locate the original sign on key from the Wi-W portal's operator audit logs.
7.0 WAC Door Contact
The door contact setting for the controller is read-only and therefore cannot be disabled. If you are not using door contacts you should short out the DS and the GND inputs on the controller.
 P/N: 02432-001 Rev. A |
Related Articles
dormakaba Lock Integration Setup Guide
1.0 Introduction From Doors.NET v5.1.0 you can integrate with the dormakaba Wi-Q wireless technology access control products (when using Mercury's LP4502 controller). dormakaba Network Drawing The integration provides seamless connectivity with the ...dormakaba Wi-Q Gateway Site Survey
1.0 Introduction The Wi-Q gateway has a built-in survey mode feature that allows you to conduct an on-site survey of the wireless communication between Gateways and the Wi-Q controllers without requiring third-party software. It is important to ...dormakaba - Using the Correct Antenna Type
Omni-Directional and Directional Antenna Types Wi-Q Gateways and Controllers support two antenna types; omni-directional and directional. Omni-directional antennas provide coverage in all directions (but over a shorter distance), whereas directional ...Wi-Q Gateway - Quick Start Guide
1.0 Introduction The following document guides you through the exact steps you should take to setup a dormakaba Wi-Q gateway with a Mercury LP4502 controller. It assumes that the LP4502 already has Overwatch installed and an Overwatch username and ...