Borealis Cardholders and Credential Enrollment
1.0 Introduction
Cardholder and credential enrollment is a very simple process and the system supports manual enrollment of Keri MS, Keri NXT, 26-bit Wiegand card formats and RAW Wiegand card numbers.
Manual Enrollment is the process of manually entering the cardholder's credential details (such as the imprint and facility code) - or the full RAW card number (copied from live events).
- Keri NXT credentials do not use a facility code.
- Temporary users are only supported when the primary controller is a PXL-500. Temp users will not work on any secondary PXL if the primary controller is an Entraguard.
Borealis uses an enrollment wizard to walk you through adding a cardholder, assigning a credential to that cardholder and then assigning access rights. Alternatively, if you wish to add a new credential to an existing cardholder, click on Credentials from the main menu and then click the CREATE button (see section 4.0).
2.0 Manually Enroll a Cardholder and Credential
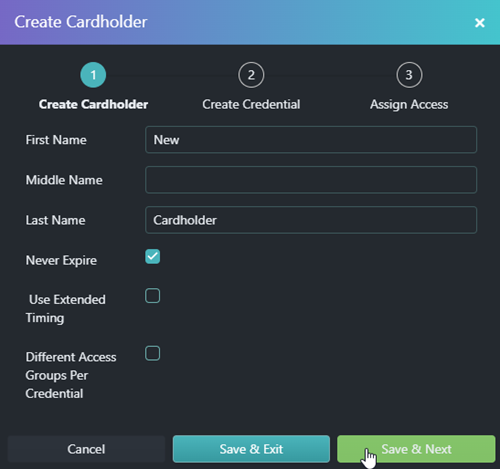
2.1 Enroll the New Cardholder
- From the menu on the left, click on Cardholders.
- The list of existing cardholders will appear.
- On the right-side of the screen, click the CREATE button.
- Enter a first name.
- Enter a last name.
- Place a check mark in the Never Expire option or set an activation date and expiration date if the cardholder will be temporary.
- Select the 'Use Extended Timing' option to apply an extended unlock time for the cardholder.
- Select the 'Different Access Groups per Credential' if the cardholder's credentials will use different access rights. If unselected, all assigned credentials will have the same access rights.
- Click Save & Next.
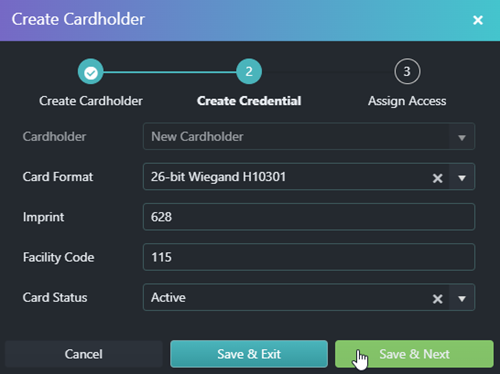
2.2 Enroll the Credential
- The new cardholder name will be displayed.
- The credential type will default to 'Borealis' and should be left at this.
- Select the credential format to enroll.
- Enter the imprint (this is usually printed on the credential).
- Enter the credential's facility code (if applicable). If the credential type does not use a facility code then this field will not be displayed.
- Select the card status.
- Click Save & Next.
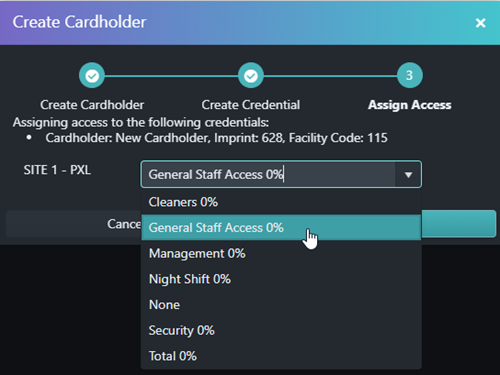
3.0 Assign Access Rights
From the site drop-down list select the access right to assign to the cardholder.
4.0 Enroll a Credential to an Existing Cardholder
The following steps allow you to enroll an additional credential to an existing cardholder.
- From the main menu, click on Credentials.
- Click the CREATE button.
- Select the existing cardholder from the Cardholder list.
- Select the correct format from the format list.
- Enter the credential's imprint (this is the number printed on the credential).
- Enter the credential's facility code (where applicable).
- Select a card status.
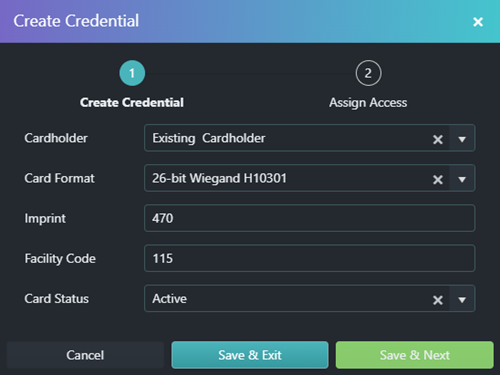
- Click Save & Exit or Save & Next to assign access rights (see section 3.0).
Related Articles
Borealis - Credential Formats
1.0 Introduction Borealis includes support for multiple credential formats including: Keri NXT Keri MS RAW Cardnumber 26-Bit Wiegand 10301 37-Bit Wiegand 10304 MIFARE 32-Bit MIFARE 56-Bit Generic 26, 32, 33, 34, 35, 36, 37, 44, 48, 56 (full card ...Borealis - QR Code Enrollment
1.0 Introduction Borealis has the option of generating and enrolling QR code credentials to simplify the management of temporary cardholders, such as visitors. Once the QR credential has been created it is then automatically emailed to the cardholder ...Borealis - Presentation Enrollment
1.0 Introduction Borealis allows you to use any reader on the system as an enrollment reader. The presentation enrollment feature can be accessed via live events and it will allow you to enroll a new credential simply by presenting that credential to ...Borealis - Block Enrollment
1.0 Introduction The Block Enroll feature allows you to enroll a sequentially numbered block of credentials via the Credentials screen. It requires you to know the credential imprint numbers and the programmed facility code (where applicable). Not ...Borealis Entraguard User and PIN Enrollment
1.0 Introduction To enroll an Entraguard PIN you must also enroll a cardholder. Borealis has an intuitive enrollment wizard that allows you to enroll the cardholder and then generate the Entraguard PIN as part of the enrollment process. If ...