EG ONE/One+ Setup - iOS App (Obsolete)
Setup Procedure Using an iOS Device
1.0 Introduction
The Entraguard ONE is an app-based, VOIP Video doorbell/Intercom system design to secure the entrance of a residential or small, commercial building.
The ONE units provide video monitoring of a door or gate as well as 2-way audio communication and remote door control from up to four internet-connected smart devices.
This setup guide explains how to setup the Entraguard ONE/ONE+ using the iOS version of the app.
NOTE: Please ensure, during setup, that the Entraguard ONE is in range of your Wi-Fi network.
2.0 Download and Install the Entraguard ONE App
- Ensure you have internet connection on your smart device.
- Go to the App Store.
- In the App Store, search for 'Entraguard ONE'.
- You will see the screen shown below.
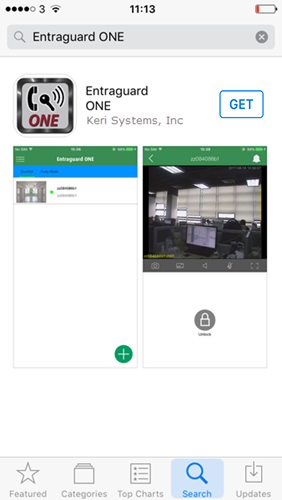
- Press the blue GET button to download and install the iOS app.
- Download and use of the app are free.
- Please keep your Entraguard ONE app updated to the latest version.
- The app is subject to change without prior notification.
3.0 Setup a New Account
- Ensure your smart device is connected to your local Wi-Fi network.
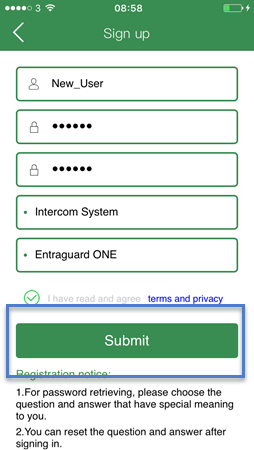
- Open the newly installed Entraguard ONE app.
- Click the Sign Up button.

NOTE: You will only need to add a username and a password for logging in to the app. No other personal details will be required. - Enter a new username (minimum of 3 characters).
- Enter a new password for the account (minimum of 6 characters), then confirm the password.
- Select that you have read through and agreed to the terms and conditions.
- Click the Submit button.
- A registration successful message should appear.
- Click the OK option.
- Click the Login button to log in to the app.

4.0 Factory Reset the Entraguard ONE/ONE+
You must perform a factory reset on the unit prior to setting it up.
- Power-off the Entraguard unit.
- Hold down the blue call button
 .
. - Apply power to the unit, while holding down the call button - you will hear two beeps.
- Continue to hold down the call button for a minimum of 75 seconds.
- At 75 seconds, all four LEDs on the front of the unit will momentarily be lit.
- A few seconds later you will hear a dull tone.
- You can now release the blue call button.
- The unit is now factory reset.
5.0 Add the Entraguard ONE/ONE+
(Setup using Wi-FI)
- Factory reset the Entraguard and wait at least 2 minutes while it reboots and starts to broadcast its own Wi-Fi name (SSID).
- Ensure you are connected to your local Wi-Fi network (and connected to the internet).
- Log in to the Entraguard ONE iOS app.

- Press the small green add (+) icon.

- Press the Configure via Wi-Fi button.

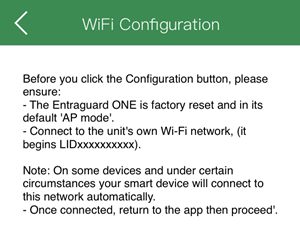
- The Wi-Fi Configuration screen advises you what to check before proceeding. Ensure you are connected to the internet via your local Wi-Fi connection, then click the Configuration button at the bottom of the screen.
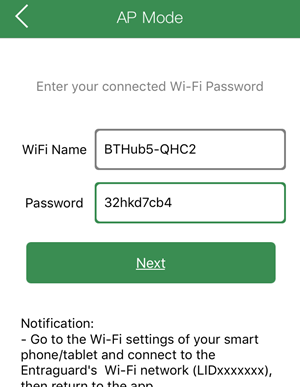
- The AP Mode screen should be displaying the name of your local Wi-Fi network and this should be the network that the Entraguard will be added to. It is on the AP Mode screen that you must now connect to the Entraguard's own Wi-Fi network.
- On your smart device, go into your Wi-Fi network settings.
- Look for the network that begins with the letters 'LID' (LIDxxxxxxxxx).
- Connect to this network.
- Return to the Entraguard ONE iOS app. - Enter the passcode for the local Wi-Fi network (the passcode usually printed on the back of your Wi-Fi router). The WiFi Name field should be displaying the name of the local Wi-Fi network that you wish to add the Entraguard unit to.
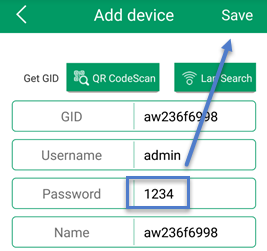
- You will now see the device details screen.
- On this screen, as per the on-screen instructions, you must wait at least 2 minutes before entering the default password (1234), then press Save.
- You will now see the device home screen and the Entraguard ONE will be listed.
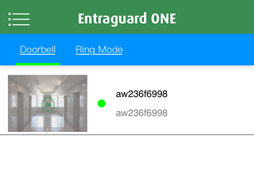
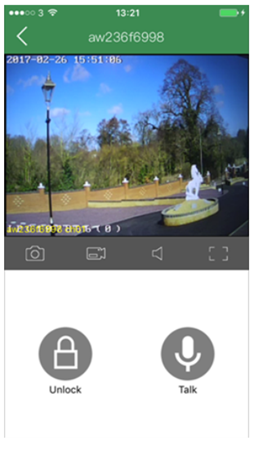
- From here you can edit the unit, delete it, add another unit or you can press the thumbnail image to open the live video window.
NOTE: You should set the time on the unit as soon as it is online.
Related Articles
EG ONE Setup and User Guide (Obsolete)
Standalone document attached.EG ONE - Download and Install the iOS App (Obsolete)
The following steps explain how to locate, download and install the iOS Entraguard ONE app. NOTE: Your iOS smart device must be running a minimum of iOS version 8.0. Download the Entraguard ONE App Ensure you have internet connection on your smart ...EG ONE/One+ Setup - Android App (Obsolete)
Setup Procedure Using an Android Device NOTE: When using an Android device, the minimum supported version is 4.2. The Entraguard cannot be used with Android versions older than 4.2. Factory reset the Entraguard and wait at least 2 minutes while the ...EG ONE/EG ONE+ Data Sheet (Obsolete)
Standalone document attachedEG ONE/ONE+ Factory Reset (Obsolete)
Here is the procedure for completely resetting the Entraguard ONE/ONE+ to its factory default settings. Power-off the Entraguard unit. Hold down the call button. Apply power, while holding down the button. Continue to hold down the call button for at ...