Intelliprox Blue - Full Reference Manual
1.0 Introduction
The Intelliprox Blue is a one-door/two-reader Bluetooth® controller designed to grant access to a single point of entry for up to 250 cardholders.
Economical Intelliprox Blue grants access to a single point of entry, and is designed for quick implementation and ease of use.
Intelliprox Blue is capable of controlling two readers on a single door, providing both "in" and "out" reads. This is accomplished through the use of Keri's exit readers in combination with standard NXT readers.
Control Intelliprox Blue through a programming and control app that is available for free in either iOS or Android.
Units are programmed wirelessly through the use of a Bluetooth connection, so the only requirement is the app (loaded on a smartphone), and proximity to the controller via Bluetooth, with a smart device.
Multiple Intelliprox Blue controllers may be programmed and controlled by a single mobile device. Database details may be easily transferred from one Intelliprox Blue to another easily, using the smartphone as a managing medium.
Intelliprox Blue offers everything one would require in the realm of basic access control, including: Door Sense, Door Held, Access Granted, Access Denied, Manual Lock/Unlock, Adjustable Lock/Unlock Times, Auto Unlock and Door Schedules. All this is provided in an easy to install, easy to manage, cost effective package.
Notes:
- Compatible HID credentials includes (but not limited to): ProxCard II, ISOProx II, and ProxTag II.
- Multiple controllers can be managed from a single app, but only on a one-to-one basis - (because each controller has its own database).
2.0 Wiring Diagrams
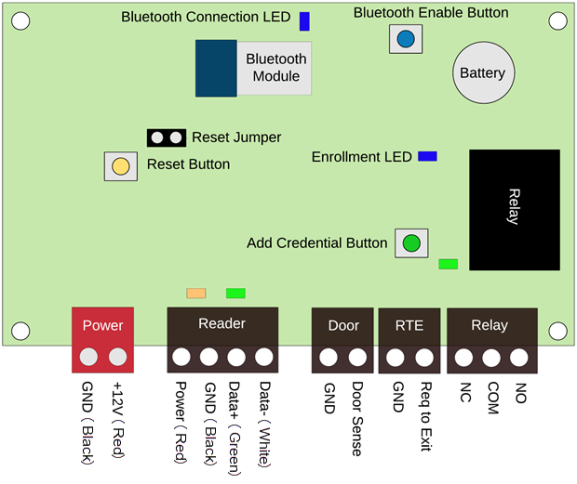
2.1 Controller Diagram
2.2 Fail-Safe Lock Wiring
A fail-safe locking device requires power to keep a door secure. An example of a fail-safe device is a maglock. If power is lost at the lock the door will unlock. To power the lock via the controller's power supply you should ensure that the lock draws a maximum of 1 amp, otherwise the lock should have its own external power supply (separate from the controller's power-supply).
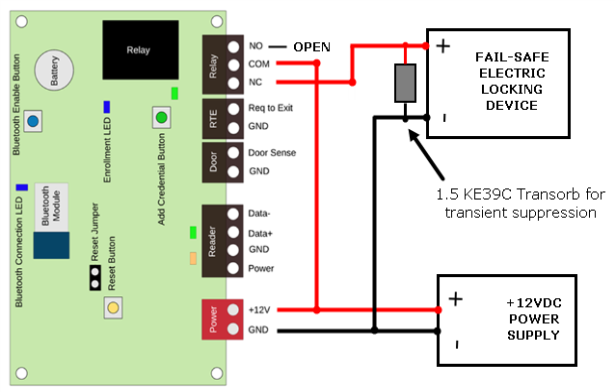
Note: the 1.5KE39C transorb is provided with the Intelliprox Blue ship kit. It should be installed as close as possible to the locking device to prevent transients from the lock affecting controller operation.
2.3 Fail Secure Lock Wiring
A fail-secure locking device requires power to unlock the door. If power is lost at the lock the door will remain locked. To power the lock via the controller's power supply you should ensure that the lock draws a maximum of 1 amp, otherwise the lock should have its own external power supply (separate from the controller's power-supply).
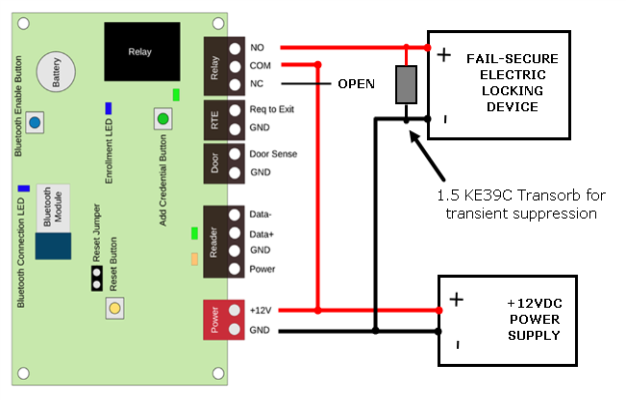
Note: the 1.5KE39C transorb is provided with the Intelliprox Blue ship kit. It should be installed as close as possible to the locking device to prevent transients from the lock affecting controller operation.
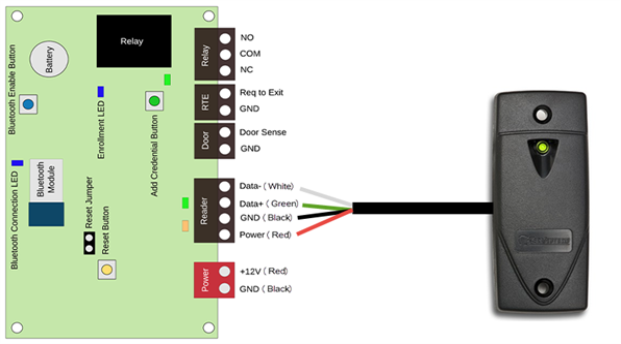
2.4 NXT Proximity Reader Wiring
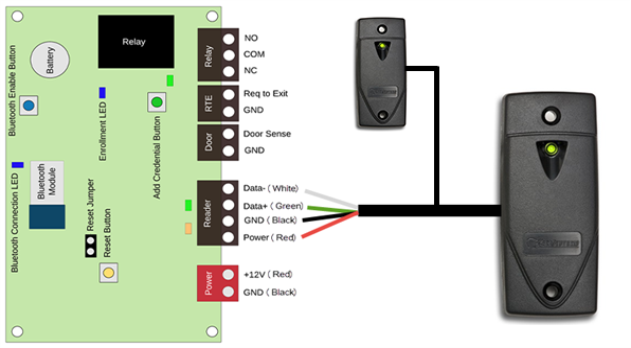
2.5 NXT Proximity Exit Reader
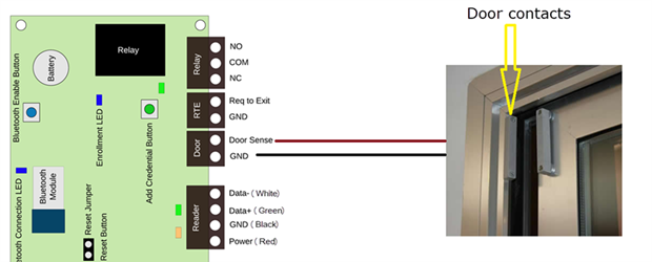
2.6 Door Contact Wiring
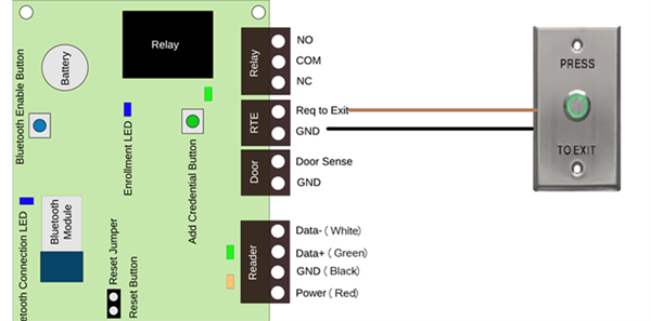
2.7 Request-to-Exit (RTE) Wiring
Note: The Request-to-Exit input is a 'Normally-Closed' circuit (so the door will unlock when the RTE input circuit goes open).
3.0 Specifications
Size (Enclosure):
2.75” H x 4.25” W x 1.32” D
Controller Board Shell
7.25” H x 6.6” W x 1.8” D
Size (PC Board)
2.36” H x 4.0” W x 0.78” D
Input Voltage:
+ 12 VDC nom. (9-15 VDC)
Current Draw:
Intelliprox Blue Controller – 250 mA
Inputs (2):
Door Contact Switch (Normally-Closed) and Request to Exit (Normally-Open)
Outputs:
1.0 amp (24 VDC max.) dry circuit
Reader Capacity:
2 with NXT Readers * (NXT-xR/NXT-xRE)
Buffer Capacity:
250 Cardholders and 2,500 Event Capacity
Temperature / Humidity:
- 40°F to 140°F (-40°C to 60°C) /- 0-90% Non-Condensing
Communication
Bluetooth v4.2 BLE (Bluetooth Low Energy)
Lithium Battery:
5 years Memory Retention
Note: Specifications are subject to change without notice.
4.0 Factory Reset the Intelliprox Blue Controller
Before initially connecting to the controller you will need to perform a factory reset on it.
- Down-power the controller.
- Ensure the jumper is across both pins of the P2 jumper (see the controller diagram in section 2.0).
- Hold down the orange reset button (K2) as you apply the power.
- Continue to hold down the K2 button for 20 seconds.
- The green DS1 LED will go on and off at least twice.
- Release your finger from the K2 button.
- The DS4 and DS5 LEDs next to the reader port will start blinking very quickly.
- The controller is now reset and ready to setup.
Note: If the app is open when you perform the factory reset, Keri recommends closing then re-opening the app to avoid any connection difficulties.
5.0 App Installation
The Intelliprox Blue uses iOS and Android apps, (available for free) from the Apple App Store and Google Play Store.
- Search for 'Intelliprox Blue' and download the Keri Systems Intelliprox Blue app.
- Tap the INSTALL option.
- The app will download and install on your device.
- A new Intelliprox Blue icon will be visible on the home screen.
6.0 Hardware Connection
- Open the Intelliprox Blue app.
- Log into the app (the default user name is 'admin' and the default password is 'pass').
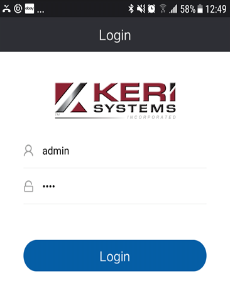
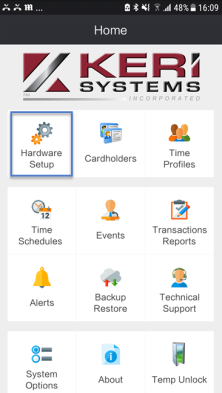
- Once logged-in, you will see the home screen.
- Press the Hardware Setup Icon.
- Press the “Connect” button to the right of the Intelliprox device.
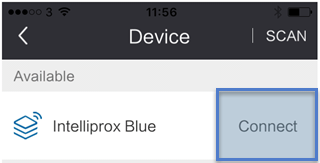
- If you are connecting to the unit for the
first time, you will be prompted to pair with the device. The default
password for initial pairing is '123456'. Enter this code when prompted,
then press OK.
Note: To connect to the controller and go straight to the door settings screen, tap the device name. To just connect to the controller (and perform other administrative functions via the home screen), simply tap CONNECT.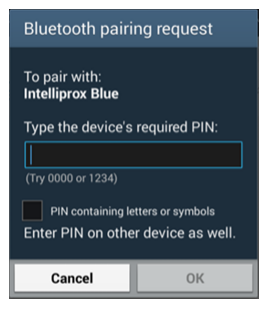
Note: On some older Android devices you may experience a few seconds delay with the display of the password prompt.
7.0 Changing the Device Name or Pairing Password
IMPORTANT NOTES:
- When using
multiple controllers it is very important to change the name of all
controllers before you begin setup. Otherwise you will not easily be
able to distinguish between controllers located within Bluetooth range.
- If you change the Intelliprox device name or pairing password you will need to perform the following steps:
- Connect to the Intelliprox Blue (tap the controller name to go to the Settings screen).
- Tap Device Info.
- Change the device name (up to 20 characters).
- Save the settings (top right of the screen).
- Close the Intelliprox Blue app.
- Go to your Bluetooth network settings.
- Review your list of paired devices.
- Select to 'Unpair or 'Forget' the connection to the controller.
- Re-open the app.
- Select the Intelliprox controller in the app (the new controller name will be displayed).
- Connect to the unit and pair with it again.
8.0 Hardware Configuration
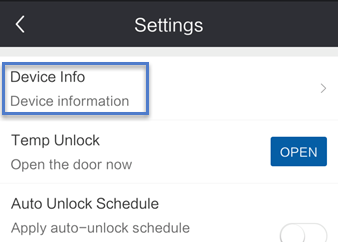
The following options are available on the Settings screen
Note: You will need to be connected to the controller to make any configuration changes.
8.1 Device Info
View or modify the device name and/or password.
8.2 Open Door
Press the OPEN button to temporary unlock
the door. The door unlock time is determined by the adjustable door
'Unlock Time'.
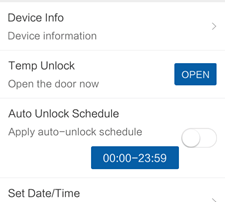
8.3 Auto Unlock
The auto-unlock feature allows you to specify a time schedule when the door will automatically unlock and automatically re-lock again. This assumes you have already added additional time schedules to the system (for time schedule setup, go to section 11).
- Enable the feature.
- Press the time schedule settings.
- Select the time schedule to assign as an auto-unlock schedule.
- Press OK.
- The door will now be programmed to auto-unlock/relock at the specified times and days defined in the time schedule.
8.4 Set Date/Time
Set the correct time and date on the controller. The controller will be set to the exact time on your smart device.
8.5 Single or Paired Readers
Configure the controller with the number of readers being used. NXT readers support an exit reader to control the same door - the doors are treated separately for reporting purposes and defining access schedules. If you have an NXT Entry reader and an NXT Exit reader connected to the controller set the door type to Two Reader.
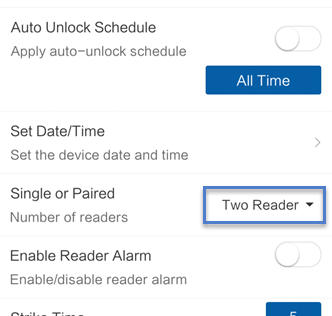
8.6 Door Alarm
Enables/disables door alarms (if the door is forced/or held-open for longer than the programmed unlock time, then the reader will go into alarm state). While in alarm state, the reader LED will be flashing red and you will hear a constant 'beep-beep'. By default the door alarm is disabled.
8.7 Unlock Time
This setting determines how long the door will unlock either from a valid card read or via a remote unlock using the app. To adjust the unlock time:
- Press the current unlock time.
- Scroll to the new value.
- Press OK.
- The door will now be programmed with the new unlock time.
8.8 Anti-Passback
Enabled/disables the anti-passback feature which is supported
when using an additional NXT Exit reader. When this feature is enabled,
cardholders will not be able to 'pass back' their card to be used at
the same reader by somebody else. Valid card presentation must always
alternate between the entry and exit readers.
Notes:
- Door contacts must be installed at the door for this feature to function correctly.
- Requires an additional NXT Exit reader.
Anti-Passback Definitions
- Disabled: The anti-passback rules are not applied.
- Soft APB: The anti-passback rules are not applied, but anti-passback events are still created (whenever a credential is detected as being presented 'out-of-sequence').
- Hard APB: The anti-passback rules are applied and anti-passback events are created. Access will be denied if access is attempted at the same reader twice.Correct card presentation is critical to the correction functioning of this APB setting.
9.0 Cardholders and Credential Enrollment
Credentials can be enrolled either using the controller enrollment button or using the Intelliprox Blue app. One credential is supported per cardholder and the controller will support a maximum of 250 cardholders.
IMPORTANT NOTE: It can
take up to a minute to load a large cardholder database. If a cardholder
gains access immediately prior to the cardholder list being opened, the
door will remain in the unlocked state until the full cardholder list
has loaded. Once all cardholders are displayed the door will then
re-lock.
9.1 Enrollment Using the Controller
- Enter Enrollment Mode - Press and
hold the green add credential button until the Add
Credential LED (DS1) flashes. The reader LED will also
flash Amber.
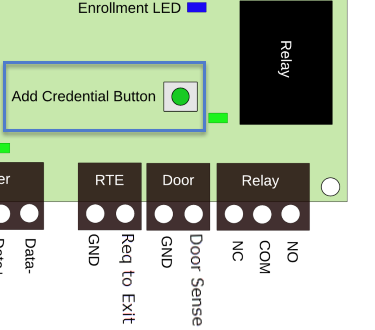
- Present a credential or multiple credentials to the reader.
- Exit enrollment mode - Press and hold the Green Add Credential button until the Add Credential LED stops flashing.
- You can now present any of the credentials a second time and you should be getting access granted.
Credentials added via the above method will be given total access with no expiration date. Name and other data can be modified at a later time using the app. Access the cardholder section via the Cardholders icon located on the home screen.
Note: When enrolling HID 125KHz credentials, the imprint number will not be displayed (only the internal number). The cards will be displayed in the app in order that they were presented to the reader. For simplicity and ease of use we recommend enrolling HID cards in blocks of no more than 10 at a time. The reason the internal number is used is to allow for the cardholder database to be upgradeable to the Doors.NET software at a later time.
9.2 Enrollment via the Credentials Screen
- Log into the app.
- Connect to the controller.
- Press the Cardholders icon from the home screen.
-
The full cardholder list will load and the total cardholder count will be shown at the bottom of the screen:
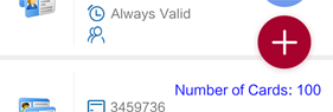
Notes: A large cardholder database (more than 100 cardholders) will take a minute or two to load. - Press the add button.

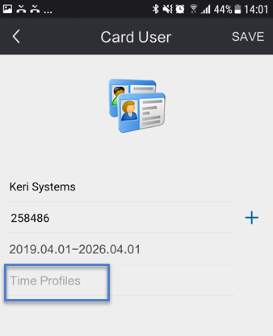
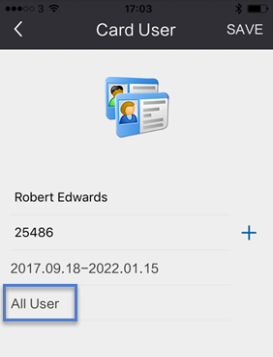
- Enter Cardholder Details.
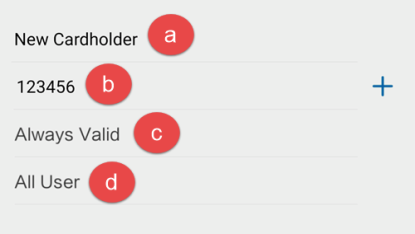
a. Name - Cardholder Full Name.
b. Card Number - The number printed on the credential.
c. Valid Period - The date range for which the credential will be active.
d. Time Profiles - The times and days-of-the-week that the credential is active. - Press Save to send the changes to the controller.
10.0 Searching for Cardholders
The app allows you to search for cardholders using the cardholders full name.
Note: You must enter the cardholder name EXACTLY as it exists in the database:
- Ensure you are connected to the controller.
- From the home screen, tap the Cardholders icon.
- Wait for the full cardholder list to load... (this may take a few minutes with a very large database).
- When the card count appears in blue at the bottom of the screen, tap the blue search icon.
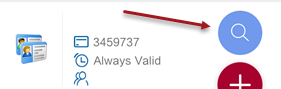
- Enter the cardholder name exactly has it is enrolled (it is case-sensitive).
- Tap OK and if found, the cardholder record will appear.
- Tap the record to open it for editing.
Note: If you have recently edited the name of a cardholder or enrolled a new cardholder and it is not found when you perform a search, you should re-open the full list of cardholders and then search again. You can refresh the cardholder list by swiping-down on your screen.
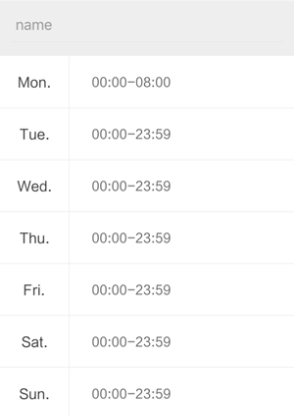
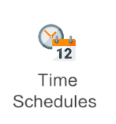
11.0 Time Schedules
Time Schedules contain a list of valid access times for each day of the week. These times are associated with access groups. Access groups are assigned to cardholders to determine when the cardholder can gain access at the door. One advantage of this is that a change to a time schedule will automatically affect all cardholders which are assigned the associated access group.
You can also use a time schedule as an auto-unlock schedule for automatically unlocking and re-locking the door during the day.
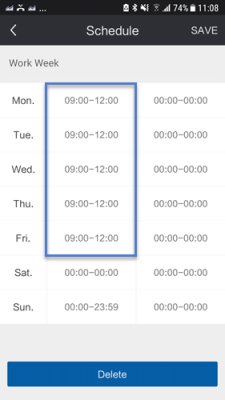
11.1 Add a New Time Schedule
The Intelliprox Blue supports two time intervals per day - so if a time schedule is to be active from 09:00 - 17:00 simply set the Start time as 09:00 and the End time as 17:00 for interval 1.
You also have an optional second interval which can be used to automatically unlock and relock the door at a later time in the day. If you do not edit the second schedule it will automatically be disabled and only the settings in interval 1 will be used.
- Press the Time Schedules icon on the home screen.
- Press the add button.

- Enter a name for the new schedule.
-
Configure the time range for time interval 1 - for example: 09:00 - 12:00.
- Next, define the time range for the second
interval (if you need to). For example: 14:00 - 17:00 (to configure a
schedule covering 2pm - 5pm).
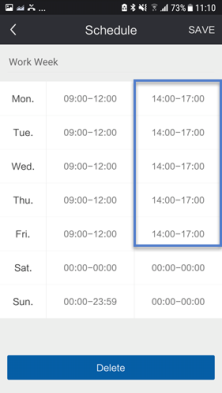
- Press the Save button to commit the changes.
12.0 Add a New Time Profile
Cardholders are assigned a Time Profile to determine when the cardholders can gain access. The default All User group gives a cardholder access at the door/doors all day, seven days a week). For new time profiles you will first need to create a time schedule - unless you will use the default 'All Time' group.
Note: Multiple controllers can be managed from a single app, but only on a one-to-one basis - (because each controller has its own database). For this reason, a time profile will only contain the reader(s) for a single controller (you cannot setup a time profile that includes readers from multiple controllers).
- Press the Time Profiles icon located on the home screen.
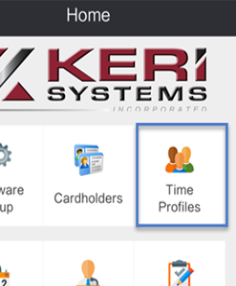
- Press the red add icon.

- Select which readers will be added to the time profile.
- Select a time schedule to assign to the time profile.
- Press SAVE.
- The new time profile can now be assigned to cardholders.
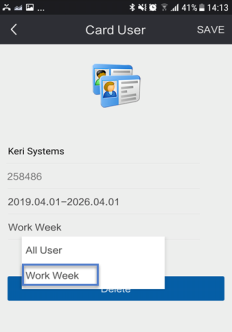
13.0 Assign a Time Profile
- Press the Cardholders icon on the home screen.
- You will see the list of cardholders.
- Select a cardholder to open the cardholder record.
- Press on the assigned time profile name.
- Select a different access group for the cardholder.
- Press SAVE.
- The new access group will now be assigned.
14.0 Firmware Upgrade Procedure
14.1 Update the Controller Firmware
The following steps explain how download the most current firmware file and then update the controller.
- Ensure you are connected to the Intelliprox Blue controller.
- Go to the home screen.
- Tap the Backup/Restore icon.
- Select Get Firmware From Cloud.
- Wait a few seconds you will then see a Firmware Download Success message.
- Tap Update Firmware.
- Navigate to: IntelliproxBlue >> Firmware directory and you will see the most current (recently downloaded) firmware file.
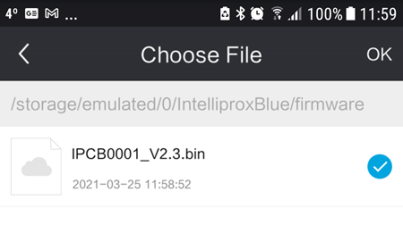
- Select the firmware file then click OK (in the top right).
- The firmware upgrade will begin.
- A progress bar will display the update progress percentage.
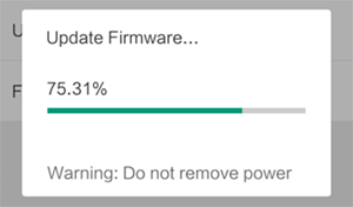
IMPORTANT NOTE: As per the on-screen notification: Do NOT remove power from the controller while the firmware upgrade is in progress. - Once completed you will see an update success message.
- To check the current firmware version on the controller, tap 'Firmware Version'.
15.0 Creating a Backup
Note: When performing a database backup you will be making a copy of the database stored on the controller. If you have recently enrolled new cardholders using the controller enrollment button you will need to re-open the full cardholder list (this will synchronize the data in the app with the database on the controller). Failure to do this will results in the newly enrolled cards NOT being included in the backup.
The following steps explain how to perform a full backup of the database.
- From the homescreen, press Backup/Restore.
- Press Back-up.
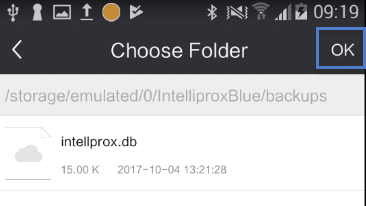
- On your smart device, navigate to the 'IntelliproxBlue' folder and then 'Backups' .
- Press OK (in the top right corner) once you have selected the Backups folder.
- You should then connect the smart device to a PC and use File Explorer to transfer the backup file from the smart device to a portable store device (such as USB thumb-drive).
16.0 Save Backup File to a PC - iOS Device
If you are using an iOS device you will have to use iTunes to obtain a copy of the backup file. The following steps explain how to copy the backup file to the PC via iTUNES.
- Connect your iOS device to the PC.
- Open iTunes on the PC.
- Log into iTunes.
- Click on the small iPhone/iPad icon.
- The device main menu will appear on the left side of the screen.
- Click on File Sharing.

- Select the Intelliprox Blue installed app.
- You will see the controller main directories.
- Select the Intelliprox Blue folder then click the SAVE TO... button.
- Save the folder to a location on the PC.
17.0 Restore
17.1 Using an Android Device
- Insert the USB drive into a PC.
- Connect the smart device to the PC (you may have to wait a few moments while the device(s) are installed.
- Open the contents of the USB drive and copy the Intelliprox Blue database file.
- Open the contents of the smart device that will be used to administer the Intelliprox Blue.
- Navigate to the folder named 'IntelliproxBlue'.
- Open the contents of the IntelliproxBlue folder.
- Open the folder named 'Backups'.

- Paste the backup file which you have copied from the USB drive.
- Once copied-across, disconnect the smart device from the PC.
- Log into the Intelliprox Blue app.
- On the home screen, press Backup/Restore.
- Press Restore.
- Navigate to the IntelliproxBlue folder >> then open the Backups folder.
- Selected the database file which you copied to that location.
- Press OK.
- While the database is being restored you will see on-screen an incremental count of the number of cardholders in the database.
- Once the database is restored you will see a restore success notification.
17.2 Using an iOS Device
The following steps assume you have the backup file saved on the PC.
- Connect the iOS device to the PC.
- Open and log in to iTunes.
- Click on the small iPhone or iPad icon.
- Click Apps/Installed Apps.
- You will see the main directories on the right.
- Select the Intelliprox Blue directory.
- Click the ADD FILE button.
- Navigate to the location of the backup file, then select the file.
- You can now close iTunes.
- Open the Intelliprox Blue app and connect to the unit.
- Once connected, tap the Backup Restore link on the homepage.
- Select Restore.
- Select the backup file (saved using iTunes).
- Press OK in the top right corner.
18.0 Events
![]()
Tap the events icon on the home screen to view the most recent event information generated by the system. These events include: Access granted, access denied, door opened/closed/forced/held, etc.
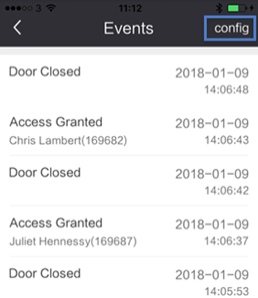
The list of events is not dynamic, so to retrieve the up-to-date list you will need to return to the home screen then re-open the events screen.
The events list is configurable, allowing you to specify the number of events to display when the events screen is opened. Press the 'config' link in the top right corner then enter the number of recent events to display (1-2500).
19.0 Reports
19.1 Transaction Reports
Tap the Transactions Reports icon to display the list of all recent system transactions. By default, all events will display:
19.2 Filter Transaction Types
Tap the ALL link and you will be able to specify which event types to list. For example; you may just want to list all the access granted or access denied events.
Tap Reader - Choose which reader events you wish to display. For example; you may just wish to display the events that have been generated by the Entry reader.
Tap Time - Choose whether to list the events in chronological order, or reverse chronological order.
19.3 Export a Report
The transaction reports screen also gives you the option to export a report as a .CSV file. Once you have generated a report, press the export link then select a folder where you wish to save the report. The report will contain all the event information displayed on screen. As it is a .CSV file it can be viewed with Microsoft Excel and can be saved to a PC (as with a database backup file). iOS users will require the use of iTunes to copy the backup file to another location (such as a USB drive).
20.0 Alerts
Tap the alerts icon on the home screen to open the alerts screen.
![]()
Within the alerts section it is possible to filter critical events in the system, such as the forced door alarm, the door alarm held open, the Anti-passback violation, etc.
21.0 Technical Support
Tap the technical support icon on the home screen to open the technical support screen.
![]()
The technical support section contains basic setup
information for the Intelliprox Blue app and links to Keri Systems
corporate website and knowledge base (where you can locate technical and
marketing material related to all Keri Systems products). You will also
find links to Twitter and YouTube accounts and technical support
contact information.
22.0 Useful Technical Resources
- Product Overview Video - https://youtu.be/DEH4SwNDgQY
- Knowledge Base Website - help.kerisys.com
- YouTube Channel - www.youtube.com/user/kerisystems
Related Articles
Intelliprox Blue - Quick Start Guide
Introduction This quick start guide walks you through the steps to take to get your Intelliprox Blue system up and running for the first time. Factory Reset Before connecting to the controller for the first time, you will need to perform a factory ...Intelliprox Blue - Overview
The Intelliprox Blue is a one-door/two-reader Bluetooth® controller designed to grant access to a single point of entry for up to 250 cardholders. Economical Intelliprox Blue grants access to a single point of entry, and is designed for quick ...Intelliprox Blue - Troubleshooting
The following Intelliprox Blue troubleshooting guide helps you to track down the cause of many installation or user issues: 1.0 The Controller Does not Power-Up The controller does not power-up (there are no LEDs displayed on the controller or the ...Intelliprox Blue - Cardholder Enrollment
1.0 Introduction Credentials can be enrolled either using the controller enrollment button or using the Intelliprox Blue app. One credential is supported per cardholder and the controller will support a maximum of 250 cardholders. IMPORTANT NOTE: It ...Intelliprox Blue Data Sheet
Intelliprox Blue Controller Data Sheet