Local Linkage Overview
The Local Linkage section is by far the most powerful feature of the Doors.NET system. It is an advanced input/output management application that allows you to easily customize the operational mode of the controller to suit individual requirements.
Note: The feature is only supported on Mercury and Mercury Powered controllers or using I/O modules connected to either of those controller types.
You can create custom linkages with each NXT-Mercury Powered or Mercury controller on the system. This feature can be thought of as a white-board that allows you to determine any IF condition to action any WHEN condition.
Customize the application to perform almost any task supported by the system
- Built in tools allow for design of “on the fly” action sequences
Any hardware input(s) can trigger any hardware output(s) within a controller
- Most system software events can be used as triggers
Triggers can also execute software based actions
- Thousands of triggers and procedures per system
Multiple triggers can execute the same procedure
- Time delays may be incorporated and can be used to cancel a procedure if another procedure is execute
- Procedures may differ depending upon the time schedules the trigger event occurs
- Variable trigger logic may be employed using Boolean logic for complex actions
The WHEN can be referred to as Procedures, the IF conditions can be referred to as Triggers. Once configured and assigned, all trigger conditions and procedure actions are executed by the controller itself with no reliance on the PC - (the controller does not have to be 'online' to the Doors.NET software). The controller simply executes the procedure actions when the trigger conditions are met.
For example, local linkage could be used to;
- Unlock all doors on a controller when an input changes state
- Lockout or Lockdown all the controller's doors when an input changes state or if a door is 'forced open'
- Enable, disable or set an occupancy count at an access area
- Activate more than one output relay following access granted from certain cardholders
- Unlock a door with a certain keypad command then relock it again with a different command
- Activate a controller output if the controller, or any of its readers go offline
Or Local Linkage can be used to program multiple actions to happen based off a trigger, i.e when a certain event happens you may want to activate an output or a group of outputs and at the same time change the reader mode at a certain door and abort or execute a completely different local linkage action at the controller.
There is almost an endless list of possible local linkage actions that can be created. Feel free to contact Keri Systems Technical Support for further, more in-depth information or further details about training sessions that are held covering this topic.
Setup Local Linkage
- After logging into Doors.NET, click the Setup tab, then 'Advanced Local Linkage'.

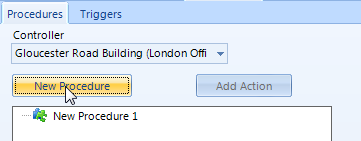
- The first tab you will see is the procedures tab, but before you can add a new procedure you will need to select a controller from the controller's drop-down list. The procedures tab configures the available procedure for each controller. Each procedure can have multiple actions items assigned to it.
Procedures
The procedures within Doors.NET are anything that the supported hardware is able to do, think of them as the actions the Mercury hardware is able to perform, either based on a schedule or from an operator command. It can be one item or a list of items and can vary from unlocking a door or a group of doors to a complicated mantrap. The software supports a default of 1,000 trigger conditions and 1,000 procedure action items.
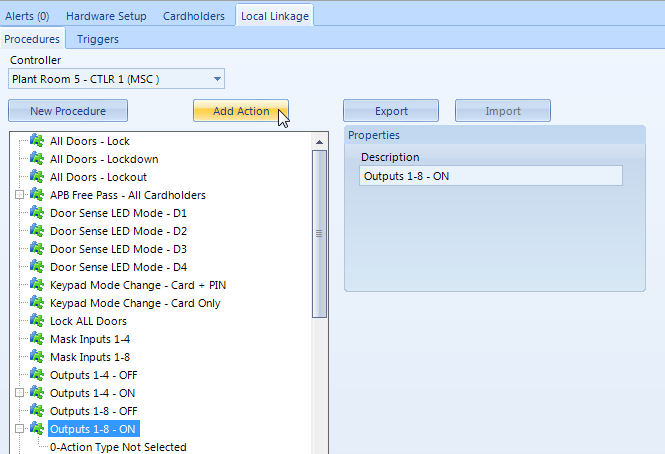
- Once the controller has been selected you can then click the New Procedure button to add a new procedure.
- Highlight the new procedure, change the default name, then click the Add Action button. There are many Action Types that can be selected. Refer to the Local Linkage Procedure Action Types for a table that lists all the available procedure action items that can be selected.
- Highlight the Action Type entry that appears beneath the procedure description and you will see an 'Action Item Type' pull-down list on the right. From this list select the appropriate action for your procedure. For example, if you want to activate a certain output select 'Control Point Control', followed by the specific output you wish to activate, then set it to On. Click Save.
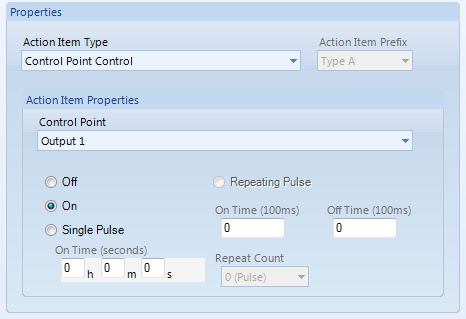
- You can use any available input on the controller, or a 4x4 or GIOX module connected to any of the controller's busses. By available, this means any output (control point which has not already been assigned for a specific purpose, such as a door strike or door alarm output.
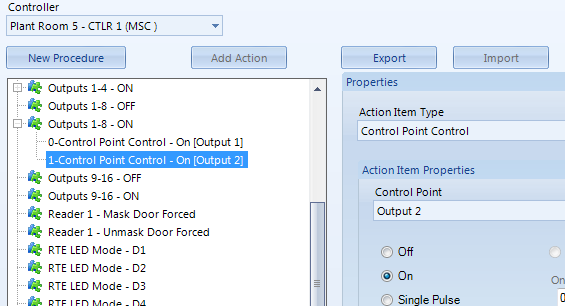
- As previously mentioned, procedures can have multiple actions assigned to them, so you may want to activate multiple outputs. If so, select the procedure name again, click the 'Add Action' button again then choose another output and repeat the same steps detailed above.
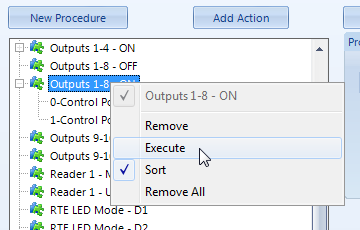
- At this point you can test the Local Linkage procedure to verify its functionality. Right-click the procedure name and select 'Execute'... If you are near to the location of the selected output(s) you should see and hear them activate.
- The Description text box allows the user to change the name of the procedure from the default name and can accept any character up to a maximum length of 50 characters.
- The New Procedure button adds a new procedure to the tree view with a default description. Use the Add Action button to add action items to the procedure.
- The Add Action button adds a new procedure action to the tree view under the selected procedure and automatically selects the item. Use the action type selections to change the type of action. This button is only enabled when a procedure is selected.
- The Action Type drop down selection is a list of the available action item types that can be added to an action list. The selections for the action item change with each selection of the action type.
Triggers
A trigger condition is simply a transaction (or event) that meets the specified criteria. Think of them as the events the Mercury hardware and the Doors.NET software is able to 'see'. This may be generic (i.e an active alarm event from any monitor point) to a very specific (i.e. access granted, at the rear door, by the cleaning crew, on the weekend, when an employee has been there that day).
The triggers tab configures the trigger condition that must be met before a procedure is executed by the controller. Refer to Trigger Conditions for a table of all the available triggers in Doors.NET.
When the system sees a trigger that you have defined, the event will appear in live events and at the same time it will execute a procedure that you have defined
(and assigned within the trigger setup).
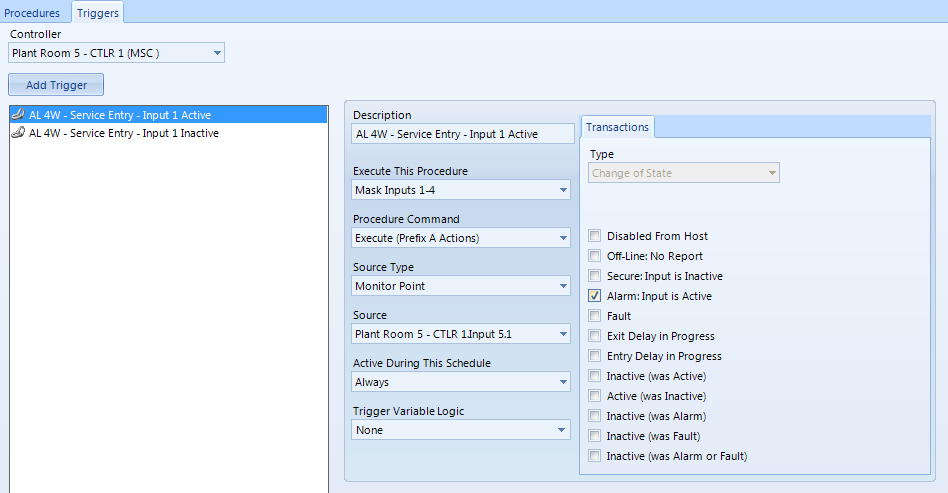
- Click the Add Trigger button then highlight the new trigger's description.
- Change the new trigger's default description within the description field and click save.
- From the 'Execute This Procedure' drop-down list select the procedure you wish to activate when the trigger event occurs.
- From the 'Procedure Command' list leave it set to the default of 'Execute Prefix A Actions' to trigger the selected procedure
- From 'Source Type' choose the specific type of trigger source. i.e an input or output generated event, a reader event, an event generated by a controller or a time schedule going active or inactive.
- The source type list is where you select the specific input, output, controller, reader, etc which will be the chosen hardware object for creating the trigger.
- Activate during the schedule is where you define when the trigger will be used. Always will mean the trigger will always be 'seen'. Otherwise you can choose a different time schedule to restrict it.
- Finally, trigger variable logic is used for conditional linkage. For example; if you want to specify two variable that must both be active before the trigger becomes active. One input on the system might be set to variable 1 and another set to variable 2. Trigger Variable Control allows you to state that BOTH variable must be in a certain state (i.e both True) before the trigger become active.
- The Execute This Procedure drop down selection is a list of the stored action lists at the controller. This is the procedure action list that will be executed when an event transaction completely matches the condition.
- The Procedure Command drop down selection is a list of execution options for the procedure action list. These include Abort, Execute and Resume.
- The Source Type drop down selection is a list of the available main categories for selecting the source of the event transaction. This selection changes a number of other selections on the menu and should be selected first.
- The Source drop down selection changes based on the Source Type selection. It may be a list of all enabled readers, monitor points, control points, weekly schedules, panels or the controller itself. In most cases, the "All" selection is available along with the list of enabled devices.
- The Active During This Schedule drop down selection is a list of the enabled weekly time schedules. If the schedule is active, then this part of the condition criteria is met and the rest of the event transaction is analyzed for further condition matches before execution.
- The Trigger Variable Logic dropdown selection will display a dialog box that allows the definition of trigger variable states necessary for this condition to execute the specified action list. A trigger variable is a Boolean variable (either TRUE or FALSE) that is stored at the controller. The trigger variable can be set to either state by an action list and can be used as part of the condition as a logical expression represented by "a AND b OR c AND d".
- The Transaction Type drop down selection is a list of transaction types associated with the selection source type. The contents of the drop down selection changes for each source type. Each selection of the transaction type changes the available checkboxes in the Transaction Tab.
Related Articles
Global Linkage Overview
The Global Linkage Module and related user interface screens provide a means of automating system functions, features and notifications system-wide. The configuration of the Global Linkage Module consists of two parts; the Global Macro (what you want ...Global Linkage - Quick Start Guide
1.0 Introduction The Global Linkage feature in Doors.NET allows you to automate many system functions, such as unlocking doors, changing reader modes, locking down certain areas of the building, granting anti-passback amnesty to cardholders, masking ...Doors.NET - Software Overview
Application Server The Application Server is the heart of the Doors.NET system. It is the only component that communicates directly with the database engine. It is an asynchronous, TCP socket server that accepts connections from both the gateway and ...System Architecture Overview
1.0 Introduction The Doors.NET software is a Microsoft Windows.NET platform suite of services that allow you to configure, command and control PXL, standard NXT, NXT Mercury Powered, Neutron and Mercury Security (SCP) Series access control hardware. ...Local Linkage - Import and Export
The Linkage Export/Import feature allows you to save Local Linkage actions which can then be imported and used on other controllers (or completely different Doors.NET systems), potentially saving a lot of system programming time. Note: ALL the ...