Photo ID - Badging Printer Setup
You will need to set up a printer before creating and designing cards. All necessary printer and page information is stored in the card design file (.DGN), which in turn is used by the software as a card format (a packet of information that includes the card design file, the card code generation method, and the printer and page setup).
IMPORTANT: To ensure accurate reproduction of your card design be careful to match the card size in your Layout Properties (described below) to the card media in your printer. If necessary, consult your printer’s documentation.
Install a Printer Driver
Install the printer drivers according to the instructions provided by your printer manufacturer. The printer appears automatically in the Print dialog box, the next time you sign into the system.
Set Up a Card Printer
- On the File menu, click Page Setup. The Page Setup dialog box appears with the Page Setup tab showing.

- Select a printer. The default printer (as specified in the Windows Printers control panel) appears in the list. To select a different printer, scroll through the list and choose from the printers displayed.
- (Optional) Select the Print Color and K planes separately option if your card printer outputs four process colors (cyan, magenta, yellow and black) when they are specified on separate document “pages”. The first page should be in CMY, and the second page should be monochrome. This option merges the two pages into one in order to output four-color process. Consult your printer manufacturer’s documentation on setting up your printer for K plane printing.
Note: Do not modify the Page Margins and Page Layout settings if you are printing to a card printer. See “Special Printing Options” below for more details.
- Click OK. The dimensions of the card layout will adjust to those of your printer’s default card media.
Special Printing Options
If you want to print cards to a sheet printer from your application, you will need to set parameters such as page margins, number of cards per page, and duplex printing using the options described in the following section. You can also use the following options to create a report that can be printed from your application to a document printer. To modify the printer settings (from the default printer driver settings) such as paper size or orientation, follow these steps:
- On the File menu, click Page Setup. The Page Setup dialog box appears with the Page Setup tab showing.
- Click Properties. The Properties dialog from your printer’s driver appears. If available, set the options that you want to modify.
- Click OK to save the settings.
Printing Reports
To create a multi-card output (for example, a report or for sheet-printing), follow these steps:
- On the File menu, click Page Setup. The Page Setup dialog appears.
- Indicate the number of cards to be printed across the page in the Cards Across field.
Note: A landscape page allows for more cards to be printed across than a portrait page, but you will not be able to print as many cards down.
- Indicate the number of cards to be printed down the page in the Cards Down field.
Note: A portrait page allows for more cards to be printed down than a landscape page, although you will not be able to print as many cards across.
- Adjust the horizontal and/or vertical spacing between the cards printed on the page should you so desire.
- Enter the new page margins in the fields as required.
Note: The default is "0" which allows the card printer to print edge-to-edge on the card media. If printing to a document printer, you may need to adjust these margins manually if this doesn't occur automatically.
Headers and Footers
You can add headers or footers to your card layout that will appear at the top and bottom of the printed card or sheet. The objects you add to these areas will be saved in the card layout file (DGN).
IMPORTANT: The heights of the Header and Footer are added to the height of the card layout--they do not overlap the card layout. When setting up the Size Height of the header and/or footer, you must subtract those amounts from the height of the Front of the layout, otherwise your header will push the card layout (front/back) down the full height of the header, and the layout will in turn push down the footer. As well, if your printer requires margins (that is, does not print edge to edge) you will need to take those into account when you calculate your heights.
- With a card layout open, on the File menu, click Layout Properties, and then select the Page Header (or Page Footer) tab. The options appear.
- Select a page size (preferably the size of your layout Front/Back).
- Modify the Header/Footer Size Height (and Front/Back height) as described in the note above.
- Add a background image or color. If you want this background to print at print time, select the Print background option should you so desire.
- Click OK.
- To add objects to the header or footer, on the View menu, click Show, and then select Layout Header (or Layout Footer). A blank layout appears on the workspace.
- Add objects such as text in the manner described in “Drawing Objects.”
Double-Sided Printing
There are two-settings available for double-sided printing:
- Printing on both sides of a card from a single card from the Print command
or
- Printing both sides of the card layout to a larger printer media from your application to a document printer (to print on a sheet or create a report, for example).
The first requires you to choose the appropriate Print Side setting on the Print dialog at print time, and the second requires you to choose a Page Setup option that will be saved in the DGN file and used when printing from your application.
Print Side
Note: This option is used for single card printing or batch printing.
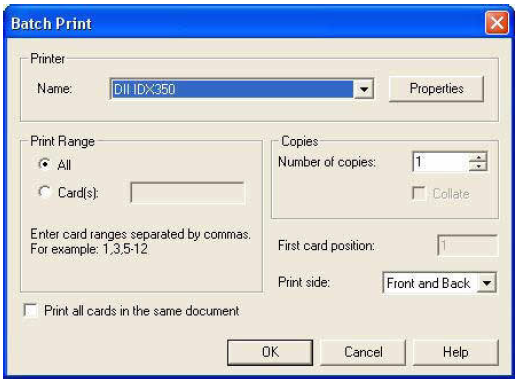
When you choose the Print command, you will have the following options:
- Front Side Only -Prints only the front layout of the card.
- Back Side Only -Prints only the back layout of the card.
- Front and Back -Prints both the front and back layouts of the card. This selection should be used if you have a specialized printer that prints on both the front and the back of cards, or if you want to manually flip the cards over to print on their backs.
Note: If you want to manually flip cards over to print on their backs -- especially if you are printing both sides of the cards in batches -- you should know that this method will require a moderate amount of trial and error before you achieve satisfactory results.
Duplex Settings
Use these settings to print layouts on both sides of the printer media or to print both sides of the layout on one side of the media. These options are saved to the layout file (DGN) and used to create reports or for sheet printing on a larger format printer.
Note: This does not affect the way your card layouts will print to a card printer.
- On the File menu, click Page Setup. The Page Setup dialog box appears with the Page Setup tab showing.
- Select the Duplex tab. The Duplex printing properties appear.
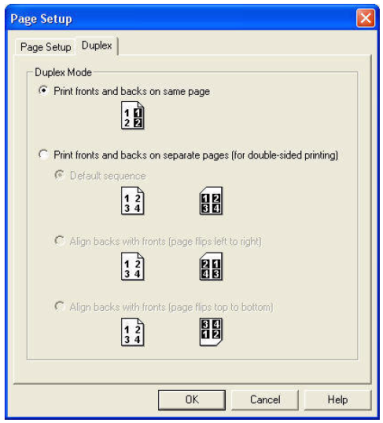
- Choose from one of the following options:
- Print fronts and back on same page -Used for printing double-sided layouts together on the front of the print media.
- Print fronts and backs on separate pages -Used for printing double sided layouts on opposite sides of the print media.
- Default sequence - Prints fronts and backs in the same sequence on both sides.
Note: The fronts and back of the cards will not be back-to-back on both sides of the print out. Use Align Backs With Fronts to achieve this effect.
- Align backs with fronts (page flips left to right) - Prints fronts to backs, flipping the media left to right.
- Align backs with fronts (page flips top to bottom) - Prints fronts to backs, flipping the media top to bottom.
- Click OK.
Selecting Page Sizes
Different types of ID cards come in different sizes dependent on the types of cards a printer will output. It is important to select the card page size before beginning to design a card, since resizing the page can have a serious impact on the overall design. The page size information is stored in the card layout file (DGN or GDR) and is used by your application during the printing process.
Setup the Page Size
- On the File menu, click Layout Properties. The Layout Properties dialog box appears.
- Click the Front tab. Front layout properties appear.
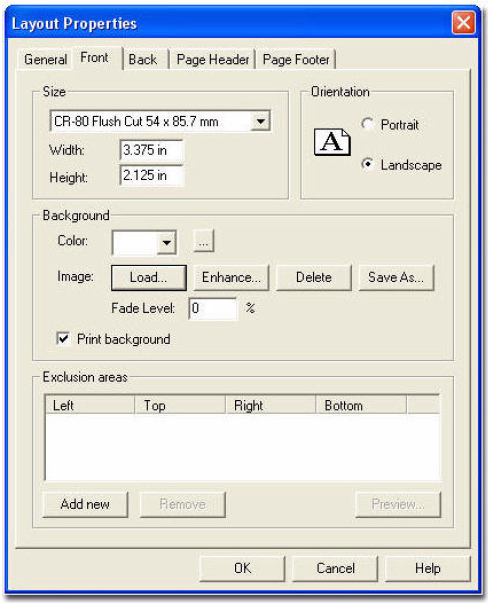
- Select the required card size from the options listed in the Size list, or select Custom Size to specify your own dimensions in the Height and Width fields provided.
Tip: To get the maximum printable size for your printer, choose Full Printer Page from the Size list.
- Select the card’s orientation on the printed page as either Portrait or Landscape.
Note: This affects only the orientation of the cards, and is not connected to the orientation of the page, which is determined in the Printer Properties dialog.

- Click OK.
Note: These settings will automatically be the same for both the front and back of the card layout.
Related Articles
Photo ID Badging Client - Quick Start Guide
Logging In Click/double-click on the 'Keri Photo ID Icon' located on the desktop or via Start >> All Programs >> Doors.Net >> Keri Photo ID. Log into the badging client using the default user ID and password (both 'admin'). On the left-hand pane ...Photo ID Client Overview
The Photo ID Badging client is a licensed Doors.NET components that allows you to: Design and print badges with photo IDs and custom graphics on plastic cards, overlays for standard proximity cards, or ISO thin proximity cards. Single card database ...Photo ID - License Revoking
It is important to know that your Photo ID license will need to be ‘revoked’ if you wish to move your Doors.NET badging installation onto a different PC, or if for some reason you wish to format the Doors.NET host PC hard-drive. Once revoked, you can ...Photo ID License Activation - Online
1.0 Introduction This article walks you through the process of activating the Doors.NET Photo ID client using an active, unrestricted internet connection. 2.0 Ensure Badging is Enabled on Your Doors.NET License The first thing you should do is check ...Photo ID - Creating Card Templates
Creating Card Templates in the Photo ID Client Click/double-click on the 'Keri Photo ID Icon' located on the desktop or via Start >> All Programs >> Doors.Net >> Keri Photo ID. Log into the Photo ID client using the default username and password ...