Photo ID Badging Client - Quick Start Guide
Logging In
- Click/double-click on the 'Keri Photo ID Icon' located on the desktop or via Start >> All Programs >> Doors.Net >> Keri Photo ID.

- Log into the badging client using the default user ID and password (both 'admin').

- On the left-hand pane (User Manager) you will see two nodes: Cardholders and PhotoID Layouts, right-click PhotoID Layouts and select 'New Template'.
- Select the 'New Template' entry that immediately appears on the left pane. The Layout Designer then appears on the main window.
Workspace
With the designer running you will notice one or more bars located across the top of the workspace window, below the menu bar. The various toolbars available at the top of the workspace are movable and resizable. To do so, click on the vertical bar at the left end of the toolbar and drag it to the desired location. Note: The toolbars that appear on the workspace may vary according to the product you have purchased. The toolbar is located directly below the menu bar. It provides quick mouse access to many of the commands found in the various menus.
Toolbar

- New, Open, Save, Cut, Copy and Paste buttons: Perform commonly used Windows commands.
- Undo and Redo buttons: Allow you to reverse the previous actions, or redo them if you so choose.
- Flip Layout button: Allows you to toggle between the front and back view of the card.
- Zoom In and Zoom Out buttons: Allows you to change the view of the layout.
- Drawing Object buttons: Allows you to select design objects; draw shapes (lines, rectangles, round rectangles, ellipses); or place text objects, static images, dynamic images, and bar codes on your card template.
- Object Properties button: Allows you to enable or disable special design features, such as image “cameos” or conditional display settings for the highlighted object.
- Layout Properties button: Allows you to set global parameters for the currently open layout (such as page size and background image).
- Print button: Allows you to print the card template.
- Print Preview button: Displays the active card template design as it would appear when printed.
- About button: Displays support and licensing information for your copy of software.
Text Style Bar
The text style bar provides access to the visual properties of text objects.

- Font Face list: Allows you to select a font when creating static or dynamic text objects.
- Font Face list: Allows you to select a font when creating static or dynamic text
- Font Style buttons: Allow you to change the style of the selected font (bold, italic, underline).
- Horizontal Justification buttons: Allow you to horizontally left-justify, center, or right-justify your text objects (and some bar codes) within their bounding boxes (that is, the adjustable invisible box within which the text resides).
- Vertical Justification buttons: Allow you to vertically top-justify, center, or bottom-justify your text objects (and some bar codes) within their bounding boxes.
Attributes Bar
The attributes bar provides quick mouse access to color and line weight settings, and access to data fields or expressions that are linked to dynamic text objects, bar codes, and image keylines.

- Line Attribute lists: Allows you to select the color and weight (thickness) of lines and borders around drawing, text and image objects. You can also select Border Text from the Line color list.
- Fill Color list: Allows you to select the color for fills (solid colors that are used to “fill” shapes).
- Text Color list: Allows you to select the color for text.
- Data Field List: Allows you to link dynamic text objects, bar codes, and image keylines to data fields or expressions. For example, linking a dynamic text object to the First_Name field in the database results in “First_Name” appearing on the card design (in whatever font and size you select). This is replaced by the cardholder’s first name (in your specified font and size) when the ID card is printed.
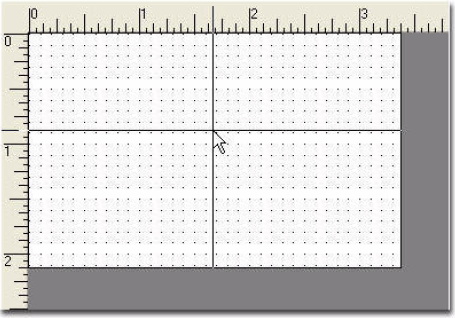
Design Window
The Design Window area of the workspace is where you design card templates. When a new file is created, the software opens a Design Window for the front of the card layout. The back of the card can be viewed at any time by selecting the View menu, and clicking 'Show Back of Layout', or by clicking Flip Layout on the toolbar.
Creating New Card Designs
When you launch the designer, it automatically opens a blank layout. You can create a new layout at anytime by following these steps:
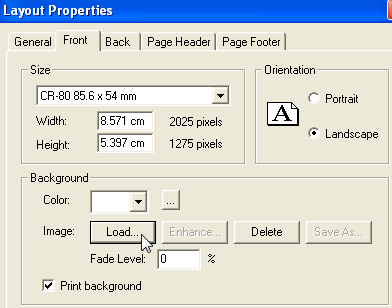
- Specify the appropriate card size information... From the File menu >> Layout Properties >> Front tab.
- Also from the file menu, click New, or click the New icon located on the toolbar. A design layout opens for the front of the card. To view the back of the card layout, click the 'Flip Layout' icon on the toolbar, or from the View menu, click Show >> Back of Layout.
- Design your card using the various tools located on the toolbar. Import a card background by going to File >> Layout Properties >> Front tab and locate the Background section. Click the Load button to the right of 'Image:' and browse your PC for the desired background image.
Opening an Existing Card File
On the File menu, click Open, or click the Open button on the Toolbar. The Open dialog box appears.
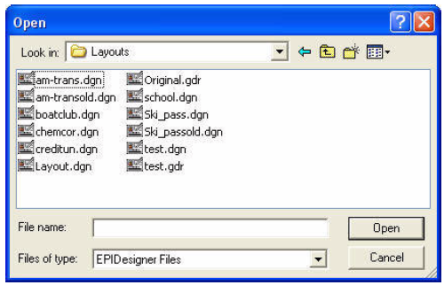
- In the File name field, type the name of the card design template you want to open (or select it from the Layouts list). If the card design you want to open was originally created using Guard Draw (used with Doors32 version 4.xx, or later) , Doors.NET Photo ID will display existing layouts with both the DGN and GDR extensions.
- If your card design is in another drive or directory, browse to it using the Look In list. You will only be able to access network drives that are mapped to your PC or available from your Network Neighborhood.
- Click Open.
Opening a Recently Saved Card Design
The last four card designs that were saved to disk will be listed at the bottom of the File menu. Select the name or number of the card design that you want to open and it will be displayed.
Saving Card Designs
The Save command displays a dialog box where you can give a new card design a filename, and specify a location in which to store it.
Saving a Card Design For the First Time
To save a card design for the first time, follow these steps:
On the File menu, click Save. The Save As dialog box appears.
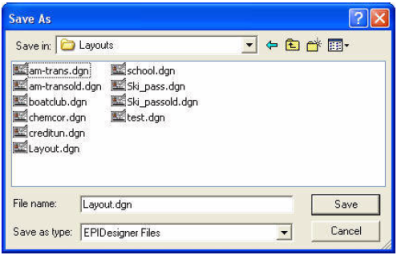
In the File name field, type a name. From the Save as type field, select .DGN or .GDR. See IMPORTANT note below.
Note: To save the card design in a different drive or directory, select the drive from the Save In drop-down list. You will only be able to access network drives that are mapped to your PC or available from your Network Neighborhood.
Click OK.
Saving a Previously Saved Card Design
After making changes to an existing card design, save your changes by clicking the Save button on the toolbar, or on the File menu, click Save. Your changes are automatically saved to the file. To save the design with a new filename, on the File menu, click Save As and follow steps 2 and 3 above.
IMPORTANT: If you open a GuardDraw file (GDR) and then save it without changing the filename, you will overwrite that file and will no longer be able to open that file using GuardDraw even though it will still have the .GDR extension. If you need to keep your old GDR or DGN files, always save with a new filename.
Importing or Removing a Card Background
Card backgrounds consist of graphics (such as bitmap images), which are created in draw or paint programs. The background is the graphical “landscape” against which the various card design objects (such as images or text objects) are placed.
Note: You can also apply these features to Back, Header and Footer layouts. On the View menu, click Show.
Importing the Card Background
To import a card background, follow these steps:
- On the File menu, click Layout Properties. You can also click the Layout Properties button on the toolbar, or double-click the layout.
- Select the Front or Back tab.
- In the Background area, click Load. The Open dialog box appears.
- In the File name field, type the name, path, and extension of the background file (or use the buttons to browse to your file).
- Click OK. The Enhance, Delete and Save As buttons are enabled.
- (Optional) Make any modifications to the image. See “Enhancing the Card Background” for more information about the enhancement options.
- Click OK. The card background is placed on the front or the back of the card design (depending on which was selected).
Enhancing the Card Background
When a background image is added to a card design, the Enhance button on the appropriate Layout Properties tab is enabled. This gives you access to the various enhancement options available for your background images--cropping, color balance, as well as exposure, contrast and brightness.
Important: When creating a background image for your card layout (using graphics software), be sure to use the same dimensions (or at least the same aspect ratio) for your background as your card media. If your image does not match your card media, as set in the Card Size list, the software will stretch the image as set in the Card Size list, the software will stretch the image as required to fill the card layout. This is also important to remember if you choose to crop your background image.
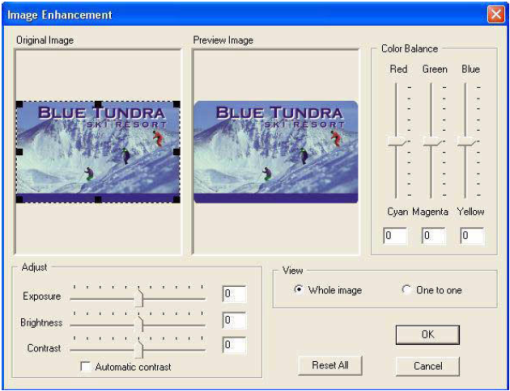
To modify any of the color or image quality settings, drag the slider one way or another until the Preview Image appears as desired, or select Automatic contrast to automatically adjust the contrast of the image. Click OK when you are finished. To undo your changes click the Reset All button to return the Preview Image to its original settings, or click Cancel to return to the Layout Properties dialog without saving the changes.
To crop the background image, drag one of the eight sizing handles that appear on the Original Image until the image has the desired shape. You can also move the cropping area (if it is smaller than the original image) by dragging it to the desired area on the Original Image.
Removing a Card Background
To remove a background from a card design, follow these steps:
- On the File menu, click Layout Properties, and then click the Front or Back tab (depending on which background you want to remove).
- Click the Delete button then click OK to return to the workspace or repeat the instructions for importing an image (see “Importing the Card Background” ).
Export a Card Background
To export a card background, on the File menu, click Layout Properties, or click the Layout Properties button on the toolbar. Click the Front tab. When there is currently a background image on the layout, the Save As button is enabled. Save the image file with a new name, define the file type, and specify the directory to which it will be saved.
Change the Background Color
This feature allows you to add a solid color to your card’s background. This color will be printed on your finished card.
Note: If you use both a background color and a background image file, the background color will be covered over by the image file and will not
be visible. To change the card’s background color, perform these steps:
- On the File menu, click Layout Properties, or click the Layout Properties button on the toolbar.
- Click the Front or Back tab. Click the Color list to choose one of the sixteen preset colors or click the ellipses button next to it to define a custom color using the Windows color dialog box. Click OK.
To remove the background color, select the X from the top of the preset color list. This removes any background color previously applied to your card design.
Inhibit Printing the Background Image
If your card media comes with the background image preprinted on it, you can still include the image file in the layout (to make layout design easier) without printing it on the card. To do this, perform these steps:
- Import the background image file that appears on your preprinted cards.
- On the File menu, click Layout Properties, or click the Layout Properties tool. Click the Front or Back tab. Clear the Print background option selection below the Background commands. The image will appear on your design in the designer but will not print on the card.
Adding Static and Dynamic Images
You can use a drawing tool to add digital images to a card, such as photographs, fingerprints, signatures, and clip art. The Dynamic Image tool is used to create a keyline for any dynamic image type available in the software. The Static Image tool allows you to import static image files from any external source. Dynamic Image keylines are automatically linked to your data source. When you print cards using your application, the keylines are replaced by the cardholder’s images. Hard-to-counterfeit transparent images and cameo effects can also be defined for the image keylines, therefore, providing an extra level of security to the cards issued.
Add Static Images
To add a static image, perform these steps:
- On the Draw menu, click Static Image, or click the Static Image button on the toolbar.
- Draw the image object (as described in “Draw an Object”). The Open dialog box appears when you release the mouse button.
- Browse to the image file you want to insert in the keyline, and then click Open.
Note: The image size is automatically set to match the size as specified in the image file header.
Add Dynamic Images
To add a dynamic image, perform these steps:
- On the Draw menu, click Dynamic Image, or click the Dynamic Image button on the toolbar
- Draw the image object (as described in “Draw an Object”).
The object will maintain the aspect ratio as set in your application for the default image type (for example, Photograph).
Change the Image Properties
To change the image properties, perform these steps:
- Change the image properties by double-clicking the object to access the Dynamic Image Properties dialog box. Select the Image tab.
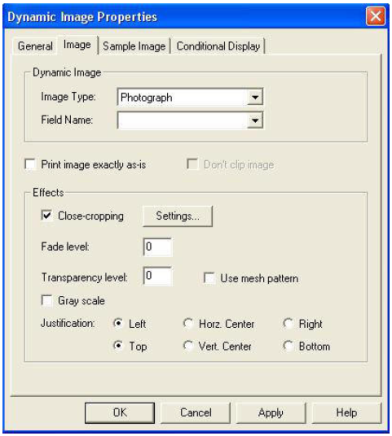
- Change the Image Type by choosing from the list.
Note: These options will differ depending on the product you have purchased.
- Optionally select Print image exactly as-is to prevent changes to an image so that it prints correctly. Use this feature for bitmaps that contain digital watermarks which may be lost if the bitmap is resized.
Note: When you select Print image exactly as-is, other properties for the image are disabled, such as line color and thickness, shadow, close cropping, fading transparency, and gray scale. However, the checkbox Don’t clip image becomes enabled, allowing you to print the entire image even if it is too large to fit in its rectangle as defined on the layout.
- If applicable, select the data source field that points to the image.
Select a Sample Image
If you want to add effects to your dynamic images, it’s a good idea to select a sample image so you can preview the effects prior to printing. Perform these steps:
- Double-click the image to open the Dynamic Image Properties dialog box. Select the Sample Image tab.
- Click Load. The Open dialog appears.
- Select an image that is a good representation of the typical image you will be capturing with your application. Click Open.
- Click Enhance to make any enhancements necessary (see “Enhancing the Card Background” for more details). These enhancements only affect the sample image and not the images that will be added at print time.
- Click OK.
Add Close-Cropping Effects
The Close-cropping option allows you to remove the background pixels from an image. On the Image Properties dialog box, click the Image tab. Select the Close-cropping checkbox, and then click Settings. The options you select depend on the image quality of the background you want to remove.
Cameo Effect - Select this option if you want to create a cameo effect. This will
remove all background pixels around the subject of the image (i.e., the cardholder's
head). Use this option with the Fade and Transparency levels to make an interesting
ghost effect.
Hue/Intensity Color Match -Select this option if you want to remove all pixels
within a specified hue/intensity range. This option is particularly useful if you are
having trouble removing background pixels with the Exact Color Match option.
Enter your custom Hue Variation and Intensity Threshold percentages.
RGB Color Match -Select this option if you want to remove all background
pixels that are exactly the same color. This option is particularly useful for solid
color backgrounds, which are commonly found in bitmap files (for example, logos),
and it may not be suitable for cropping photographs. In the Color variation field,
enter an amount of variation from the selected color, or enter 0 for an exact color match.
Color Variation -This is the percentage of the hue that software will use to scan
for variations of the background pixels along the color spectrum. The software
removes pixels by sampling the first one located in the upper left-hand corner of
the image. It then uses this setting to scan for pixels of a similar hue along the
specified percentage of the color spectrum. A higher value means that software
will scan and remove pixels across a wider percentage of the color spectrum. A
lower setting means that software will confine the removal to pixels that more
closely match the first one that was sampled.
For example: If you enter a setting of “30” here, and if the image's first pixel is a
shade of green, the software will scan and remove all shades of green across 30
percent of the spectrum (and possibly into portions of the yellow and blue color
ranges).
Intensity Threshold -This is the percentage that the software will use to scan for
variations in color intensity. The software removes pixels by sampling the first
one located in the upper left-hand corner of the image. It then uses this setting as
a threshold by which all pixels of a certain intensity (and higher) will be scanned.
A higher value means that the software will confine its removal to the brighter
pixels that fall within the specified Hue Variation range. A lower setting means
that the software will widen its scan and remove a broader range of bright and
dark pixels within the specified Hue Variation.
For example, if you enter a setting of “60” here and a setting of “30” in the Hue
Variation box, and if the image’s first pixel is a shade of green, then the software
will scan and remove all of the brighter shades of green across 30 percent of the
color spectrum. In other words, fewer green pixels will be removed from the
image. If, on the other hand, you lowered this setting to “20,” the removal will
include a broader range of both light and dark green pixels.
Background Color - If Automatic is selected, the software removes pixels by
sampling the top-left and top-right pixels of the image and estimating the
background color. To select a different color, click on the color in the displayed
image, or check the Specific color box and then click Choose color. Select the
color and then click OK.
Create an Image Ghost Using the Effects Settings
The Fade and Transparency levels can be used to create a ghost image. An image ghost is an image that is transparent (that is, the background elements show through it) generally used in addition to a regular image, and can be placed anywhere on the card design—even behind text or other objects. This is considered to be an additional ID security feature, as ghosted images are extremely difficult to reproduce. You may want to experiment with the settings to get the effect you want.
- Add an image object (as described in “Draw an Object” ). If you want to create a ghost of an image that already exists on your card, Ctrl+click the image and drag the newly created image to its location. Then you can apply the effects you want to the new image. You will need to move the ghost behind the original; on the Object menu, click Move, and then click Back.
- Double-click the image to open the Dynamic Image Properties dialog box. Select the Image tab.
- Modify the Effects settings to get the look you want.
- Fade level: Use this feature to create a “washed out” appearance. The number entered in the field represents the percentage of “whiteness” that you want for the image.
- Transparency level: Use this feature to reduce the opacity of the image. The number entered in the field represents the percentage of the image that will be transparent.
- Use mesh pattern: This is a quick way to create a ghost effect and can be used instead of changing the Transparency level. It automatically sets
the appropriate level of opacity. This option uses the same algorithm as a ghost option. - Gray scale: Select this option to remove the color information from the image — the color will be replaced with levels of gray.
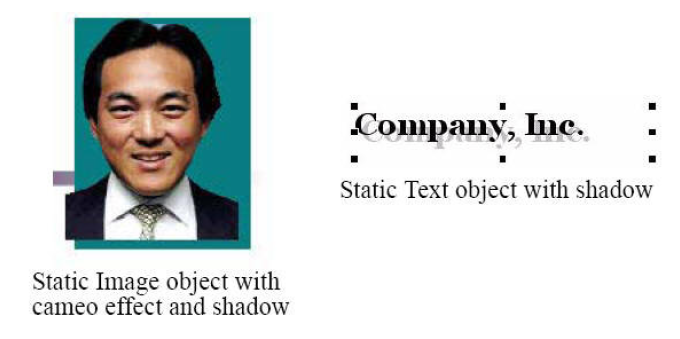
Create a Shadow
Create a shadow behind any text or image object, static or dynamic, giving a sense of depth and dimension to a 2D object.
Note: In the case of an image object, the shadow created will reflect the shape of the image’s keyline (outside border) and not that of the image itself (even if you select a close-cropping effect).
- Double-click the image or text object to open the Properties dialog.
- In the Style settings, click Shadow.
- (Optional) Modify the color and offset of the shadow (keeping in mind what the object over the shadow will be).
- Click OK.
The default settings for the amount of offset are, horizontally and vertically, 0.04 of the units of measurement you are currently using, and the color is black. These settings create a shadow appearing below and to the right of the object. To change these settings, perform these steps:
- Select a new color from the Color list, or click the ellipses button next to it to change the shadow color. The Microsoft Color palette appears.
- Type a new setting for the horizontal and vertical offsets. Positive integers create a shadow below (horizontal) and to the right (vertical), while negative integers create them above and to the left. Experiment to see the settings that are most appropriate for your design.
Tip: Create eye-catching portraits on your cards by adding a Cameo Effect to your image and then adding a shadow. Remove the object outline, change
the shadow color, and increase the offset to enhance the effect.
Change Signature Fill and Text Attributes
Changing the fill color and/or text color of a signature can make it stand out more on your card design. Changing the text color will result in your printed signature appearing in the chosen color.
- With the signature selected, change the text and fill color by choosing from the sixteen quick-access colors in the Text Color list on the toolbar.
For a more extensive selection of colors, double-click the object to open Dynamic Image Properties. Click the General tab, and then click the ellipsis button next to the color list. To print the signature against the card background, click X for “no fill”.
Note: These two attributes will not change the appearance of your sample image (if you have chosen one); they will only affect the final printed card.
Design Objects
The software comes complete with an extensive selection of tools to allow you to design cards with ease. In addition to text, image and bar code objects, you can also use lines, circles, squares, rectangles, and ellipses to spice up your illustration, or to create security clearance symbols for the easy identification of unauthorized cards.
Note: You can apply these features to Back, Header and Footer layouts. On the View menu, click Show and then choose the appropriate layout.
Magstripe Encoding
A Custom encode format is available in PhotoID using software version 3.5.1.18 or above - It allows a user to specify a different field (instead of the cardnumber) to use as the source for the encode string. Since this is track 2, string is checked for numerics and padded left with leading zeros up to the maximum specified. The options are turned on via the EclipseEncode.config file.
Entries are UseCustomEncoding (0=false, 1=true), MaxCustomEncodeDigits (this value is used for padding leading zeros), and CustomEncodeFieldName (the name of the Cardholder property/database field that will be used).
The customer must, of course, be using a printer that has a built-in magstripe encoder.
Related Articles
Photo ID Client Overview
The Photo ID Badging client is a licensed Doors.NET components that allows you to: Design and print badges with photo IDs and custom graphics on plastic cards, overlays for standard proximity cards, or ISO thin proximity cards. Single card database ...Photo ID License Activation - Online
1.0 Introduction This article walks you through the process of activating the Doors.NET Photo ID client using an active, unrestricted internet connection. 2.0 Ensure Badging is Enabled on Your Doors.NET License The first thing you should do is check ...Photo ID - License Revoking
It is important to know that your Photo ID license will need to be ‘revoked’ if you wish to move your Doors.NET badging installation onto a different PC, or if for some reason you wish to format the Doors.NET host PC hard-drive. Once revoked, you can ...Doors.NET - Quick Start Guide
1.0 Introduction This document covers the basic installation and configuration of Doors.NET with Standard NXT, PXL, Entraguard, NXT-MSC (Mercury-Powered) or True Mercury controller types. It assumes that the computer being used for the Doors.NET ...Photo ID - Creating Card Templates
Creating Card Templates in the Photo ID Client Click/double-click on the 'Keri Photo ID Icon' located on the desktop or via Start >> All Programs >> Doors.Net >> Keri Photo ID. Log into the Photo ID client using the default username and password ...