PXL-500 Controller Factory Reset
1.0 PXL-500 Standard Controller RAM Reset
If you're turning controller power on for the first time, or have just changed the EPROM/PIC, the PXL-500/PXL-510 controller RAM must be reset before performing any other action... this clears any spurious information that may be in the RAM in preparation for entering your access control information.
Important Note: Resetting the system RAM completely erases all information within the PXL-500/PXL-510 controller. If there is any information in system RAM from an access control installation and the system RAM is reset, the information in the controller is lost and cannot be recovered. To reload the information, an update will therefore need to be performed from the software. The controller address will not be affected by this reset procedure.
Before performing the reset, (for an existing, functioning controller), you should collect the events stored in the controller’s internal memory buffer if you need to run reports on system activity.
- Remove power from the controller.
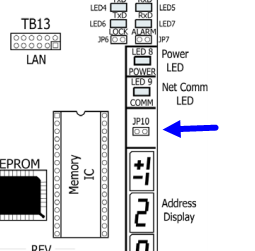
- Ensure there is a jumper placed across both pins of JP10 (located above the address display).
- Hold down the white S1 button and then apply power.

- If a reader is connected it will beep twice.
- Continue to hold down the S1 button for a minimum of 10 seconds.
- Release the S1 button.
- The controller is now factory reset.
Note: You do NOT need to remove the jumper from the pins of JP10.
2.0 Extended Factory Reset
There is also an extended factory reset for the PXL-500 controller. This should only be used if the standard reset seems to fail.
- Remove power from the controller and all connectors.
- Insert a jumper across pins 1 and 2 of JP10 on the controller.
- Press and hold down the white S1 Options button as you apply the 12 VDC power. The power connector is the red connector (TB2).
- LED 8 will be solid green.
- Continue to hold-down the S1 button for at least 20 seconds.
- Release the white S1 button.
- Remove Power from the PXL-500 controller.
- Press and hold the S1 button for at least 20 seconds.
- Apply power again.
- LED will go solid green again. After approximately 7-10 seconds the LED 7 will turn on.
- Wait for LED 7 to turn off then back on.
Release the S1 button.
Remove the power connector TB 2.
Reinstall all of the connectors - install the TB 2 power connector last.
Perform an auto configuration operation from the software.
Perform a controller update network to reload the database into the controller.
The controller should be functioning properly.
Related Articles
PXL-500 Controller Setup - Doors.NET or Borealis
1.0 Introduction This section covers the initial setup and basic configuration of PXL controllers in the Doors.NET and Borealis software. If Using Doors.NET It assumes Doors.NET has already been successfully installed on your host PC, the software ...PXL-500 Troubleshooting Guide
Following is a list of possible scenarios you may encounter when setting up or using the PXL-500 controllers. You will then see a possible solution or a list of possible solutions listed in order of the most likely cause: 1.0 Controller Communication ...PXL-500 Setup in Doors.NET with a LAN-520
1.0 Introduction The following are basic setup instructions for the LAN-520 module. Some settings may not apply to every application. Note: The LAN-520 AESP is an updated version of Keri’s LAN-520X device. If you are using the new NC-485X Network ...PXL-500 Setup in Doors.NET With a USB-Serial Adapter
1.0 Introduction This guide explains how to setup a connection to a PXL-500 Primary controller using a USB-serial adapter. The adapter used in this example is the Keyspan 19-HS by TRIPP-LITE which is one that Keri highly recommends. It is robust, ...Replacing a PXL-500 Controller
1.0 Introduction If you need to replace a PXL-500 controller in the Doors.NET software, such as if it has been damaged, please use the following procedure to minimize the amount of system down-time: 2.0 Replacing a Primary PXL-500 Controller The ...