PXL-500 Firmware Chip Change Procedure
1.0 Introduction
PXL controllers do not have flash firmware and so they require a physical chip change. The PXL Firmware Upgrade ship kit comes with a chip extraction tool to assist with the removal and replacement of chips - failure to use the extraction tool properly may permanently damage the chip and/or the socket.
Note: These instructions also apply to changing the firmware on an Entraguard controller.
2.0 Upgrade the EPROM
Note: If the PXL controller has an SB-593 connected THIS MUST BE REMOVED before you can change the PXL chips. YOU MUST NOT CHANGE THE CHIP on the SB-593 (satellite board). Down-power the PXL controller before you remove the SB-593.

- Locate the socket with the chip to be replaced. Notice the rectangular slot in two of the chip corners. These are the slots in which the extraction tool is placed.
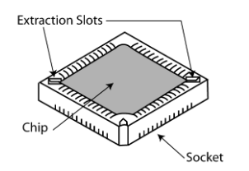
- The extraction tool has two prongs that are inserted into each end of the chip socket.
- It is important to place the prongs of the extractor tool fully into the each of the slots so that the tool sits flush on the top of the socket so as not to damage the chip and socket when the chip is extracted.
- Squeeze the tongs of the extractor tool so that the prongs rise and will release the chip from the socket.
3.0 Changing the PIC
Typically you will not be required to change the larger PIC chip as it will most likely already be at revision v2.11. In the unlikely event that the PIC is at a revision less than v2.11 then it will need to be changed. Use a small flat-head screwdriver to loosen the connection at the bottom of the PIC and then use the screwdriver to loosen the top end of the PIC. You should then be able to gently lift the PIC from the socket. Then carefully insert and press down the replacement PIC.
Related Articles
PXL Controller Firmware Upgrade (CU-500 Upgrade Kit)
1.0 Introduction PXL controllers do not have flash firmware and so they require a physical chip change. The PXL Firmware Upgrade ship kit comes with a chip extraction tool to assist with the removal and replacement of chips - failure to use the ...PXL-500 Firmware Release Notes - v8.5.16
Standalone PDF - PXL-500 Firmware Release Notes - v8.5.16PXL-500 Firmware Release Notes - v8.4.51
Standalone PDF - PXL-500 Firmware Release Notes - v8.4.51PXL-500 Firmware Release Notes - v8.5.22
Standalone PDF - PXL-500 Firmware Release Notes - v8.5.22PXL-500 Firmware Release Notes - v8.5.19
Standalone PDF - PXL-500 Firmware Release Notes - v8.5.19