PXL-500 - Upgrade Advisor
This article explains how to use the new version of the PXL Upgrade Advisor.
| 1.0 | Download the New Upgrade Advisor from here: |
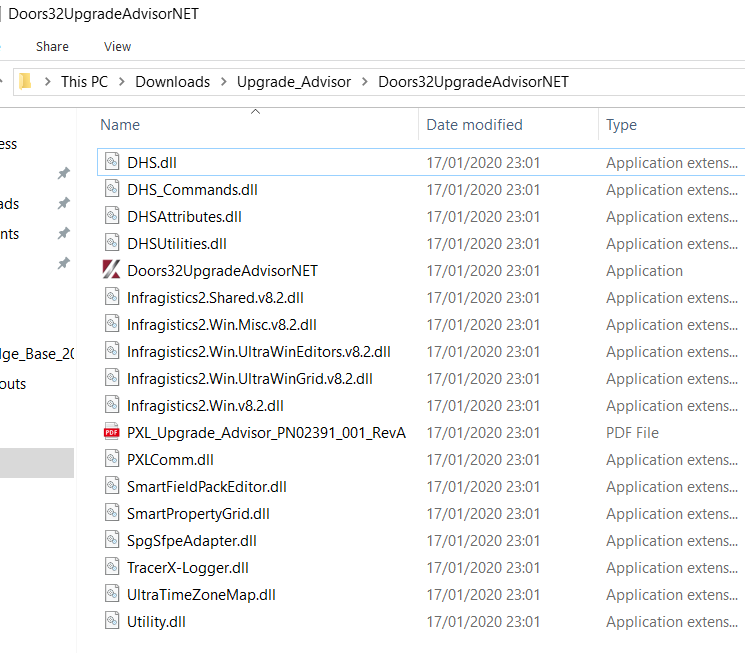
| 2.0 | Extract the Contents of the ZIP File |
- Navigate to the folder where the downloaded zip file exists:
- Right-click the file and select to extract all files.
- Several files and a Logs folder will be extracted.
| 3.0 | Disconnect from the PXL Controller Network |
From within Doors32 go to Operate >> Net Disconnect.
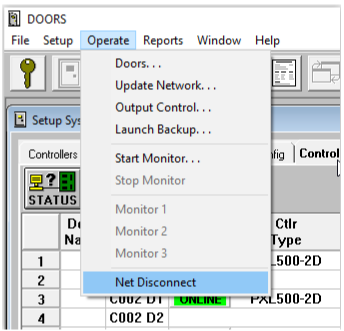
- Doors32 will then drop the connection to the PXL controllers (allowing you to connect with the upgrade advisor).
| 4.0 | Run the Upgrade Advisor Utility |
- Go back to the directory where you extracted the upgrade advisor files.
- Double-click the 'Doors32UpgradeAdvisorNET' executable.
- The upgrade advisor window will open.
| 4.1 | To connect via Serial or Modem |
The upgrade advisor utility opens up on the Serial/Modem connection tab, so for these steps you will need to return to Doors32.
- Go to Setup >> System >> Network Config. Make a note of which COM port is being used and (if applicable), any modem communication settings.
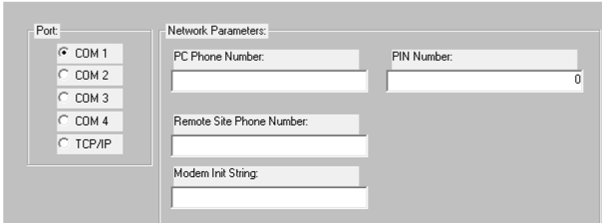
- Return to the upgrade advisor utility.
Select the appropriate PC COM port from the drop-down list. This COM port number is the COM port selected in Doors32 network config.
- Enter the PXL Primary modem phone number (if connecting via modem).
Select the appropriate modem initialization string from the drop-down list (if connecting via modem).
- Typically the PXL Primary Site ID will usually be 0. To check in Doors32 if you have multiple sites look for the SELECT SITE button. If there is no SELECT SITE button visible then you are not using multiple sites.
The PXL Primary Site PIN will also usually be 0.
- Click the CONNECT button.
Enter your Email address (e-mail address is required) and optionally you can enter a customer contact telephone number.
Click the OK button.
- In the Status Messages pane you should see a 'SUCCESSFULLY CONNECTED' message.
| 4.2 | To Connect via TCP/IP |
Again, you will need to go into Doors32. Go to Setup >> System >> Network Config. Make a note of the Remote Site TCP/IP address and check that the Remote Port Number is
10001:
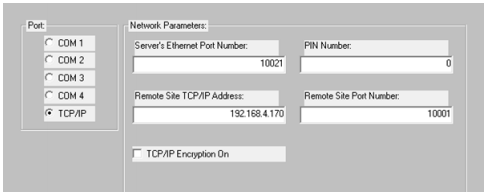
Note: If you have encryption selected, you should de-select the option then perform a smart update - you will then be able to connect to the network with the upgrade advisor. You should then re-enable encryption and update again once you have finished using the upgrade advisor.
- Return to the upgrade advisor.
- The upgrade advisor opens up on the Serial/Modem tab, so click on the second tab (TCP/IP).
- Enter the IP address for the LAN-520 connected to the Primary PXL.
- Typically the TCP/IP port number will remain at 10001 and the site ID will usually be S001.
- The PXL Primary Site PIN will also normally be 0.
- Click the CONNECT button.
- Enter your Email address and optionally you can enter a customer contact telephone number.
- Click the OK button.
- In the Status Messages pane you should see a 'SUCCESSFULLY CONNECTED' message.
| 5.0 | Generate and View the Legacy License Report |
- Once successfully connected, click the 'GENERATE LEGACY LICENSE REPORT' button.
- In the Status Messages pane you will see the message: 'PLEASE WAIT - AUTO-CONFIG IN PROGRESS'.
Note: The PXL Auto-Config process can take approx. 2 minutes to complete. - Once Auto-config is complete you will see a message notifying you to copy the report into an e-mail and send it to: 'keripxlupgrade@kerisys.com'.
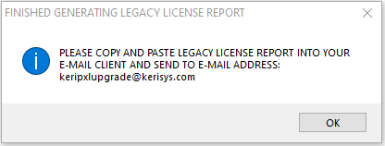
- Click OK to this message.
| 6.0 | E-Mail the Legacy License Report |
- Click on the Legacy License Report tab.
- Click the button labeled: 'COPY LEGACY LICENSE REPORT TO CLIPBOARD'.
- Open up your e-mail client.
- Click to write a new e-mail:
- In the body of the e-mail message, right-click and select Paste - the report information will appear.
- In the To: field, enter 'keripxlupgrade@kerisys.com'.
- In the subject field enter your name and the name of the site.
- Click send to send the report to Keri Systems.
| 7.0 | Review the PXL System Report |
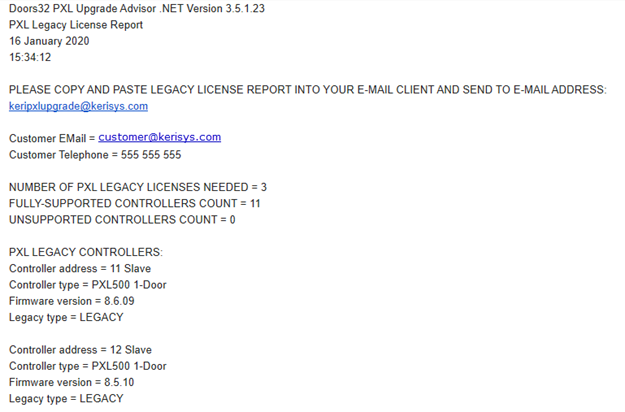
When you receive the upgrade advisor report it will detail the total number of PXL controllers that have been detected on the site. It will provide a count of the number of fully supported controllers, a count of legacy controllers (there is a charge to add legacy controllers to Doors.NET) and there will be a count of how many unsupported controllers (such as the older PXL-250 controller type) - the PXL-250 controllers are NOT supported in Doors.NET - these controllers would need to be replaced for PXL-500s.
| 8.0 | Troubleshooting |
If the Utility Fails to Connect
- Check the Doors.NET PXL Gateway is definitely stopped.
- Ensure the controller is powered up and the communication cable is connected.
- If connecting via Serial Modem connection ensure the COM port number is specified correctly.
- If connecting via TCP/IP verify that the TCP port # and the IP address is correct.
Related Articles
PXL Controller Firmware Upgrade (CU-500 Upgrade Kit)
1.0 Introduction PXL controllers do not have flash firmware and so they require a physical chip change. The PXL Firmware Upgrade ship kit comes with a chip extraction tool to assist with the removal and replacement of chips - failure to use the ...PXL and Doors32 Upgrade Data Sheet
Doors32 and PXL-500 data sheet attached.PXL-500 Troubleshooting Guide
Following is a list of possible scenarios you may encounter when setting up or using the PXL-500 controllers. You will then see a possible solution or a list of possible solutions listed in order of the most likely cause: 1.0 Controller Communication ...PXL-500 Controller Data Sheet
PXL-500 Controller Data Sheet (attached)PXL-500 Firmware Chip Change Procedure
1.0 Introduction PXL controllers do not have flash firmware and so they require a physical chip change. The PXL Firmware Upgrade ship kit comes with a chip extraction tool to assist with the removal and replacement of chips - failure to use the ...