Replacing a PXL-500 Controller
1.0 Introduction
If you need to replace a PXL-500 controller in the Doors.NET software, such as if it has been damaged, please use the following procedure to minimize the amount of system down-time:
2.0 Replacing a Primary PXL-500 Controller
- The first thing is to right-click and disconnect the controller in the hardware tree to drop
the controller connection on the PXL gateway.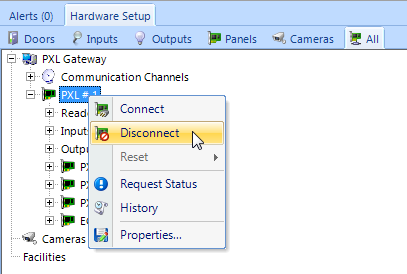
- Down-power the old controller.
- Remove the LAN-520 module, the USB COMMS Module or the serial cable.
- Ram reset the replacement controller and verify it is addressed as #1.
- Re-connect the host-controller communication device.
- Ensure the JP6 and JP7 jumpers are either OFF for a LAN-520 module or ON for a serial connection.
- You do not need to program a LAN-520 as it will retain its TCP/IP settings.
- Power up the controller again.
- Right-click the PXL Primary in the hardware tree again and select Connect.
- The controller should come online almost immediately.
- You can check the online status in the controllers grid.

3.0 Replacing a Secondary PXL-500 Controller
Down-power the Secondary PXL controller.
Install the new controller, ram reset it, then set the address to the same # as the old controller.
Power the controller back up again.
Within about 5 seconds the replacement controller should come online.
- After about 30 seconds an update will be sent to the controller automatically. You can view the update progress events in live events.
Note: Always ensure you use the connectors that come with the replacement controller (such as for the readers, power, RS-485 network and serial connection).