Setup PIN-Only Access
PIN-Only Access
1.0 Introduction
This document explains how to setup PIN-Only access when using a keypad connected to a PXL-500W or when using NXT and NXT-MSC controllers with a reader interface module.
Notes:
- The feature setup varies slightly depending on the hardware type being used - so the following setup instructions are covered for each hardware type. For example; when using the NXT-MSC controllers it is possible to immediately switch between Card + PIN and PIN-ONLY. However, with the other controller types the enrolled cardholders will always function as PIN-Only.
- When using the standard NXT controllers it is not possible to set the reader (keypad) to PIN-Only mode. If you wish cardholders to only use a PIN and not a card you would need to enroll the PIN as a 26-bit card number (primary credential) and not using the PIN field.
2.0 Using PXL-500W Controllers
When using PIN-Only with PXL-500W controllers, you have to enroll the cardholder as a 26-bit primary credential. This can be done either by entering the PIN during presentation enrollment or by manually entering the PIN.
Note: Most keypads can be configured with a specific facility code so you would need to know this facility code when using the manual enrollment method. For this setup example the keypad is set to a facility code of 115.
- From within Doors.NET, Open the hardware tree via Setup >> Hardware Setup >> All.
- Locate and double-click the controller that has the keypad connected to it.
- Ensure Advanced View is enabled for the controller properties. (To enable Advanced View go to View >> Advanced View and then enter Keri10 as the password).
- In the reader (keypad) properties verify that the correct Manufacturer Model has been selected. For example; 'P-640H'.
- Next, go to Home >> Cardholders.
- Click the ADD icon to add a new cardholder record.
- Enter a first name and a last name and save the new record.
- On the right-hand side of the screen ensure the option 'Calculate Internal Number' is checked.
- From the format drop-down list, select Wiegand 26-bit.
- Enter the facility code that the keypad is programmed with.
- In the imprint field, enter the PIN that you wish to assign to the cardholder.
Note: Because this will be enrolled as a 26-bit credential, the PIN cannot exceed 65, 535 - Set the status to active.
- Click the ADD CARD button and a unique credential ID will be generated. This number is created using a combination of the imprint and the facility code.
- Go to the Access Rights and assign a valid access group.
- Save the cardholder record.
- The cardholder will be immediately sent out to the access controller network.
- Access can then be granted at the keypad using the PIN.
3.0 Using NXT 2D/4D Controllers
The following steps cover the PIN-Only access setup when using a standard NXT controller.
- From within Doors.NET, Open the hardware tree via Setup >> Hardware Setup >> All.
- Locate and double-click the controller that has the keypad connected to it.
- Ensure Advanced View is enabled for the controller properties. (To enable Advanced View go to View >> Advanced View and then enter Keri10 as the password).
- In the reader (keypad) properties verify that the correct Manufacturer Model has been selected. For example; 'P-640H'.
- Next, go to Home >> Cardholders.
- Click the ADD icon to add a new cardholder record.
- Enter a first name and a last name and save the new record.
- On the right-hand side of the screen ensure the option 'Calculate Internal Number' is checked.
- From the format drop-down list, select Wiegand 26-bit.
- Enter the facility code that the keypad is programmed with.
- In the imprint field, enter the PIN that you wish to assign to the cardholder.
Note: Because this will be enrolled as a 26-bit credential, the PIN cannot exceed 65, 535 - Set the status to active.
- Click the ADD CARD button and a unique credential ID will be generated. This number is created using a combination of the imprint and the facility code.
- Go to the Access Rights and assign a valid access group.
- Save the cardholder record.
- The cardholder will be immediately sent out to the access controller network.
- Access can then be granted at the keypad using the PIN.
4.0 NXT-MSC Controllers
When using NXT-MSC controllers you have the option of configuring the keypad for PIN-only and there is also an option to set it to Card OR PIN. If the manufacturer model has a keypad you will see these additional options in the admin client.
To set PIN Only
- Ensure the manufacturer model is set correctly.
- In the hardware tree, right-click the reader/keypad and select Mode >> Card OR PIN or Mode >> PIN Only.
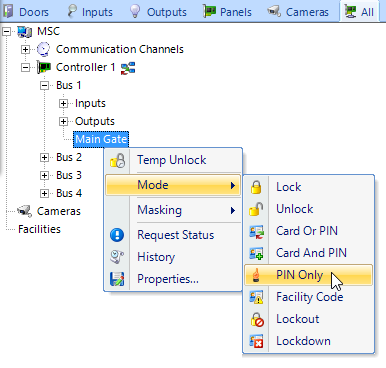
- In Live Events you will see a reader mode change event.
Related Articles
Setup Card + PIN
Card + PIN/Dual Verification 1.0 Introduction Card + PIN (or sometimes called 'Dual Verification') is an advanced feature that is supported on NXT, NXT-MSC and PXL controller types (when using a combination keypad and prox reader, such as the ...Setup Cardholder Usage Counts
1.0 Introduction When using NXT-MSC or SCP controllers you can configure the system so that cards can only be used a certain number of times. Each cardholder can be configured with its own 'Usage Count' ranging from 1 - 256. Once this count has been ...Global Linkage Setup - Standalone Document
Global Linkage Setup Guide - Standalone Document (attached)Setup a PXL-500 Controller
1.0 Introduction IMPORTANT NOTE: The PXL and Entraguard controller types are not supported with Doors.NET version 6 (v6.0.0) and future versions. Ongoing support and development for these products will be in Borealis. Doors.NET v5.4.0.8 was the last ...Advanced Situation Manager Setup Guide
1.0 Introduction Advanced Situation Manager is an extension of the Global Lock and Global Unlock features that are available. You can not only use the Situation Manager for unlocking and locking doors but you can create different system behavior for ...