Setup Automated Database Backup
1.0 Introduction
The following procedure explains how to back up the full database automatically onto a remote memory device (such as a thumb drive/memory stick) and then how to restore the database onto a new computer. Keep in mind the new computer will require you to install the latest version of the Doors.NET software (including the default SQL database) and then for you to obtain a new Doors.NET software license; you cannot use the same license that was on the old computer.
Doors.NET includes the ability to schedule a system backup to be automatically created once a week, every week. This is included in the standard and professional versions of Doors.NET. The feature is setup via the License Manager. By default, scheduled backup is enabled and is configured to create a backup at 23:00 every Friday.
The following procedure explains how to back up the full database automatically onto a remote memory device (such as a thumb drive/memory stick) and then how to restore the database onto a new computer. Keep in mind the new computer will require you to install the latest version of the Doors.NET software (including the default SQL database) and then for you to obtain a new Doors.NET software license; you cannot use the same license that was on the old computer.
2.0 Creating the Backup
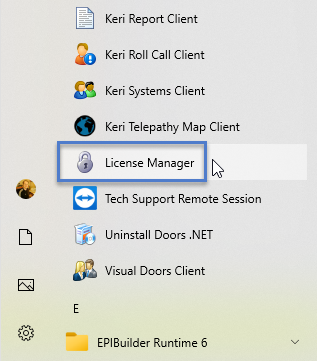
- From the Start Menu go to All Programs >> Doors.NET >> License Manager (or from the C:\Keri\DoorsNET directory).
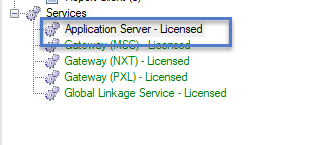
- Click on Application Server from the list of installed components on the left (it should be highlighted in green).
- Click the Settings button on the right.
- Click on the Backup tab.
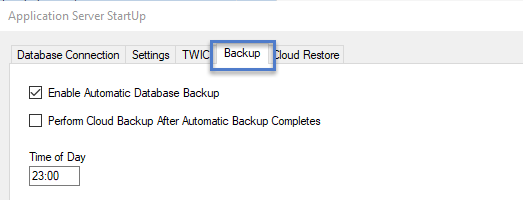
- Verify that 'Enable Automatic Database Backup' is selected.
- Enter the time of day that you wish the backup to be created (as you will see, the default time is 23:00).
- Select a day that the backup will be performed (as you will see, the default day is Friday).
- Make a note of the backup filepath (by default, you will see that the default backup location is C:\Keri\DoorsNET\Backups.
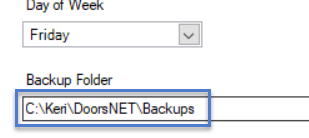
- Use the default file path for the backup file to be saved, or specify a new location, such as an external hard drive or USB thumb drive.
Note: When using a thumb-drive, be aware that the drive letter may change if plugged into a different port than originally used during configuration. - Click the Save button.
- Click Yes to the prompt to restart the Application Server Windows Service.
- If the software is open at the time the scheduled backup occurs, there will be backup events generated in the Live Events grid.
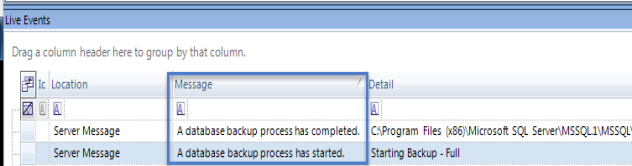
- As well as the specified backup folder location a copy of the database will also be save in C:\Program Files (x86)\Microsoft SQL Server\MSSQL.1\MSSQL\Backup (as shown in the image above in the detail field).
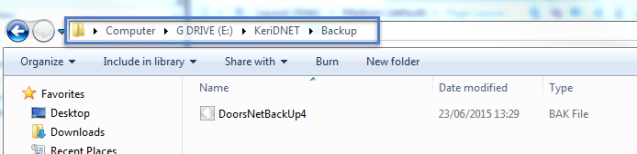
- Check the USB drive to ensure the backup file has been created.
- If a backup file already exists in the specified file location of the License Manager, this old file will automatically be overwritten with the new one.
3.0 Advanced Setup - Using System Calendar
Note: System Calendar is a system-add-on that must be purchased and enabled on your license. It is not included with the standard version of Doors.NET.
- Click the System Calendar icon in the ribbon bar.
- Click the New Appointment icon.
- Input a description in the subject text field.
- Input a start time for when you want the automatic backup to take place. An end time is automatically created which does not need to be altered.
- Click on the Categories tab.
- Select Backup.
- Go to the Start Action tab and put a check mark against 'Full Backup'.
- Click the Save and Close link.
- Click the Save All icon in the upper left corner.
- The Appointment description and time will appear in the appointments list.

- At the Start time an event will appear in live events: "A database backup process has started", followed by "A database backup process has completed".
- You can find the backup (.bak) file by navigating to the following location on a default installation: C:\Program Files\Microsoft SQL Server\MSSQL.1\MSSQL\Backup.

4.0 Restoring the Database
4.1 Delete the Default Database
You will need to install the Doors.NET software on the new PC. During the installation you should select to install the default database – this is the quickest method of installing the required SQL database instance and associated username and password that are used to connect to the restored database.
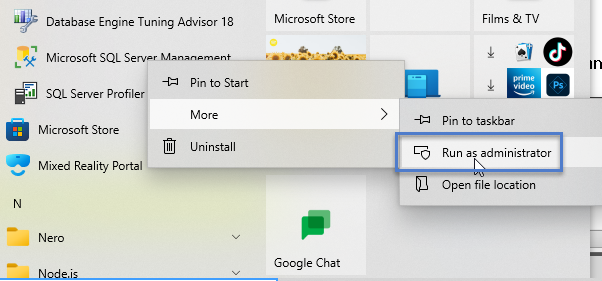
Once software has installed open up SQL Studio Manager via the start menu. You should right-click on the icon and select to: “Run as administrator” to avoid any possible permissions issues.
Click the Connect button on the login window.
- Double-click Databases on the left.
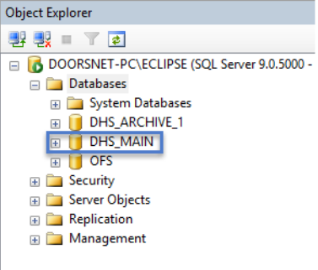
You should see the Doors.NET database listed. It will be named DHS_MAIN.
- Right-click DHS_MAIN and select Delete.
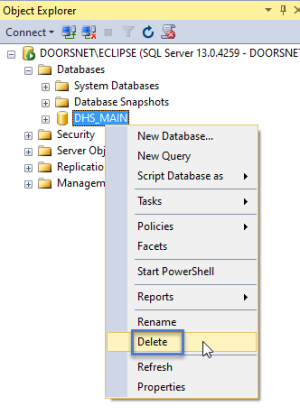
- Place a checkmark against ‘Close existing connections’. Then click OK.
The database files will automatically be detached and deleted from the host PC. Ready for you to restore the backup database.
4.2 Restore the Backup Database
- Insert the USB/thumb drive into the new PC.
Log into Studio Manager again if you are not still logged in.
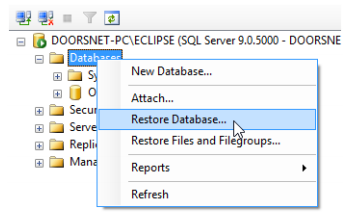
- Right-click Databases and choose Restore Database.
Select ‘From Device’ then click on the browse button.
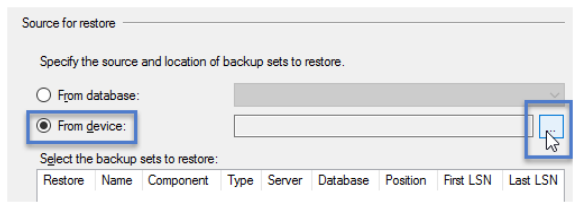
- On the Specify Backup window, click the Add button.
Locate the drive for the USB/thumb drive. It is likely to be at the bottom of the list.
- Double click the drive.
Open the folder which contains the backup file.
- Select the database backup file then click OK.
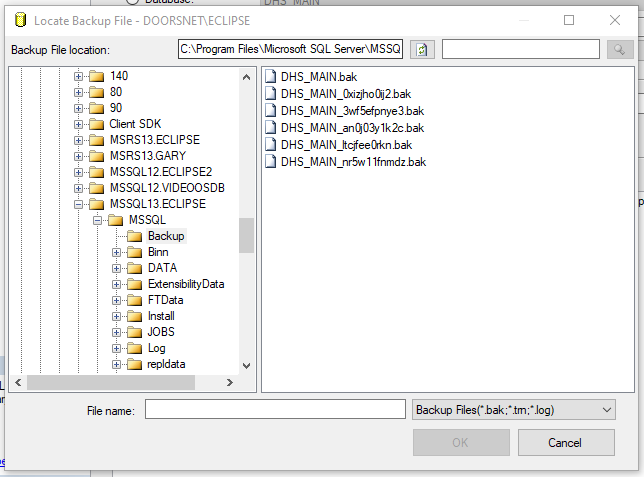
Click OK again on the Specify Backup window.
- Place a checkmark against Restore and at the top of the Restore Database window select the database backup name from the drop-down list.
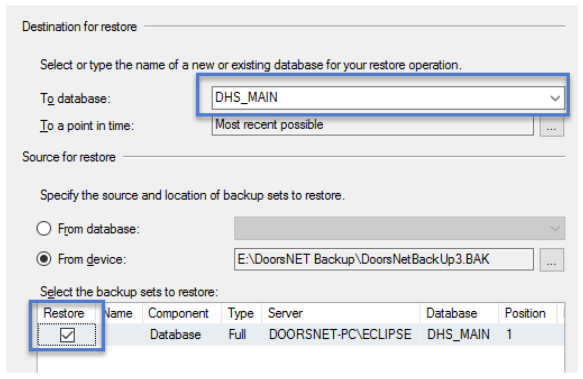
- Click the OK button and the database restoration will begin.
Related Articles
Scheduled Database Backup and Restore - Standalone Document
Scheduled Database Backup and Restore - Standalone Document (attached)Quick Database Backup
Backup The backup features is a very simple means of creating a full backup of the entire Doors.NET database. There is no configuration required and the backup process completes very quickly. On the top toolbar click on the 'Tools' tab. The Backup ...Backup the Doors.NET Database
This procedure describes a backup process for Doors.NET databases using Microsoft SQL Studio Manager 2019, however, the procedure is almost identical to other versions of SQL Studio Manager. Note: These instructions specifically cover a Disc backup; ...Doors.NET Cloud Backup and Restore Setup - Standalone Document
Doors.NET Cloud Backup and Restore (PDF) PN:02438-001 Rev A (attached)System Calendar - Scheduled Backup (i.e Daily)
Included in Doors.NET is an automated backup feature that, by default, backs up the entire system once a week (at 23:00 every Friday). However, you can use System Calendar to backup the system every day if you wish, or multiple times every day. ...