Setup Time Schedules in Visual Doors
Time schedules are assigned to access groups to determine the hours in which cardholders are able to gain access. They are also used in Auto Unlock Schedules (AUL). AUL schedules are assigned to doors to determine when the door should automatically unlock and then re-lock again.
Time Schedule Limitations
When using Visual Doors, multiple hardware platforms are supported (except when using the Neutron controller type). Otherwise you can use any combination of the following hardware types:
- PXL controllers
- Entraguard controllers
- Standard NXT controllers
- NXT-MSC (Mercury Security) controllers.
When using a combination of different hardware types the Visual Doors software will limit itself to the 'lowest common denominator' - for example, if your system uses PXL and NXT-MSC controllers then Visual Doors will be limited to the values imposed on the PXL hardware type.
| Hardware Type | Time Schedules | Intervals per Schedule | Intervals per Day | Intervals per Week |
| PXL | 32 | 4 | 4 | 28 |
| Entraguard | 32 | 4 | 4 | 28 |
| Neutron | 12 | 50 | ||
| NXT | 64 | 12 | 50 | |
| NXT-MSC | 255 | 12 | 84 |
Create a New Time Schedule
- From the home screen, click the Time Schedules tile.
- The Time Schedules screen will open and any existing time schedules will be listed on the left.
- Click on the Add icon.
- Then select the new schedule.
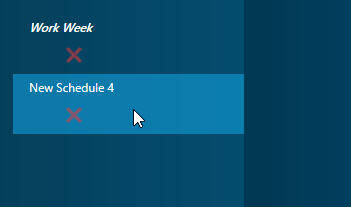
- Rename the new schedule.
- Enable the new schedule.

- Click the save icon.
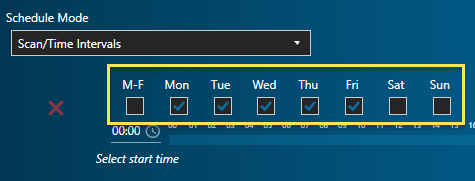
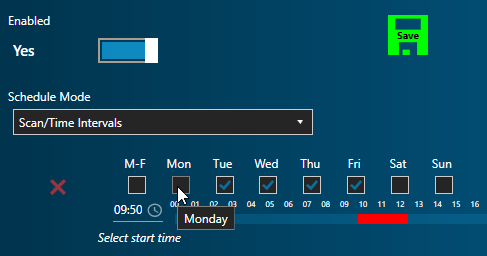
- Click on Add Intervals to Time Schedule icon.
- Place a check mark in any day of the week that the schedule will be active on. Or use the M-F option to select Monday-to-Friday.
- Save the schedule.
- Next, click the Select start time clock icon.
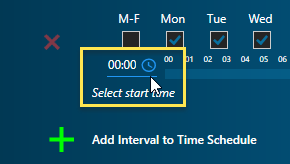
- A clock will appear allowing you to set the start time. First select the start time hour and then select the start time minute.
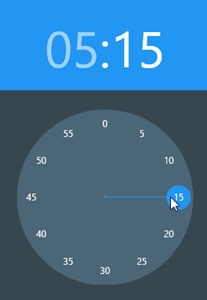
- The start time will then be set.
- Click on the Select end time clock icon and use the same method to set the end time for the schedule.
- Finally, click the green save icon and the new Time Schedule will be created.
- The schedule can now be used as an auto-unlock schedule or to define when cardholders can gain access.
Edit Time Schedules
It is very simple and straight-forward to make changes to existing time schedules. For example, you may wish to define a different start and end time for Mondays.
- From the Time Schedules page, deselect Monday from the existing schedule, then save.
- Click Add Interval to Time Schedule.
- Select Monday for the new interval.
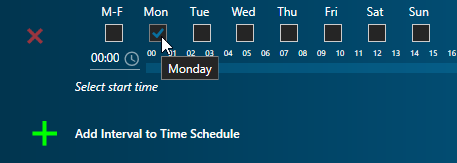
- Click the start time clock and set a new start time.
- Click the stop time clock and set a new stop time.
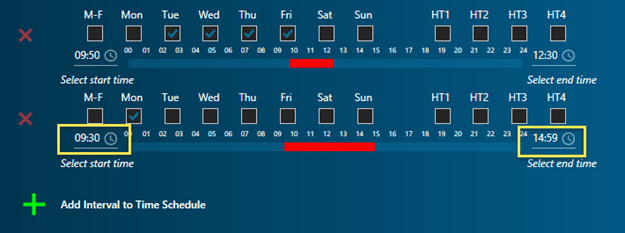
- Save the new time schedule settings.
Related Articles
Auto Unlock Time Schedules in Visual Doors
Once time schedules have been setup they can be used to automatically unlock and lock doors. For the following example the work week time schedule will be assigned to a specific door to automatically unlock the door as per the start and end times ...Visual Doors Data Sheet
Visual Doors Data Sheet (attached)Visual Doors - Full Reference
Visual Doors - Full Reference Guide - P/N: 01691-001 - Rev B (attached)Assign Holidays in Visual Doors
Holiday Assignment Once Holidays have been setup, they can be assigned to Time Schedules. For example, you may have a schedule that automatically unlocks certain doors during the day. When you enable 'Type 1' holidays (HT1) on that schedule, any ...Setup Holidays in Visual Doors
Create a New Holiday Click on the Holidays tile located on the home screen. Click the Add icon. Give the Holiday a new name. Set the holiday to being enabled. Set the type for the holiday (default is Type 1) - If you want all your holidays to make ...