Telepathy - Alerts and Alert Acknowledgement
You can use alerts in the map client to provide enhancements to the system event monitoring. When a hardware object (for example: a reader or input) is setup, as an alert, the icon on the map will be more clearly identified (it might be constantly rotating),the event will also be displayed in the alerts grid (located at the bottom of the Maps screen.
You can also setup an alert to require acknowledgment, so the event will continue to display until it has been acknowledged by a system operator. You can also require the system operator to enter notes or a specific password before the event is cleared.
Creating an Alert
The following steps explain how to setup an alert for a door forced-open event at a specific reader. An alert is setup using the standard Doors.NET client.
Create the Filter
- Log into the standard Doors.NET client. (Default username and password - both admin.
- Go to Setup >> Filters.
- Click the Add Filter button.
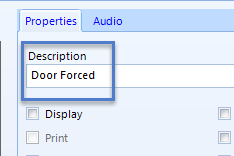
- Enter a new description for the filter, for example Door Alert Filter.
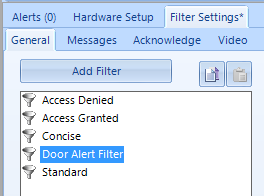
- Press the save icon (upper left corner)
 .
. - Go to the Messages tab and locate the specific message type; 'Reader Contact - Forced Open'.
- Select this specific message.
- Save
 again.
 - Go to the Acknowledge tab and select for 'Reader Contact - Forced Open' to be acknowledged.
- Save once again.
Assign the Filter
While still in the Doors.NET client:
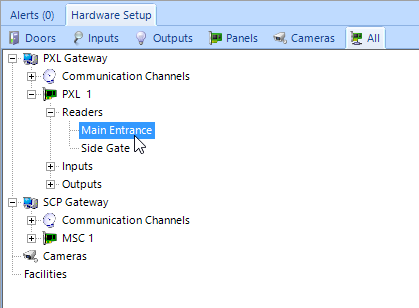
- Go to Setup >> Hardware Setup.
- Expand the controller in the hardware tree and locate the reader that you will sign the alert to.
- Select the reader and the reader properties will be on the right.
- Ensure that Advanced View is enabled for the properties. Click the orange atom icon to toggle the feature On/Off.
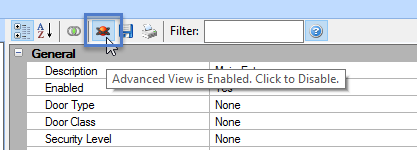
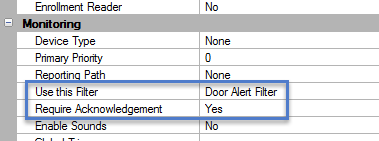
- Scroll down the reader properties and locate the Monitoring section.
- Set Use this Filter to the new filter you just created.
- Set Require Acknowledgment to Yes.
- Save the reader properties.
- The reader is now setup to create alerts.
Receiving and Confirming Alerts
Now that the reader is setup to generate alerts, it will create an alert every time the door-forced event occurs.
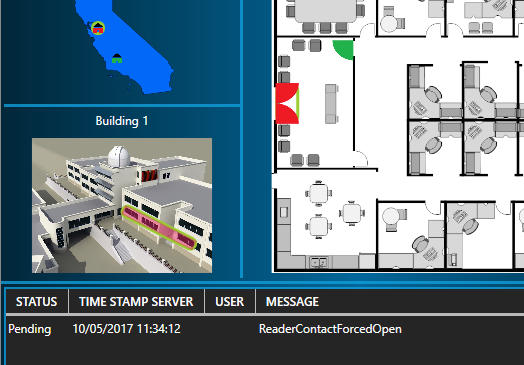
Alerts can be viewed from the bottom grid of the Telepathy client. When the specific alert appears in the alerts grid, the door icon that represents that specific door will also be displayed more animated than just simply changing colour. By default, all the library icons in alert state will rotate and pulse in size. You will have to confirm the alert AND return the door to its closed state before the icon goes back to displaying normally.
- From the Telepathy home screen, click on the Maps icon.
- You will see the alerts grid located at the bottom of the screen.
- Force open the door that you are working with.
- The icon for that door will be displaying differently.
- The alert text will appear at the top of the alerts grid (the information includes a time stamp of when the event occurred, the message type and the name of the reader).
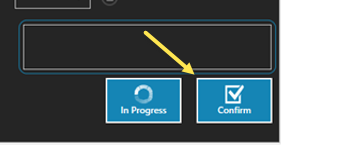
- To confirm the alert, double-click the text, then click the confirm button and the alert text will disappear.
NOTE: The door icon will only go back to its normal state once the alert has been cleared AND when the door has returned to its secure/closed state.
Alert Acknowledgment
By default, to confirm an alert all you need to do is click the Confirm button. You can however, also configure an alert to require specific operator-input, such as some notes or a specific password before the alert can be confirmed. Alert Acknowledgment is configured using the Device Type settings in the Doors.NET standard client.
Require a Password
- Log into the standard Doors.NET client. (Default username and password - both admin.
- Go to Setup >> Device Types.
- Click Add Device Type button.
- Enter a description for the new device type, for example, Door-Forced.
- Select Must Confirm.
- Select Require Password.
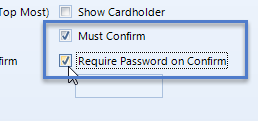
- Enter a specific password that will need to be entered by the operator to confirm the alert.
- Save the device type (save icons in the top-left).
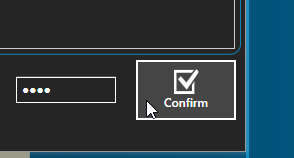
- To clear the alert in the Telepathy client, you will need to enter the specific password and then click Confirm.
Require Notes
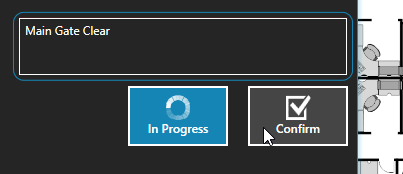
When the alert is configured to 'Require Notes', the operator will have to enter a note before the alert can be confirmed within Telepathy. The note must be at least 3 characters in length.
- Follow steps 1-4 from the previous section.
- Ensure Must Confirm is selected and Require Notes.
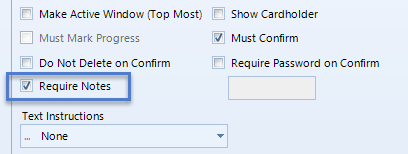
- Save the device type (save icons in the top-left).
- To clear the alert in the Telepathy client, you will need to enter notes before you can confirm.
Related Articles
Telepathy Introduction
Introduction to Telepathy The Telepathy map client provides you with a graphical representation of your integrated security system. Know when a door has been held or forced open. Know if an input on the system goes active (motion detection, fire ...Telepathy Data Sheet
Telepathy Data Sheet (attached)Telepathy - Maps
The Maps are from where you monitor your system. They are the combination of building images, floor plans and sensor icons and the Maps section is where you graphically monitor you access control system in real-time. The Maps screen is also where you ...Telepathy - Icon Editor
Viewing and Editing Existing Icons The icons which exist in the icon library can all be viewed and edited within Icon Editor >> Icon settings. From the home screen, click on Icon Editor tile. The icon library will be on the left and the icon settings ...Telepathy Installation
The Telepathy map client is installed by performing a 'custom installation' of Doors.NET. Then ensure Map Client and Map Editor is selected from the list of available clients to install. Following installation, you will need to activate your ...