Automation - Unlock and Lock Doors From an Input
1.0 Introduction
The Automation feature in Borealis allows you to use an input to unlock a door or all doors on a controller, for example from a fire alarm input. When the input goes active the door will unlock and when the input goes inactive the door will re-lock. Additionally, if you are using a keypad you could put the keypad into Card + PIN mode when the input is active and the back to Card-Only mode when the input is inactive.
The input must be configured in Borealis as a Monitor Point - so it could be an available input on an NXT 4x4 module or an unused REX or door contact input which has been programmed as a Monitor Point.
The following setup example will use an unused door contact input on bus 2 of a controller (configured as a Monitor Point).
Note: Automation can be used to program doors to unlock on a specific controller... it is not possible to have an input on one controller triggering an action on a different controller.
2.0 Configure an Available Door Contact Input as a Monitor Point
This example will use a door contact input on bus 2 to unlock the door on bus 1. It is then a simple tasks of adding all doors on the controller so they all unlock when the input goes active.
- In Borealis, go to Hardware >> All. This will display the hardware tree.
- Expand the controller's bus 2 and then expand the inputs on bus 2.
- Select the door contact input on bus 2.
- Click the EDIT button on the right side of the screen.
- Give the input a new description, such as: Fire Alarm Input.
- Change the input type to Monitor Point.
- Set the Line Supervision to Normally-Open or Normally Closed. If the input is set to Normally-Open it will be active (alarm) when the input closes and it will be inactive (secure) when the input is open.
- Click the SUBMIT button to save the input settings.
3.0 Setup the Input (Active) as an Automation Trigger
The next step is to setup the input as a trigger in Automation. Initially a trigger must be defined for when the input goes into alarm state.
- From the main menu on the left click on Automation>> then Automation Rules.
- In the upper-right, click on the CREATE RULE button.
- Select the site, then the controller, then click NEXT.
- Enter a name for the input trigger, for example: Fire Input Active.
- Expand Inputs then put a check-mark against Monitor Point. Click NEXT.
- From the Trigger Source list, select: Alarm: Input is Active.
- The transaction type displayed on the right should be left at the default of 'Change of State'. Click NEXT.
- Select the Fire Alarm input was that configured in the previous section. Click NEXT.
- The Trigger Schedule defaults to Always - this means the designated input will be an Automation trigger 24/7.
- The Advanced Trigger Logic should remain at the default of disabled. Click NEXT....
You can now create the Macro which will unlock the door when this input goes active.
4.0 Create the Macro to Unlock the Door
- Click the NEW MACRO button.
- Enter a name for the new macro. For example: Unlock Door.
- Click the ADD ACTION button.
- From the Action Item Type drop-down list, select Reader Mode Control.
- Action Item Prefix should be left at the default of Type A.
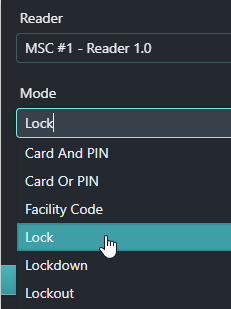
- From the Reader list select the specific reader you wish to unlock.
- Set the Mode to Unlocked.
- Click the SAVE MACRO button.
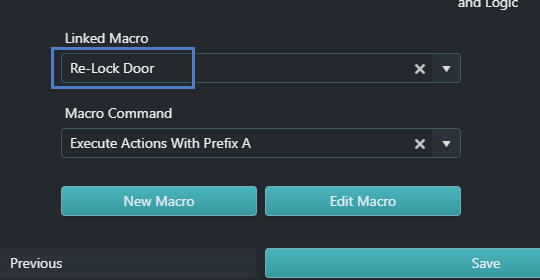
- On the Automation screen, select the new Macro and set the Macro Command to: 'Execute Actions with Prefix A'.
- Then click the SAVE button on the Automation Rule screen.
- The new Automation Rule will now appear on the Automation Rules Screen.
5.0 Test that the Door Unlocks When the Input Is Activated
- At this point you can now test that the designated door does unlock when the input is active.
- Activate the input on bus 2.
- The door should immediately unlock.
- The following events should appear in live events (although they may be displayed in a different order).
A second Automation Rule must now be created - this will re-lock the door when the same input goes secure...
6.0 Setup the Input (Inactive) as an Automation Trigger
You should now perform the exact steps defined in section 3.0... the only difference is that the trigger source will be Inactive: Input is Inactive.
7.0 Create the Macro to Re-lock the Door
You should then perform the exact steps as outlined in section 4.0 - Only this time the Mode will be different - it will be set to Lock as opposed to Unlock.
And on the assign macro screen you would need to select the re-lock macro.
8.0 Test that the Door Locks When the Input Is Inactive
You should now have two Automation rules listed. The first one to unlock the door when the input is active and the second one to re-lock the door when the input is inactive.
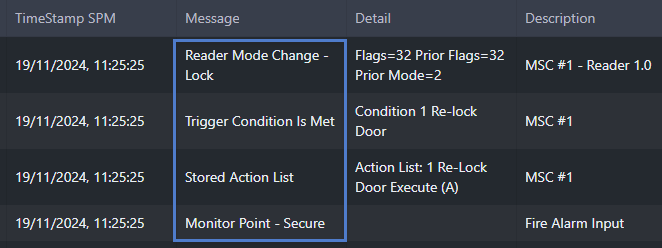
When the designated input on bus 2 is inactive the door should re-lock and the following events should appear in live events.
Related Articles
Automation
1.0 Introduction Automation allows you to create custom action sequences to automate system functionality. If you are familiar with Doors.NET and the Advanced Local Linkage functionality, automation is the equivalent feature in Borealis. Automation ...Lock and Unlock Doors
1.0 Introduction Reader Control allows you to lock, unlock or temp unlock any door on the system. A temp unlock will unlock the door for the same duration as following a valid card read. You can send remote lock and unlock commands to a single door ...Site Lock and Site Unlock
1.0 Introduction The Site Lock and Site Unlock feature allows you to unlock all doors or a selection of doors on a specific site - either from buttons in the user interface or from a general-purpose input. In addition to locking and unlocking doors, ...Automation - Toggle a Door (to alternate between lock and unlock)
Toggle a Door Using Automation Rules 1.0 Introduction The following Automation rule explains how to setup a toggle feature on an NXT-MSC controller or True Mercury controller. This setup uses the 'Double Presentation' feature to trigger the unlock of ...PXL - Global Unlock
1.0 Introduction This section explains how to enable the standard implementation of the Global Unlock feature using the dedicated Global Unlock input on a Primary PXL controller (controller addressed #1). The dedicated Global Unlock input is ...