Design Mode - Custom LED Modes
1.0 Introduction
When using Mercury and NXT Mercury-Powered controllers there are three available default LED modes defined in the software that control how the reader’s LEDs behave when the various modes are set to the readers. Examples of these modes are; Unlocked, Lockdown, Lockout, PIN only, Card + PIN, Access Denied, Access Granted, Locked, etc. By default, all readers connected to Mercury and NXT Mercury-Powered controllers are set to use LED Mode 1 and single-line LED control. You can use the Design Mode feature to edit any one of the default LED modes.
2.0 Default Reader LED Mode (Single-Line)
By default, NXT Reader Interface Modules (RM3 and WI+) are configured for single-line LED mode (D5 LED is solid green and the D1 LED is solid red) and the module is programmed with 03.03.21 firmware. Therefore the Wiegand reader should be wired with a single LED wire that connects to PIN 3 of the reader interface module (there is no wire that connects to pin 4).
- Locked, Card And PIN, Card Or PIN or PIN Only - Solid amber LED.
- Unlocked or access granted - Solid green LED.
- Door forced or held - Flashing red LED.
- Access denied - momentary red LED.
3.0 Setup Custom LED Modes in Design Mode
- Login to the software and click the Design Mode icon
 .
. - Click Setup >> Hardware Setup.
- Double-click an NXT-MSC controller in the hardware tree.
- You will see LED Modes node located directly beneath it.
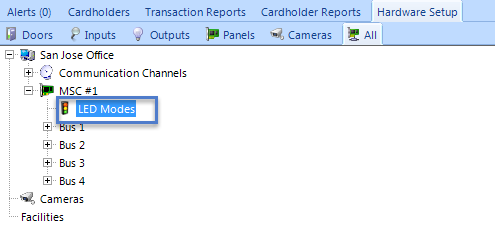
- Highlight LED Modes and from the ribbon bar click Add LED icon.
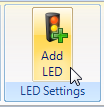
- An Undefined LED Mode entry will appear in the hardware tree.
- Highlight the new LED Mode and the properties will appear on the right.
- From the properties, select one of the default LED Modes (i.e Mode 1). LED is the best mode to edit because by default all readers on the system are assigned this mode. plus it contains all the most commonly used LED behavior for events such as: Access Granted, Access Denied, Door Forced, RTE, Lockout etc.
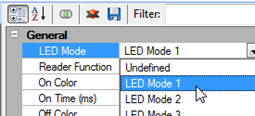
- From the Reader Function, select a specific reader mode (such as Card + PIN).
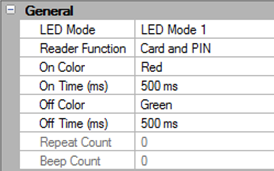
- Set the On Color, On Time and Off Color options and decide how you wish the LED to behave during Card + PIN mode.
- The following settings will result in the reader LED alternately flashing between red and green when in Card + PIN mode.
- Save these settings, then highlight a reader in the hardware tree.
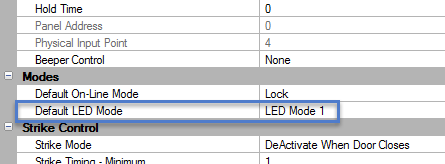
- Verify that the reader is set to the default LED Mode of 'Mode 1' - You will need to be in Advanced View to see this setting.
- Click the Design Mode icon again to exit Design Mode and return to the standard mode.
Related Articles
What is Design Mode and How is it Used?
Doors.NET Design Mode Overview The Design Mode feature is only enabled if you are a System Administrator. If you have the standard version of Doors.NET you will also need to have Advanced View enabled. The feature allows you to perform a variety of ...Design Mode - Custom Labels
1.0 Introduction Each cardholder record includes 18 custom fields allowing you to add custom data to any or all of the cardholders. For example; you can keep a record of the License Plate/Car Registration number, Company Name, Payroll Number, Project ...Design Mode - Simulate Credentials
1.0 Introduction Design Mode also gives you the ability to simulate the presentation of a credential at a reader. This is useful for verifying updating of the controller network and for checking access rights for a cardholder without physically ...Design Mode - Cardholder Templates
1.0 Introduction You can use Cardholder Templates and Design Mode to automatically assign the same access group/groups to all block enrolled cards, to assign them with the save company contact information, set certain Advanced cardholders settings or ...Design Mode - Transferring Controllers
Design Mode offers another time-saving feature, which is to move a controller to a different gateway (if the system utilizes multiple gateways of the same type). It can potentially save a lot of time in terms of configuring the controller settings. ...