dormakaba Lock Integration Setup Guide
1.0 Introduction
From Doors.NET v5.1.0 you can integrate with the dormakaba Wi-Q
wireless technology access control products (when using Mercury's LP4502
controller).
This guide walks you through the process of setting up the Wi-Q Gateway, the Wi-Q Controllers and configuring the LP4502 controller in the Doors.NET software.
This guide assumes that you have worked through the dormakaba
Wi-Q Gateway installation instructions, signed-in Wi-Q Controllers and
have setup the Wi-Q Gateway to communicate over TCP/IP with an LP4502
controller.

The supporting Wi-Q documentation also includes instructions on the following;
- Configuring the Wi-Q Gateway with a static IP address.
- Performing a deep reset on the Wi-Q Gateway.
- Steps for performing a site survey. The survey is useful for positioning the Gateway antennas for optimal communication with the controllers.
- Enabling the interface to the Mercury LP4502 controller.
- Signing-on Wi-Q Controllers to the Wi-Q Gateway.
2.0 General Notes and Capacities
- Doors.NET integrates with the dormakaba Wi-Q technology using the LP4502 controller (over TCP/IP).
- The Mercury LP4502 can communicate with up to 32 Wi-Q Gateways with up to 64 Wi-Q Controllers.
- If using less than 62 Wi-Q controllers you will still be able to use the controller's two readers and relays for general access control. The LP4502 readers will both be disabled if 64 Wi-Q controllers will be used.
- One Wi-Q Gateway can control as many as 64 Controllers.
- The Wi-Q Gateway can be powered via an external 12VDC power-supply or via PoE.
- All wireless communications are via secure AES 128-bit encryption using spread-spectrum 2.4GHz radio frequency.
- SSL encryption between the LP4502 and the Wi-Q Gateway.
- Transmit range from Gateways will be dependent upon building construction.
- Supported card technologies: Magnetic stripe, Prox and MIFARE (CSN-only).
- 512 timezones (per segment).
- Each lock can store up to 14000 user credentials.
- The BEST heavy-duty locks can be powered by batteries that last for 2 years.
- ADA (Americans with Disabilities Act) compliant.
- The Wi-Q Gateway is designed to operate with Wi-Q Technology BEST 45HQ Mortise and/or BEST 9KQ cylindrical locksets.
- All wireless communications are via secure AES 128-bit encryption.
- The software must be installed and the Gateways online before the controllers can be added and configured. Once Wi-Q Controllers are installed, sign them onto the Wi-Q Gateway.
- When installing the Wi-Q hardware it is essential that you create a record of the MAC address, device name and location of each device to be installed.
- Following a soft reset on the Wi-Q Gateway or after power-cycling it will take a few minutes for the Gateway and controller(s) to boot and come back online.
- Required firmware for the Wi-Q Gateway = 4.11.7 (firmware can be updated via the Gateway portal).
Important Note: It is very important to keep a note of the sign-on key that is used when initially signing-on the locks. If a deep (factory) reset is performed on the Wi-Q Gateway you will need to set the gateway back to using the original sign-on key.
3.0 Doors.NET Licensing Requirements
dormakaba lock integration is a licensed feature and therefore will need to be enabled on your Doors.NET license. The dormakaba hardware type must be enabled on your license - as well as the number of locks that will be used (in total and per controller).
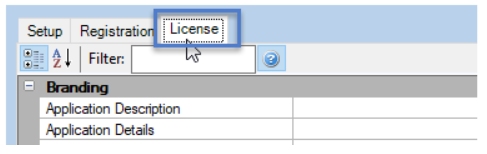
To verify dormakaba hardware type is enabled:
- From the Windows Start Menu, go to Doors.NET >> License Manager.
- Right-click License Manager and select 'Run as Administrator'.
- Select Application Server from the list on the left.
-
Click the License tab.
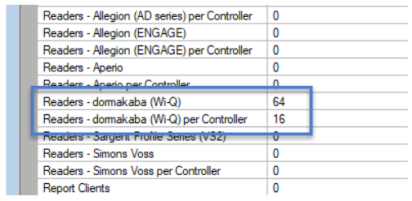
- Within the Capacities section, verify that
Readers - dormakaba (Wi-Q) and Readers - dormakaba (Wi-Q) per Controller
both have positive values set (other than 0).
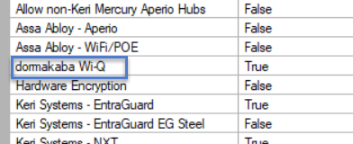
- Scroll down further to the Supported Hardware section and verify that dormakaba Wi-Q is also True.
4.0 LP4502 Controller Configuration
The LP4502 locates the Wi-Q Gateway on the local area network
and allows you to then import the gateway into the Doors.NET software.
The Mercury LP4502 supports all Wi-Q technology wireless controllers via
the Wi-Q Gateways. When installing the Wi-Q hardware it is essential
that you create a record of the MAC address, device name and location of
each device to be installed.
- If your controller does not have overwatch installed, contact Keri Systems to obtain the appropriate firmware file.
- The dormakaba integration requires the LP4502 to have Overwatch installed and the controller firmware to be at a minimum of v1.29.
4.1 Setup Overwatch on the LP4502 controller
- Ensure the LP4502 controller has been updated with the Mercury Overwatch firmware. Click >> here << for controller firmware upgrade instructions.
- Open a web browser and in the address field, enter the LP4502 IP address.
- Log in to the controller with the controller's user name and password - (the defaults are: admin/password).
Note: To use the default user name and password you will also need to transition the SW1 DIP switch to the off, then on position. - From the list of properties on the left, locate the Overwatch setting. Add a new Overwatch user name and password, then click the ADD USER button. This user name and password will need to match what is configured in the Wi-Q Gateway (in the Mercury Interface Configuration).
- Ensure the listening port in the controller settings matches what is set in the Wi-Q Gateway settings (the default port number is 1883).
- In the LP4502 settings >> Security Options, ensure that 'Enable Encrypted Partition' has a checkmark.
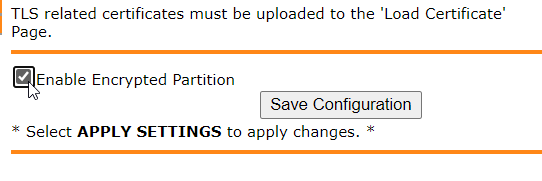
- Click the SAVE CONFIGURATION button.
- Click the APPLY SETTINGS link on the left.
- Finally, click the APPLY SETTINGS, REBOOT button.
- The controller will momentarily go offline.
- Open Doors.NET and go to the controller status tab to verify when the controller is back online.
4.2 LP4502 SSL Certificate
SSL must be used to communicate with the Mercury controller. Most installations will use the default, pre-loaded Mercury certificate (so Select Use Mercury Certificate) or select Load Certificate to optionally load your own SSL certificate into the Wi-Q Gateway. If this option is used then the same certificate needs to be loaded into the LP4502 controller and in the Wi-Q Gateway (using your own SSL certificate is not covered in this document).
4.3 Configuring the LP4502 controller in Doors.NET
This section assumes you have already setup the LP4502
controller in Doors.NET and have updated the controller with the Mercury
Overwatch firmware. The controller should now be online and ready to be
configured.
- In Doors.NET, go to Setup >> Hardware Setup >> All. To display the hardware tree.
- Expand the hardware and select the LP4502 controller.
- In the hardware properties, ensure that Advanced View is enabled.
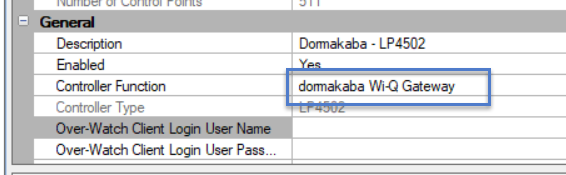
- Locate the General properties and change the controller function from Normal to 'dormakaba Wi-Q Gateway'.
- Enter the Over-Watch username and password (as configured in the controller
settings and in the Wi-Q Gateway settings).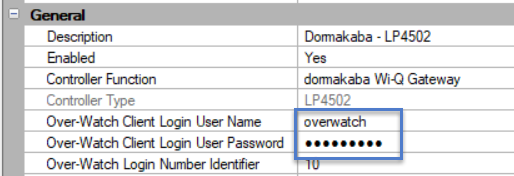
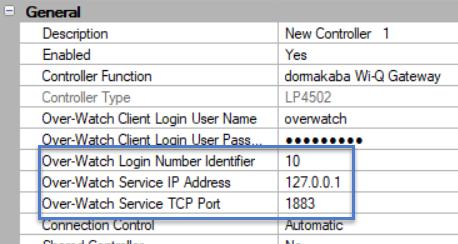
- The Login Number Identifier can be left at the default of 10.
- The Over-Watch Service IP address should be set to 127.0.0.1 (loopback address).
- The Over-Watch Service TCP Port number should
be set to the default of 1883 (or the listening port number as
configured in the Wi-Q Gateway and the LP4502 controller).
- Save the controller settings.
- You will now be prompted to reset the LP4502 - so confirm to go ahead with this.
- In live events, look for an event that indicates the Overwatch service is logged-in
successfully.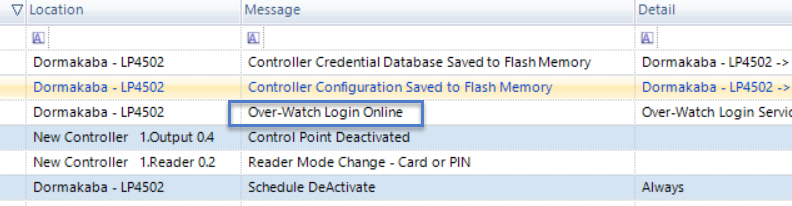
Note: The Overwatch service log in event does not indicate that the Wi-Q Gateway is online. It is just an indication that the Overwatch service is working on the LP4502 controller.
5.0 Add the Wi-Q Gateway in Doors.NET
- Select the LP4502 controller on the hardware tree.
- In the hardware select ribbon bar, click on the Wi-Q Gateway icon.
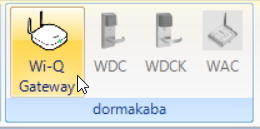
- A Wi-Q Gateway node will appear on the hardware tree.
- Select the Wi-Q Gateway.
- Ensure Advanced View is still enabled for the hardware properties.
- In the Gateway properties, enter the MAC address and the Sign On Key.

Note: If you are unsure of the MAC address or Sign On Key, these can be found by
logging into the Gateway portal and viewing the Gateway Status screen.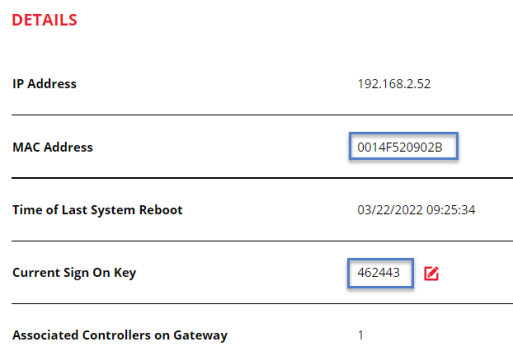
- Save the gateway settings.
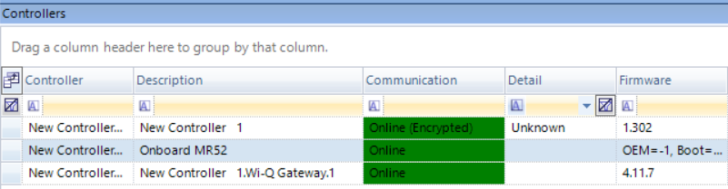
- Finally, right-click the LP4502, select Memory >> Reset and wait a few seconds for the LP4502 to come back online.
- Go to controller status and you should see that the LP4502 and the Wi-Q Gateway are both online.
6.0 Add a Wi-Q Controller in Doors.NET
This section assumes you have worked through the process of signing the Wi-Q controller onto the Wi-Q gateway (this procedure is performed using the Wi-Q Gateway portal) and in covered in the supporting Wi-Q Gateway documentation.
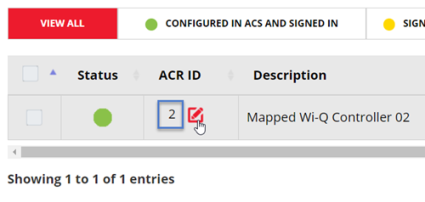
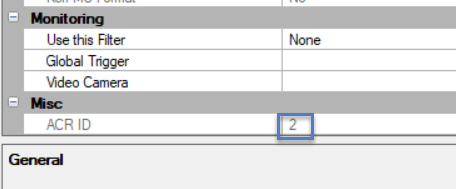
IMPORTANT NOTE: When you add a Wi-Q controller to Doors.NET, the first controller will have the automatically assigned ACR ID of 2 (because the LP4502 readers will be addressed as 0 and 1). You would therefore need to go to the controller screen in the Wi-Q Gateway portal and edit the ACR address so it matches the automatically-generated address in Doors.NET - as this address is not editable in Doors.NET.
The second WAC unit you add will be address 3, the third will be address 4, etc.
Notes:
- In the Wi-Q
Gateway portal, it is also recommended that you edit the name of the
controller to match how it is displayed in Doors.NET.
- This setup
example uses the WAC unit but the same steps also apply to the WDC and
the WDCK (you just click on the relevant icon in step 2).
- In Doors.NET, select the Wi-Q Gateway.
- From the ribbon bar, click on the WAC icon.
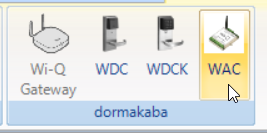
- The Wi-Q controller will appear on the hardware tree directly beneath the Gateway.
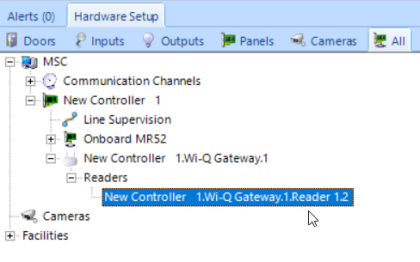
- Select the controller entry.
- Scroll to the bottom of the controller
properties and check that the ACR ID matches the controller ACR ID as
programmed in the Wi-Q Gateway portal.
- At this point the Wi-Q controller will be
offline so you will again need to right-click the LP4502 and select
Reset >> Memory.
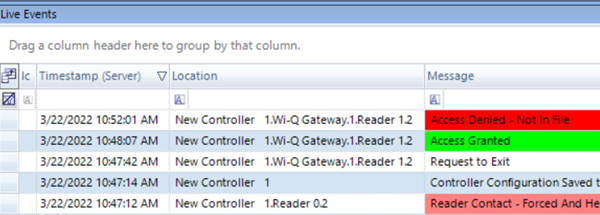
Note: A memory reset is required on the LP4502 each time new Wi-Q hardware is added to Doors.NET. Once the LP4502 is back online following the reset, the Wi-Q hardware should also then be online. - Once the Wi-Q Gateway is showing as online, view live events and wait for Wi-Q
Gateway events. - If you now present a card at the reader/keypad connected to the Wi-Q controller, you should then see access granted/access denied events.
7.0 Checking the Wi-Q Hardware Status
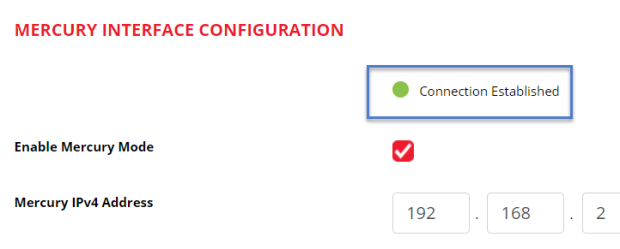
- In the Wi-Q Gateway Mercury Interface
Configuration screen, there is a status indicator for the communications
between the Wi-Q Gateway and the LP4502 controller.
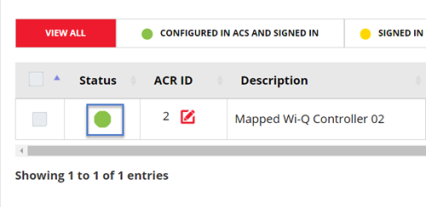
- On the controller status screen, you will see a
green status indicator when the controller is successfully sign-in and
online to the LP4502.
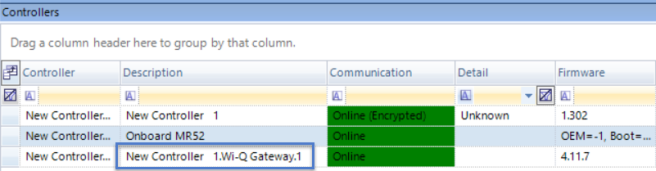
- In Doors.NET, the controller status screen will also show the status of the Wi-Q Gateway.
 P/N: 02431-001 Rev. A |
Related Articles
dormakaba Configuration and Options
1.0 Introduction When using the dormakaba hardware, there are certain factors that have to be configured to provide correct interoperability with existing hardware. For example; if the site uses Mercury hardware then you will have to use the ...Wi-Q Gateway - Quick Start Guide
1.0 Introduction The following document guides you through the exact steps you should take to setup a dormakaba Wi-Q gateway with a Mercury LP4502 controller. It assumes that the LP4502 already has Overwatch installed and an Overwatch username and ...dormakaba Wi-Q Gateway Site Survey
1.0 Introduction The Wi-Q gateway has a built-in survey mode feature that allows you to conduct an on-site survey of the wireless communication between Gateways and the Wi-Q controllers without requiring third-party software. It is important to ...dormakaba - Using the Correct Antenna Type
Omni-Directional and Directional Antenna Types Wi-Q Gateways and Controllers support two antenna types; omni-directional and directional. Omni-directional antennas provide coverage in all directions (but over a shorter distance), whereas directional ...