Video Plug and Play Setup Guide
1.0 Introduction
From Doors.NET v5.0.0 onwards, Keri Systems offers a new Video Plug-and-Play option that replaces the previous Reflections™ video program. The feature allows you to add a multitude of camera models from several manufacturers. Once cameras are added to Doors.NET you can associate a camera with readers, inputs or outputs and trigger a live video stream from events that are generated from the linked hardware. For example, door forced events from a reader or input alarm events from a monitor point. Typically, the default camera settings can be used for streaming live video from the camera.
The older Reflections™ video program will be removed from the current Doors.NET installation should it be detected during a Doors.NET software upgrade process.
 Note: If you wish to continue using the Reflections™ video client then Doors.NET v4.9.0 is the last available supported version.
Keri currently has video plugins for the following vendors:
- Axis
- Axxon
- Digital Watchdog
- Exacq
- Hanwha
- OpenEye
- Milestone
Development is also under way to add several other video software vendors.
2.0 Notes About Video Recording
- For Axis camera playback, you need to have an SD card installed and configured to record video. The available recording options are based on what the camera offers. Some of the Axis models have AI level (i.e face detection or vehicle) in addition to basic motion detection.
- Doors.NET looks for the source of the video recordings - which may be either via an on-board SD card, or as is often the case with plugins such as OpenEye and Milestone, recordings are to the NVR or a cloud source.
- There is no guarantee that recorded video exists at the camera for the Doors.NET event timestamp - some cameras are edge devices that may or not have an SD card for video storage.
- The video recordings are NOT stored in the Doors.NET client - they are retrieved from the camera's recorded video storage location - (SD card, NVR or a cloud source).
-
IF the video source does have recorded video, the playback stream starts at the event time (controller time) - the pre event time (default is 10 seconds) and continues up to event time + post event (default 10 seconds). So a 20 second playback (+/- 10 seconds from event time) is the default.
-
The video playback timestamp is provided by DNET either from Live Events, Reports, or History. The timestamp passed into the plugin is the controller time along with the pre and post event times setup for that camera. Each camera can have different values for pre and post.
- To retrieve H.264 recorded video clips from an AXIS camera, you will need to install the Axis Media Control SDK. The SKD can be downloaded from the following location: https://kerisys.sharefile.com/d-s55b32be11c09457983ea84742fc85def
3.0 Download the Video Plug and Play Installer
Note: to download the software from the www.kerisys.com you will need to create a free account on the site so you can log in with your user name and password.
- Open a web browser, in the address field, enter www.kerisys.com.
-
At the top of the homepage you will see: "MEMBER LOGIN". Click this link.
- Enter your username and password and log in.
- You will be on the downloads screen.
- Click the Software Downloads tile.
- From the download area, select the 'Doors.NET Video Plugin Installer' option.
- Download the installation file to your PC.
4.0 Install Video Plug and Play
- Locate the installation file (.exe) in your Downloads directory
- Right click the installation file (and select Run as Administrator) to initialize the installer.
- Click NEXT.
- Read through and accept the license agreement.
- Click NEXT.
- Review the displayed information - this page displays which camera vendors are supported.
- Click NEXT.
- Review the folder where the plugin drivers will be installed. The default folder location is C:\Keri\DoorsNET
- Click NEXT and NEXT again to begin the installation of the video plugin drivers.
- All the video plugins will be installed within 60 seconds.
- Click FINISH to complete the installation.
5.0 Add an Individual Axis Camera to Doors.NET
- Log into the Doors.NET software.
- Go to Setup >> Hardware Setup >> All.
- Enable Advanced View if you do not see the Cameras entry on the hardware tree.
- Select Cameras.
- From the ribbon bar, click on ADD CAMERA.
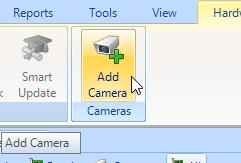
- From the drop-down menu, select the appropriate camera vendor.
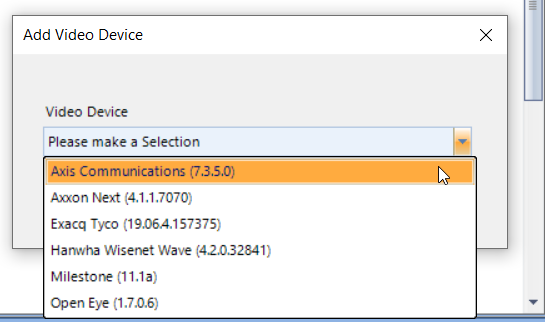
- Click ADD.
- Expand Cameras on the hardware tree to display the new entry.
- Select New Camera.
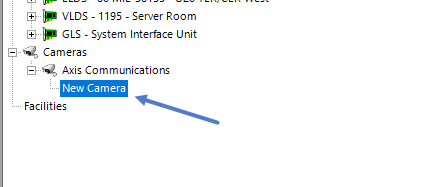
- The camera properties will be displayed on the right.
- Enter a new name for the camera in the Description field.
- Locate the Axis Configuration section and enter the camera's URL/IP Address.
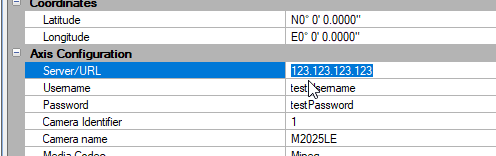
- Enter the user name and password to authenticate and connect to the camera.
- Save the camera settings.
6.0 Add a Milestone Camera to Doors.NET
The next section explain how to add cameras from a Milestone server. You will need to know the URL for connecting to the Milestone server along with the username and password. You will also need to know the name and unique identifiers of each camera that you wish to add.
- On the Doors.NET hardware tree, select Cameras.
- Click the ADD CAMERA icon.
- From the drop-down list, select Milestone, then click ADD.
- A Milestone entry will appear on the hardware tree, beneath the Cameras node.
- Click the expander to see the New Camera entry.
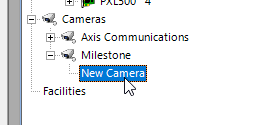
- The properties will appear on the right.
- Enter the URL for the Milestone server.
- Enter the user name and password for connecting to the server.
- Enter the unique identifier for the camera you wish to add.
- Enter the camera name for the camera you wish to add.
- Select the authentication type from the drop-down menu. The options are Basic and Windows authentication.
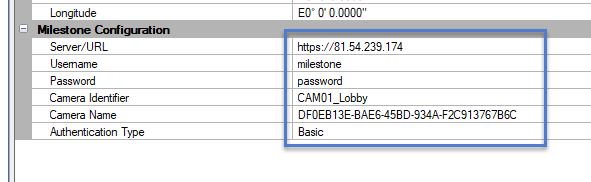
- Save the Milestone camera settings.
7.0 View Live Video
To view a live video stream from the camera you must first associate the camera with a hardware object (for example, a controller, reader, input or output).
The following steps explain how to associate a camera with a reader.
- Navigate the hardware tree and select a reader.
- The reader properties will be on the right.
- Locate the Monitoring section at the bottom of the properties grid.
- In the Video Camera setting select the camera from the drop-down list.
- Save the reader settings.
- Select a different hardware object on the hardware tree then click back on the configured reader.
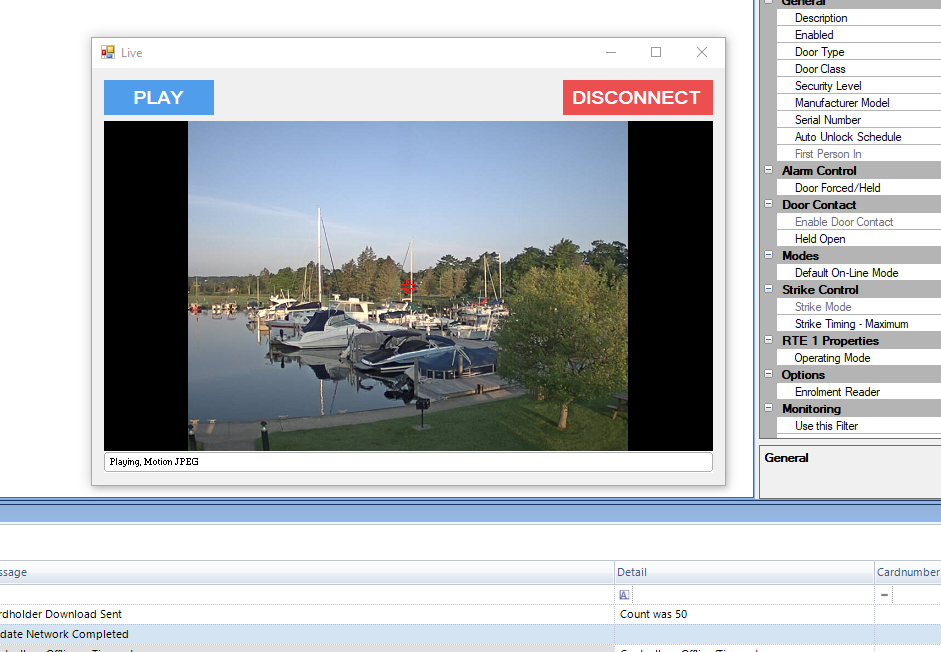
- You will now see a Live Video icon on the ribbon bar.
- Click this icon to immediately view live video from the camera.
- The live video window will appear.
- The live video stream will appear almost immediately. If not, Click the PLAY button to view the live video stream.
8.0 Display Live Video Window From an Alert
Doors.NET can be configured to display a live video window if a specific event occurs at the hardware object that the camera is associated with. For example; you can display a live video window if there is a door-forced event at the reader. This is achieved by using a filter - the filter has the specific event set to 'Require Acknowledgment' and then this filter is assigned to the reader. Additional functionality can be applied to the filter by using Device Types - you can configure a device type to generate a sound at the PC and you can set the alert to require notes or a password from the operator. The next steps explain how to setup an alert for when a door-forced event occurs.
8.1 Select the Event Type in Filters
- In Doors.NET, go to Setup >> Filters.
- Select the existing Standard Filter.
- Click on the Messages tab.
- Ensure the Reader Contact - Forced Open event is selected.
- Click on the Acknowledge tab.
- Ensure the Reader Contact - Forced Open event is selected.
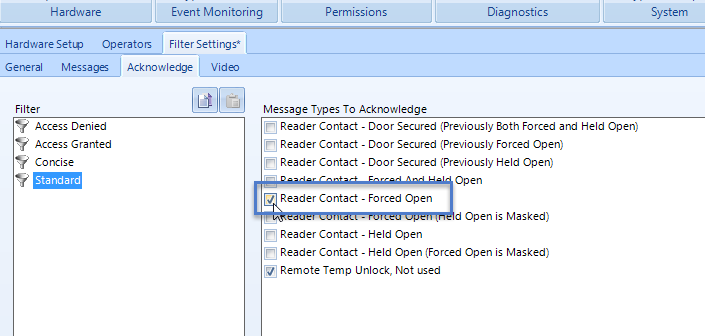
- Save the filter.
8.2 Configure Device Types
A device type should now be configured. The device type is where you select to view live video.
- In Doors.NET, click on Setup >> Device Types.
- Click ADD DEVICE TYPES button or select one of the existing device types.
- In the properties on the right, ensure Show Video is selected.
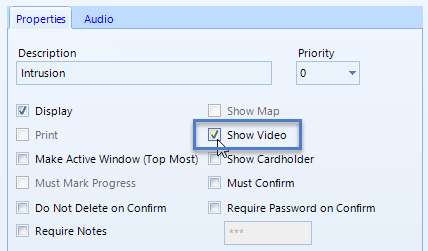
- Save the Device Type.
8.3 Assign the Filter and the Device Type
The filter should now be assigned to the reader which has a camera associated with it:
- In Doors.NET, go to Setup > Hardware Setup >> All.
- Expand the hardware tree and select the appropriate reader. The reader properties will be on the right.
- Ensure Advanced View is enabled for the hardware properties.
- Locate the Monitoring section.
- Set the correct filter to the reader.
- Set the correct device type to the reader.
- Set Require Acknowledgment to Yes.
- Save the reader settings.
8.4 Viewing the Live Video
- Generate the door-forced event at the designated reader.
- An alert will appear in the software.
- At the same time, a live video window will appear.
- Click the PLAY button to view what is happening, physically at the reader.
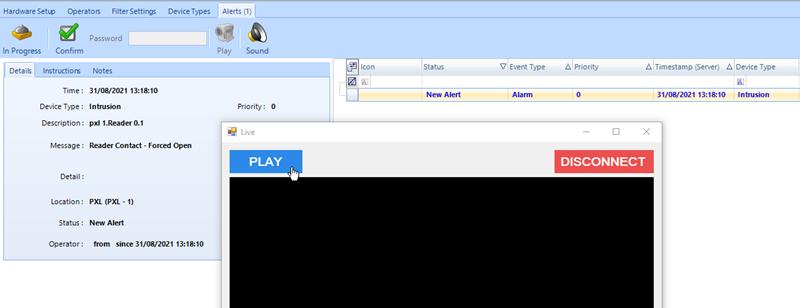
- The live video feed from the camera should then appear.
- You can re-size the video window and can also move it to a different monitor (for example; if you wish to confirm the alert).
9.0 View Recorded Video Clips
The following steps explain how you can configure Doors.NET to associate video recordings with an alert.
Notes:
- To retrieve H.264 recorded video clips from an AXIS camera, you will need to install the Axis Media Control SDK. The SKD can be downloaded from the following location: https://kerisys.sharefile.com/d-s55b32be11c09457983ea84742fc85def
- There is no guarantee that recorded video exists at the camera for the Doors.NET event timestamp - some cameras are edge devices that may or not have an SD card for video storage.
- These video recordings are not stored in the Doors.NET client - they are retrieved from the camera's recorded video storage location.
- The camera must be already be configured for recording.
- All Axis cameras require an on-board SD-card for video storage.
- Some Axis camera models also have AI level (i.e face detection or vehicle) in addition to basic motion.
- Many cameras will send video clips to be saved at the NVR or a cloud source.
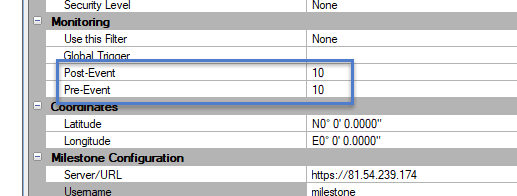
- Pre-pre/post event settings has a minimum value of 5. If it is set to lower that 5 it will default to 5 regardless.
9.1 Steps to View Recorded Video Clips
The following steps explain how to view recorded video clips for a camera that has been associated with a reader.
- Add a camera and then associate the camera with a hardware object (for example, a reader).
- Select the reader and verify that you can view live video from the camera (click on the eye icon).
- Close the live video window.
- Generate an an event at the reader (for example; access granted, access denied, door forced, etc).
- In live events, in the icon column, you will see a camera icon. If you do not see the icon column you will need to use the field chooser to display the column.
- Double-click the camera icon and you will see a message prompting you to view video playback. Click YES.
- If video exists at the camera, the video clip will be displayed.
- By default you will see 10 seconds before the event (Pre Event) and 10 seconds after the event (Post Event) - So a 20 second playback (+/- 10 seconds from event time) is the default. These settings can be configured in the camera settings within Doors.NET.
|
|

P/N: 02412-001 Rev C
|
Related Articles
Video Plug and Play Setup Guide - Axis Cameras
1.0 Introduction From Doors.NET v5.0.0 onwards, Keri Systems offers a new Video Plug-and-Play option that replaces the previous Reflections™ video program. The feature allows you to add a multitude of camera models from several manufacturers. Once ...Video Plug and Play Setup Guide - Digital Watchdog
1.0 Introduction From Doors.NET v5.0.0 onwards, Keri Systems offers a new Video Plug-and-Play option that replaces the previous Reflections™ video program. The feature allows you to add a multitude of camera models from several manufacturers. Once ...Video Plug and Play Setup Guide - Hanwha Wisenet Wave
1.0 Introduction From Doors.NET v5.0.0 onwards, Keri Systems offers a new Video Plug-and-Play option that replaces the previous Reflections™ video program. The feature allows you to add a multitude of camera models from several manufacturers. Once ...Video Plug and Play Setup Guide - Open Eye
1.0 Introduction From Doors.NET v5.0.0 onwards, Keri Systems offers a new Video Plug-and-Play option that replaces the previous Reflections™ video program. The feature allows you to add a multitude of camera models from several manufacturers. Once ...Display Live Video From an Alert
1.0 Introduction Doors.NET can be configured to display a live video window if a specific event occurs at the hardware object that the camera is associated with. For example; you can display a live video window if there is a door-forced event at the ...