Elevator Control with Mercury EP/LP Series Hardware
1.0 Introduction
This section explains how to setup Elevator Control when using Mercury SCP hardware. This example uses LP-4502 and MR16IN and MR16-OUT modules.
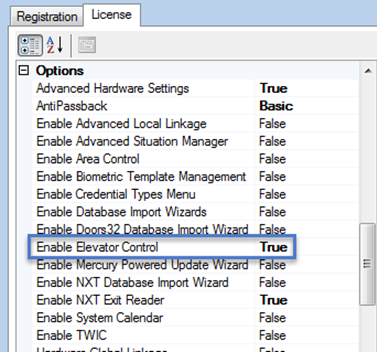
Elevator Control is a licensed feature and therefore must be purchased and enabled in your license.
This setup procedure assumes you have already installed the software with the SCP/MSC Gateway and you already have a Mercury EP or LP controller and MR16IN and MR16OUT modules online and ready to configure.

Important Notes When Using True Mercury Controllers for Elevator Control
- Elevator control is supported with the older EP controllers and the newer LP and MP controllers.
- All True Mercury controller types can be used for elevator control (this includes the MR51E and MR62E single door controllers)
- Supported reader types are Wiegand and OSDP.
- If using No Floor Select then only MR16OUT modules are required.
- If using With Floor Select then MR16IN and MR16OUT modules will be required (unless you are only controlling up to 4 floors), in which case the inputs and output on the controller can be used.
- If using With Floor Select it doesn't matter whether you add the MR16IN or the MR16OUT module first as long - as the controller's onboard module is configured correctly.
2.0 Add a Facility
- From within Doors.NET, click on Setup >> Hardware Setup >> All.
- The hardware tree will be displayed.
- Highlight Facilities (located at the bottom of the hardware tree.
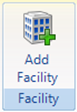
- Click the ADD Facility icon.
- Highlight the new facility and enter a description.
- Specify how many floors the facility will have.
- Further down the facility properties, locate Floor Names. Here you can name the floors. For example, you may wish to rename floor 1 as lower-ground or basement.
Rename floors
- Save the properties of the facility.
3.0 Convert the Mercury Controller to an Elevator Controller
The next section assumes that you have already followed the steps to add a Mercury controller (EP or LP series) and it is online. It explains how to convert the controller to the elevator control function and then how to assign the facility to the controller.
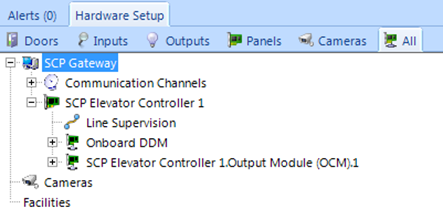
- On the hardware tree the controller will be listed beneath the MSC gateway.
- Select the controller and the controller properties will be displayed on the right.
- Verify that Advanced View is enabled for the controller properties.
- In the controller properties locate the Controller Function setting and change the controller to an Elevator Controller.
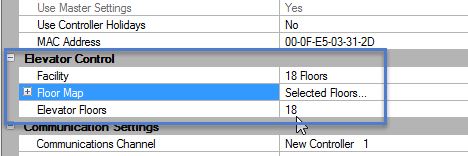
- In the next section of the controller properties select the facility to assign to the controller.
- In the Floor Map setting, select the down arrow and then place a check mark against each of the floors that will be controlled by this controller. Controllers can be assigned the same facility and therefore may have different floors selected. For example, in some facilities one elevator may control access to the first 10 floors and then a different elevator may control access to the next 10 floors.
- Enter the number of floors you have selected.
- Save the controller settings (save icon at the top of the properties).
- You will now be prompted to reset the controller so click Yes to go ahead with the reset.
4.0 Set the Reader Function
The Elevator Control option has two different functionality options:
- No Floor Select means all outputs will activate for all floors to which a cardholder has access when they present and authenticate their credential to the elevator cab reader. So if a cardholder has total access, all outputs will change state, which, in effect, will allow any of the floor select buttons to be pressed in the cab in order to access any of the floors. Without the Floor Select option you are only using the MR16OUT modules (outputs). When someone presents a card the floor buttons in the elevator cab will illuminate for the floors which the cardholder has access to.
- With Floor Select does not activate any of the outputs until an input is pressed following a valid card read. Once input 1 has been pressed, the corresponding output 1 will fire; input 2 will fire the output 2, etc. This information is then stored in the system database so that at a later time reports can be run to see which floors cardholders have accessed. When using the With Floor Select option MR16 module inputs and outputs are paired, one input for every output. There are also settings for defining the floor relay activation time and the floor select time (the time duration permitted in which a floor select button must be pressed).
When using True Mercury controllers this reader setting must be set manually.
- On the hardware tree, expand the controller.
- Expand the Readers section.
- Select the reader to use for Elevator Control (usually reader 1).
Note: Although many Mercury EP and LP controllers have 2 readers, when a controller is configured for Elevator Control you should not attempt to use the second reader for general access control. An Elevator Control controller should only be used for the purpose of Elevator Control. The readers that will not be used for elevator control should be disabled and renamed to: 'Not to be Used' or such-like. - The reader properties will appear on the right.
- You should rename the reader in the Description field.
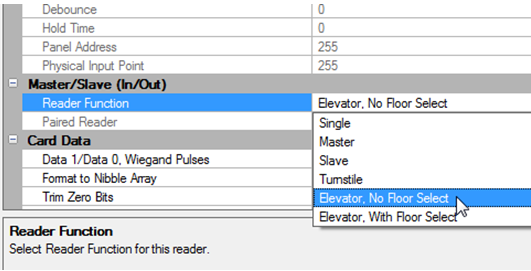
- Scroll down the reader properties and locate the Reader Function and set the reader to Elevator, No Floor Select or Elevator, With Floor Select.
- Save the reader properties.
4.1 Configure the Onboard DDM Inputs
The following steps only apply when the With Floor Select option is being used.
- On the hardware tree, expand the controller.
- Then expand the Onboard DDM.
- If using the With Floor Select option, expand the Inputs.
- Select the first of the 8 inputs.
- The input properties will be displayed on the right.
- Change the Input to Elevator Feedback. The Elevator Reader should be pre-selected automatically.
- Save the input settings.
- Repeat the previous few steps for each input on the controller's Onboard DDM.
- All 8 of the controller's inputs should then be configured as Elevator Feedback.
3.0 Configure the Onboard DDM Inputs and Outputs
When a True Mercury controller is configured for elevator control the controller's inputs and outputs are not automatically configured as elevator inputs or outputs. These must be set manually.
- With Advanced View enabled, select the SPM (EP-1502) and in the properties change the controller function from Normal to Elevator Control – by doing this you will no longer be able to use the second reader on the Onboard DDM.

- In the Elevator Control properties section, select the drop down for the facility and select which floors will be applied to this SCP controller.
- In the Floor Map setting place a check mark against all the floors the controller will be servicing.
- The correct floor count will then automatically be set.
- You will be prompted to reset the controller. Click yes to the prompt then wait for it to come back online.
- Highlight the Onboard DDM and in the properties locate the Elevator Control section.
- Set the Onboard DDM to continue the elevator outputs on to the OCM (MR16OUT) panel.

- Highlight reader 1 on the Onboard DDM and change the function to “Elevator, No Floor Select”. Rename reader 2 to NOT USABLE (changing the panel to elevator control disables the second reader).
- Change your outputs on the onboard DDM to Elevator Outputs and select the Elevator Reader to associate with those outputs.
- Change all the outputs on the OCM to elevator outputs and select the same reader. (Remember to save your settings).
Related Documentation:
Related Articles
Mercury EP Controllers Overview
Introduction In addition to our own Mercury Powered NXT controllers (NXT-MSC), Keri also offers non-proprietary authentic Mercury Security hardware, which is supported by Doors.NET Professional Edition software. The hardware platform consists of the ...Mercury LP Controllers Overview
Introduction In addition to our own Mercury Powered NXT controllers (NXT-MSC), Keri also offers non-proprietary authentic Mercury Security hardware, which is supported by Doors.NET Professional Edition software. The LP hardware platform consists of ...Mercury EP-Series - Full Setup and Configuration Guide
1.0 Introduction This section explains how to setup and configure all controller settings and advanced options. All these settings can be found either by logging into the controller via a web browser or by accessing the controller's 'internal ...Elevator Control Data Sheet
Elevator Control Data Sheet (attached)Elevator Control - Scheduled Override of Floors
1.0 Introduction In normal elevator control operating mode access to controlled floors will require the presentation of an access credential to the reader in the elevator cab. Occupancy requirements at some facilities may require that some floors ...