LAN-520-AESP - Quick Start Guide
1.0 Introduction
The following are basic setup instructions for the LAN-520-AESP module. Some settings may not apply to every application.
Note: The LAN-520 AESP is an updated version of Keri’s LAN-520X device. If you are using the new NC-485X Network Converter with the LAN-520, you must use the LAN-520 AESP module (or the existing LAN-520X module). The original NC-485 Network Converter is NOT compatible with the new LAN-520 AESP (or the existing LAN-520X module).
Note: To set up the LAN-520-AESP, you MUST have technical knowledge of general networking in a PC environment. Please have a network administrator on site to resolve any special networking issues that might occur during device programming. Network topologies and strategies will vary.
As well as PXLs, LAN-520-AESP modules also provide Ethernet connectivity to Entraguard controllers.
2.0 Installing the LAN-520-AESP on the
PXL-500 Controller
- Power-down the PXL-500 controller.
- On the Primary PXL-500 remove jumpers from JP6 and JP7 (highlighted).
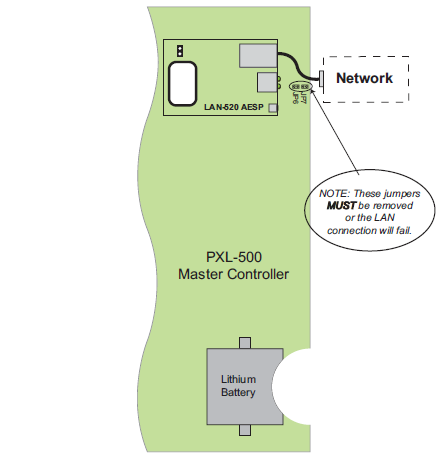
- Carefully insert the LAN-520-AESP into TB13 with the RJ-45 connector to the right. Mounting screws are supplied to secure the LAN-520 to the PXL-500 controller. (The PXL500 will have to be removed from its enclosure to do this).
- Connect the RJ-45 port on the LAN-520-AESP to the network or directly to the host PC via a cross-over network cable.
- Power up the PXL-500 (if it is a new controller a RAM reset is required).
- The LAN-520-AESP module should be displaying 1 x amber LED and 2 x green LEDs.
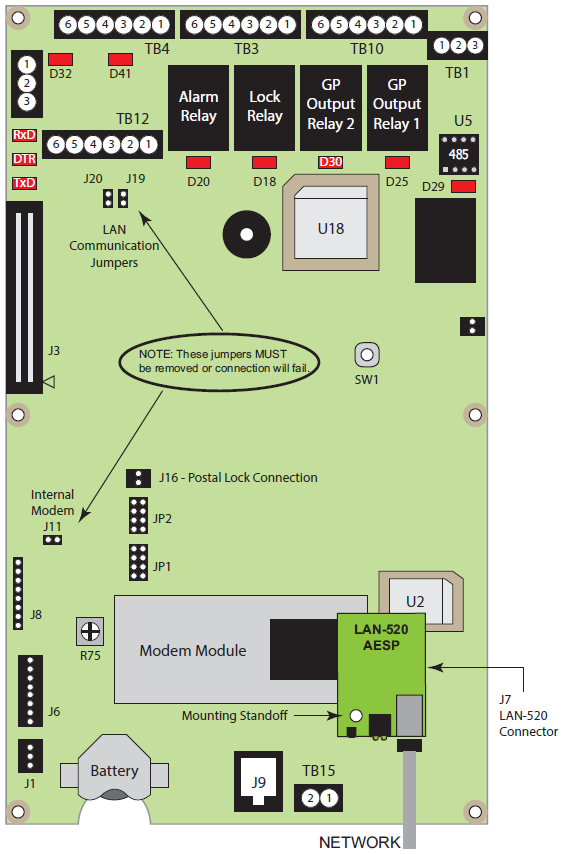
3.0 Installing the LAN-520-AESP on an Entraguard Controller
Support for the LAN unit on Entraguard begin with PCB 23217-001 Rev. E. Earlier units cannot support a LAN unit.
- Power-down the Entraguard controller.
- On the Entraguard PCB, remove jumpers from J11, J19, and J20.
- Insert the LAN-520X into J7 on the Entraguard. Orient the LAN unit as shown in the image below.
Note: Mounting screws are supplied to secure the LAN-520 to the Entraguard unit. The Entraguard PCB will have to
be removed from its enclosure to do this.
- Connect the RJ-45 port on the LAN-520 to the network or directly to the host PC via a cross-over cable.
- Power up the Entraguard unit (if this is a new Entraguard panel, or a Primary controller from a Doors32 conversion then a RAM reset is required).
4.0 Factory Default DHCP Setting
The LAN-520 AESP module is DHCP enabled by default. When the LAN-520 AESP module is connected to a DHCP enabled router it automatically receives an IP address. The quickest way to find out what DHCP address has been assigned to the module is to download and run Grid Connect Device Manager. Perform the following steps to download and use this program:
5.0 Download the Grid Connect Device Manager Software

- Register for an account by going to kerisys.com, click on Member Login, and fill out the form.
- You will receive an approval email to create your password.
- Once logged in to Kerisys.com click on Supporting Software.
- The list of software applications will appear.
- Click on Grid Connect Device Manager.
- Click the DOWNLOAD button.
- The Device Manager application will be downloaded to the host PC.
- You can now run the Device Manager software.
6.0 Run the Grid Connect Device Manager Software
- Locate the downloaded file on the host PC - typically it will be located in the Downloads folder.
- Right-click the ZIP file and select Extract All.
- Extract the file to the same directory.
- Once extracted, open the unzipped file and right-click on the application file.
- Select Run as Administrator.
- The application will now open.
7.0 Assigning a Static IP Address to
the LAN-520
- From the list on the left, click on the module that you wish to configure.
- The device details will be displayed on the right, including the currently assigned IP address.
- Click the TELNET CLIENT button.
- Press enter to make a Telnet connection to the module.
- All device configuration will be displayed as well as the setup menu.
- At the prompt, enter 0 then <ENTER>.
- Enter the first 3 digits of the IP address you wish to set, then <ENTER>.
- Enter the second 3 digits of the IP address to set, then <ENTER>.
- Enter the third 3 digits of the IP address to set, then <ENTER>.
- Enter the last 3 digits of the IP address to set, then <ENTER>.
- Enter through the remaining settings.
- At the change setup menu enter the number 9 to save and exit.
- The settings will be saved to the device and the telnet session will be disconnected.
- You can now close the Telnet window.
- Click the SCAN DEVICES button and select the specific LAN-520 again that you modified.
- The new IP address will be displayed in the device details.
8.0 Connect to the PXL-500 in Doors.NET
- Log into the Doors.NET software (the default user name and password are both admin.
- Go to Setup >> Hardware Setup >> All - this will display the hardware tree.
- The PXL gateway will be listed at the top of the hardware tree.
- Highlight the gateway and check in the properties that it is online.
- You will now need to create a Network communication channel.
- Select Communication Channels and click the Network option.
- Highlight the new channel.
- Enable it, give the channel a new description, then save.
- Highlight the PXL gateway and click ADD PXL.
- Enter a new description for the PXL and select the exact controller model. It doesn't matter if you are unsure because the controller model will automatically be detected when the controller comes online - If in doubt, select the default option. Then click ACCEPT.
- The new Primary PXL will be added to the hardware tree - listed beneath the PXL gateway.
- Highlight the new controller and in the controller properties on the right, locate the Communication Channel setting - select the new network channel you previously created.
- As it is a network channel you will now be able to enter the assigned IP address of the LAN-520.
- Save the controller settings.
- At this point you may wish to look at the Live Events grid.
- Within a few seconds the controller should come online.
9.0 Perform the Initial Update on the Controller
- Locate the new controller on the hardware tree.
- You will see that there is an update indicator next to the controller.
- Select the controller then click the Update Network icon in the ribbon bar.
- View Live Events and you will see update in progress events.
- Wait until you see an update complete message.
- The PXL-500 is now setup and ready for further configuration.
10.0 Troubleshooting
10.1 Initial Checks
- Ensure the primary controller that the LAN-520 is connected to is addressed as number 1. You can check the address by pressing the white S1 button once. S1 is located beneath the address display.
- Ensure the JP6 and JP7 jumpers have both been removed. The JP6 and JP7 pins are located directly to the right of the LAN-520-AESP Ethernet port when it is connected to the controller.
- Ensure the controller has been factory reset - this is especially important if it is a new controller or one that ha been redeployed from a different system.
- Verify that the controller is receiving the correct voltage. This is indicated by a green power LED (LED 8).
- Ensure the port number is correct. By default, the LAN-520 communicates using TCP/IP port number 10001. Verify that the port number is correct in the Doors.NET software. This value is found in the primary controller properties.
10.2 Telnet Session to Verify Communication
This will test the default port used by Doors32/Doors.NET to communicate to the device.
The telnet command is preferred over the ping command in testing communications because the telnet command will give a specific response from the device, whereas the ping command may give a response from a different device (if there is a duplicate IP address on the network).
- In a command prompt window type in, telnet [IP address] 10001 then enter.
- If successful a blank screen and a blinking cursor will appear. The link LED (bottom green LED) will blink on and off on the LAN-520 AESP indicating that port 10001 is open. Close the command prompt window and the link LED should stop blinking.
- If telnet is unable to connect, then review the settings. If the settings are correct then contact a network administrator to verify the needed ports are available. Some operating systems and hardware, such as routers and firewalls are set to block ports. Ensure these firewalls have ports 10001, 10021, and 9999, open for communication with the Doors32 or Doors.NET software.
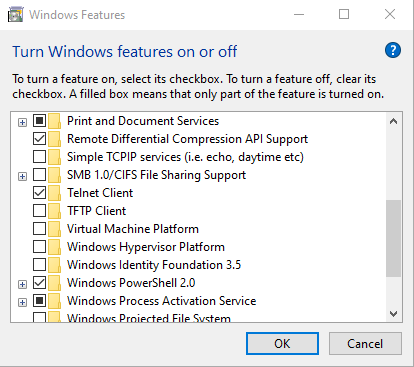
10.3 Enable Telnet Client in Windows
If you try to make a telnet connection to the LAN-520 but you see the following message: ‘telnet is not recognized as an internal or external command, operable program or batch file’ then it is likely you are using Windows 10. Telnet Client is disabled by default on certain Windows operating systems.
Perform the following steps to enable Telnet in Windows 10:
- From the Windows start menu go to Control Panel >> Programs and Features.
- On the left of the program list click Turn Windows Features on or off.
- From the Windows features list locate Telnet Client.
- Place a checkmark against Telnet Client.
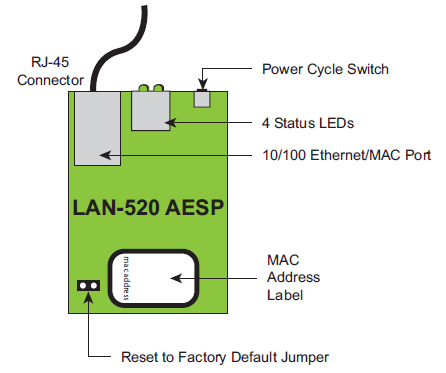
11.0 LAN-520 AESP Factory Reset Procedure
Perform the following steps to reset the LAN unit to its factory default settings:
- Power the unit OFF.
- Place a jumper across the Factory Default Jumper pins (located next to the MAC address label).
- Power the unit ON – this resets the LAN unit.
- Power the unit OFF.
- Remove the jumper from the Factory Default Jumper pins.
12.0 General Notes
- The new LAN-520 AESP unit start with the MAC address of 00-80
- We recommend setting a static IP address to the module using Grid Connect Device Manager. If the DHCP address changes then Doors32 or Doors.NET will no longer be able to connect to the LAN-520 AESP.
- The original NC-485 module is NOT compatible with the LAN-520 AESP or the LAN-520X. Only the NC-485X is compatible with these modules.
- To setup a LAN-520 AESP module you must have technical knowledge of general networking in a PC environment. Please have a network administrator on site to resolve any special networking issues that might be encountered during device setup and programming. Network topologies and strategies will vary.
- If the LAN-520 AESP is connected to a network that isn’t DHCP enabled the module will set itself to an IP address in the range of 169.254.XX.XX with a netmask of 255.255.0.0
- Keep in mind that although the Device Manager is capable of finding LAN520 devices on a local LAN even if they are on different subnets. However, routers and firewall settings can prevent the application from finding them.
- If you are able to telnet into port 9999 in the command prompt but not to 10001, it is very likely that the ports required by Doors32/Doors.NET are blocked and will require that a Network Administrator address the issue so a successful telnet session to port 10001 may take place.
- To use the LAN-520 AESP the PXL firmware must be at v8.4.43 (or greater).
Related Articles
LAN-520 - Quick Start Guide
1.0 Introduction The following are basic setup instructions for the LAN-520 module. Some settings may not apply to every application. Note: The LAN-520 AESP is an updated version of Keri’s LAN-520X device. If you are using the new NC-485X Network ...LAN-520 AESP - Full Installation Guide
1.0 Introduction The following are basic setup steps for the LAN-520 AESP. Some settings may not apply to every application. The following setup instructions explain how to use Lantronix Device Installer to find the DHCP assigned IP address and then ...LAN-520 and NC-485 Network Converter Setup Guide
1.0 Introduction The NC-485X offers you more flexibility in managing multiple, remote, physical sites and enhanced networking capability. By using the LAN-520X in combination with an NC-485X Network Converter, PXL-500 controllers, which are normally ...LAN-520 - Enhanced Security Settings
1.0 Introduction If the LAN-520 channel 1 port # has been changed to 1234 then this is highly indicative that the device has been hacked. The default value for the port number is 10001. This is the number that identifies the channel for remote ...LAN-520 Data Sheet
LAN-520 Ethernet Connectivity Data Sheet (attached)