PXL - Global Lock
PXL Global Lock, Lockout and Lockdown - Using PXL-500 Controllers in Borealis

1.0 Introduction
The global lock feature uses a dedicated input on the satellite board installed on the primary controller. This option will not appear if a satellite board is not installed. When the global lock input is triggered, all online and functioning doors on the PXL network are automatically locked.
The Global Lock input on the SB-593 is on pins 5 and 6 of the TB8 connector:
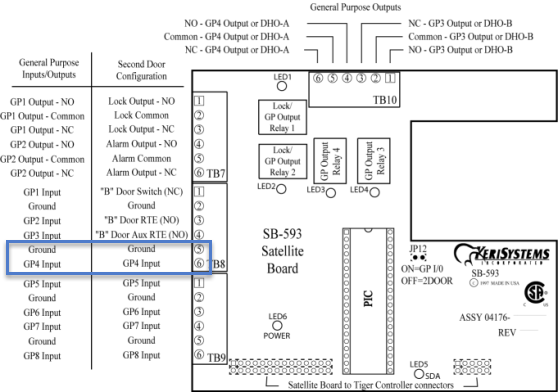
The Global Lock/Lockout/Lockdown input is a normally-open circuit (that goes active when the circuit closes).
The PXL controllers support five different types of Lock implementation:
- Lock – Immediately locks all PXL doors (doors which have been opened with a valid card, a time schedule, or that have been manually unlocked, will all lock). Lock allows credentials which have valid access to still gain access and RTE is still enabled.
- Lockout – Operates the same as Lock but NO credentials are allowed access regardless of access level or group permissions. RTE is still enabled.
- Lockout - Allow Total Access – The same as Lockout but allowing access to those credentials with the Always schedule assigned. RTE is still enabled.
- Lockdown – Operates as Lockout with NO RTE functionality.
- Lockdown – Allow Total Access – The same as Lockdown but allowing access to those credentials with the Always schedule assigned.
Notes:
- The Global Lockout and Global Lockdown options are NOT supported on PXL controllers using firmware version older than 08.06.09. To use Global Lockout or Global Lockdown, a firmware upgrade is required on PXL controllers that do not have this firmware version.
2.0 Enable Global Lock, Global Lockout or Global Lockdown
- In Borealis, go to Hardware >> Controllers.
- Locate the primary controller that will have the Global Lock input wired into its SB-593.
- From the primary controller's Action drop-down list, select Edit.

- The controller edit form will appear.
- Scroll down the list of settings and locate the Global Lock option.
- Place a check mark against Global Lock Enabled.
- Set the Global Lock Type to one of the available options.

- Click the SAVE button.
- An update network will be performed to configure the primary controller.
3.0 Test Global Lock, Global Lockout or Global Lockdown
3.1 Test Global Lock
The best way to test the Global Lock setting is to manually unlock a door or assign an auto-unlock time schedule so that the door will be in auto-unlocked state.
- Ensure one or more doors are manually unlocked or auto-unlocked.
- Short the global lock input located on the SB-593 connected to the primary controller (between pins 5 and 6 of TB8).
- Any doors which are auto-unlocked or manually unlocked will become locked.
- In live events you will see Global Lock events displayed as well as Auto Unlock Suspend events for any doors that were assigned auto-unlock schedules.

- De-activate the global input (open the circuit between pins 5 and 6 of TB8).
- Any doors assigned auto-unlock (AUL) schedules will go back to following their AUL schedules.
- Again, restore events will be displayed in live events.
Important Note: Doors that were manually unlocked from the readers screen will not return to an unlocked state. If these doors need to go back to being unlocked they will need to be manually unlocked again.
3.2 Test Global Lockout or Global Lockdown

The best way to test the Global Lockout or Global Lockdown options is to first ensure you have a cardholder that is gaining access at the door you will be testing on. Also ensure that the request-to-exit is fully functioning.
- Short the global lock input located on the SB-593 connected to the primary controller (between pins 5 and 6 of TB8).
- Any doors which are auto-unlocked or manually unlocked will become locked.
- In live events you will see Global Lock events displayed as well as Auto Unlock Suspend events for any doors that were assigned auto-unlock schedules.
- Present a card to one of the readers on the network (that the cardholder has access to).
- Access will be denied. Live events will display: 'Access Denied - Reader Locked' and the name of the reader.
- Test the request-to-exit input... it should be functioning if you are using Global Lockout but should not be functioning if you are using Global Lockdown.
- De-activate the global input (open the circuit between pins 5 and 6 of TB8).
- Any doors assigned auto-unlock (AUL) schedules will go back to following their AUL schedules.
- Cardholders should be able to gain access again, where expected.
- If you are using Global Lockdown, the RTE should be functioning again.
Important Note: Doors that were manually unlocked from the readers screen will not return to an unlocked state. If these doors need to go back to being unlocked they will need to be manually unlocked again.
Related Articles
PXL - Global Lock
PXL Global Lock, Lockout and Lockdown - Using PXL-500 Controllers in Borealis 1.0 Introduction The global lock feature uses a dedicated input on the satellite board installed on the primary controller. This option will not appear if a satellite board ...PXL - Global Unlock
1.0 Introduction This section explains how to enable the standard implementation of the Global Unlock feature using the dedicated Global Unlock input on a Primary PXL controller (controller addressed #1). The dedicated Global Unlock input is ...PXL - Global Unlock
1.0 Introduction This section explains how to enable the standard implementation of the Global Unlock feature using the dedicated Global Unlock input on a Primary PXL controller (controller addressed #1). The dedicated Global Unlock input is ...Site Lock and Site Unlock
1.0 Introduction The Site Lock and Site Unlock feature allows you to unlock all doors or a selection of doors on a specific site - either from buttons in the user interface or from a general-purpose input. In addition to locking and unlocking doors, ...PXL Controller Settings
1.0 Introduction The following document explains the PXL controller settings that are available and editable in Borealis. From the main menu, go to Hardware >> Controllers. The controllers page will appear. From the Actions drop-down list on the ...