Doors32 to Doors.NET Database Conversion Procedure
| 1.0 | Introduction |
This document provides basic information regarding the process for converting a Doors32 database/system for use in a Doors.NET access control system. It is intended to ensure that you (the customer) understand the steps you need to take to ensure a successful data transfer and that the system to which you are transferring the database is fully capable of operating the Doors.NET software.
Doors.NET Host PC Requirements - https://help.kerisys.com/portal/en/kb/articles/pc-requirements
Please read through this entire document before proceeding with the database restoration.
| 2.0 | Upgrade Advisor |
It is highly recommended that you run the PXL Upgrade Advisor program before you start your conversion process and then send the results from the Advisor to Keri Systems via email at the following address: techsupport@kerisys.com. The Upgrade Advisor analyzes your database to ensure that all hardware installed on your Doors32 network is compatible with Doors.NET.
The Upgrade Advisor can be downloaded from the following location:
https://www.keri-kb.com/#Downloads/Doors32_PXL_Upgrade_Advisor_v4.6.2.1.zip
| 3.0 | Detecting and Converting Legacy Controllers |
Doors.NET software notes the firmware revision of each Entraguard and/or PXL unit during Auto Configuration and determines if the unit is "Standard" or "Legacy."
Standard units are accepted by Doors.NET software with no additional fee. Legacy units require a per-unit conversion fee. Contact your Keri Systems Inside Sales Rep for pricing.
Note: Each legacy controller will require an upgrade kit which includes the legacy license, battery, and the latest PXL firmware chips.
Details for identifying Legacy controllers is provided below:
| 3.1 | Standard Versus Legacy PXL Controllers |
The following PCB part numbers are non Legacy PCBs.
| Controller Type | PCB Part Numbers |
| PXL-500P-X | 05496-001 |
| PXL-500P-X NE | 05496-002 |
| PXL-500W-X | 05497-001 |
| PXL-500W-X NE | 05497-002 |
| TDK-500-X | 05668-001 |
All earlier PCB part numbers designate Legacy PCBs.
| 3.2 | Standard Versus Legacy Entraguard Controllers |
The easiest method for identifying Standard versus Legacy Entraguard controllers is through the firmware revision of the individual controllers.
These firmware revisions are recognized as Standard by Doors.NET:
• Platinum v9.2.02 or greater
• Titanium/Silver v7.8.02 or greater
These are the firmware revisions recognized as Legacy by Doors.NET:
• Titanium/Silver - v7.6.09 and v7.6.13
• Platinum - v9.1.09
These Legacy firmware revisions have improvements in how Smart and Full Updates are performed that are required for operation in Doors.NET.
| 4.0 | Doors32 Database Submission |
This is a two step process:
• Prepare the Doors32 installation for backup.
• Submit the Doors32 backup folder and host PC datafile.
| 4.1 | Prepare for Backup |
1. Ensure the software revision of the existing Doors32 installation is at v5.20 or higher. If not, you must update Doors32 to the current revision.
2. Ensure your controllers meet minimum firmware requirements: - Keri strongly recommends the firmware on your PXL-500 controllers be at revision v8.4.49 or greater. This is the minimum firmware revision that supports the current Daylight Savings Time dates as set by the U.S. government. It is also the minimum firmware revision that has complete support for anti-passback. Keri suggests you upgrade to the most recent firmware revision available (currently v8.6.09) for best operation.
- Entraguard Platinum units must be at v9.1.09 or greater. This firmware revision implements changes that increase the stability of Smart and Total Updates.
- Entraguard Titanium and Silver must be at v7.6.09 or greater. This firmware revision implements changes that increase the stability of Smart and Total Updates.
3. Perform a full-update to ensure the information within all controllers is completely up to date, is synchronized with the Doors32 database, and all events are cleared from the PXL controller buffers.
| 4.2 | Submit the Doors32 Directory |
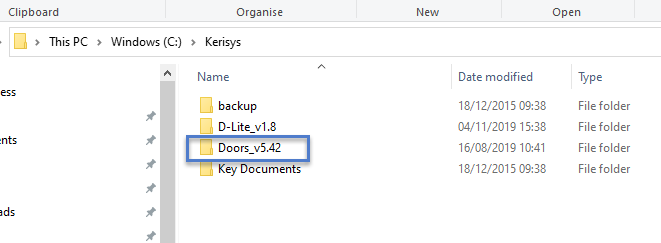
1. Copy and submit the entire “C:\Kerisys\Doors32_vN.NN” sub-folder set. The specific database “Db/Files” and “Db/Badge” folders are not sufficient to ensure a proper database conversion. Keri needs the entire directory from C:\Kerisys\Doors32_vN.NN, as highlighted.
Submit this folder set using the “Upload File” link provided on the Keri Systems’ website:
https://www.kerisys.com/database-upload
1. You must provide the exact version number of Doors.NET that you will be installing and licensing (typically the current release version). This is critical since Keri is continually making improvements to both Doors.NET and to the database conversion programs. To ensure compatibility between the converted Doors.NET SQL Server database files and your actual, installed Doors.NET system, Keri needs to know the exact version of Doors.NET you will be installing and licensing. Typically, you can include a text file with your Doors32 database to include this information.
2. As much as possible, ensure no changes are made on the existing Doors32 database during the conversion time period. If you change anything in your Doors32 system after submitting your database for conversion, you will have to manually recreate all of those changes in your converted Doors.NET system.
| 5.0 | Install Doors.NET Software |
When installing Doors.NET software you must be logged into your Host PC as an Administrator, or have your user permissions elevated to Administrator.
You should ensure you are installing the most up-to-date version of the Doors.NET software. The most current version at the time of writing is v4.8.0 - for detailed instructions about downloading the Doors.NET software, click here:
https://help.kerisys.com/portal/en/kb/articles/doors-net-software-download
- Double-click the self-extracting installation file.
Wait a few moments while the file extraction initializes, then click the EXTRACT button.
- You can also right-click the file and select 'Extract All'.
Once you see the list of extracted files, click on the DoorsNETInstaller executable.
- The installer will initialize.

- The welcome window then appears displaying the software title, version, and the detected Windows operating system. If your PC does not have an accepted operating system the installer displays a disqualification window and exits the program.
Next is the license agreement. Keri recommends you read through the agreement in its entirety, then confirm with the check box to accept the terms. Click the Next button.
- Enter the user registration information and organization information.
The hardware selection page is next. Select “Keri PXL and/or Entraguard Controllers.”
- Then comes the Installation Type selection page.
- Default option will install the Application Server, the PXL Gateway, and an administrative client.
- Second option is a Basic Install and will only install the client.
- Third option will install the client with the PXL Gateway.
- Fourth option, Custom Install, will allow custom installation where you select exactly what components you wish to include. Choose the “Custom Install” and click Next. The minimum selections you will need to make for the custom installation are: the Administrative Client plus the Application Server, Gateway PXL Series, and the Archive Services. If you will be adding IP cameras for recorded video then also select “Video Client” and “Gateway Video.” Click Next when you have made your selections.
- The review page is next. Review this list carefully as it explicitly states what will and will not be included in the installation. The items to be installed will be listed on the left in green, the items that will NOT be installed will be listed on the right in red. If the information shown is not correct, click Back and review the installation selections.
If all is correct check the confirmation box and click Next.
- Now the Destination Folder page is displayed. This is the default folder into which the Doors.NET software and other supporting files will be installed. Most systems will use this default directory: C\Keri\DoorsNET. Keri recommends using this default folder for your installation. This page will also display the required Hard Disk space and the disk space available.
Now comes the Shortcuts page. Select the types of program shortcuts to be installed on the host PC.
The final installation screen will list an SQL Server if it is detected on the PC. You will be presented with three options:
- Install the database in this computer – this is the default option.
- Scan the Network for an existing SQL Server – this option requires the network folder always be available for the PC/Doors.NET program.- Install the Application Server only – this will require a manual installation of the database using the InstallDHSDB program which is also installed into the C:\Keri\DoorsNET on a default installation.
Click Next once more when you are ready to proceed with the installation.
A progress bar keeps you informed of the status of the installation. There are several steps involved where there may be a delay of several minutes. Please be patient during the installation.
Once installation has completed you are prompted to run the License Manager.
| 6.0 | Activating Your Doors.NET License |
- With a check mark placed against “Run License Manager now,” click on the Finish button. The installation window closes and the License Manager window opens. The Doors.NET License Manager can also be opened by clicking Start > All Programs > Doors .NET > License Manager.
- A new license key can be generated at license.kerisys.com. This license is for systems that do NOT require the use of legacy PXL controllers.
Type your license key into the license key fields.
- Click the “Activate” button. If the PC has unrestricted access to the Internet then you will see a notification window thanking you for registering. Click OK to continue. If the License Manager cannot connect to Keri's Licensing Server, then you will either need to:
- overcome the Internet connection issue.
- or perform an offline license activation via e-mail. Once activation is successful, restart the Application Server.
With the Application Server highlighted on the left hand side of the License Manager, click on the License tab. Under “Capacities,” verify the “PXL controllers (Legacy)” count is set to the number of legacy PXL or Entraguard controllers used in your Doors32 system.
- Scroll down until you can see the “Supported Hardware” section.
- For PXL controllers, verify “Keri Systems - PXL 500” is set to True.
- For Entraguard controllers, verify “Keri Systems - Entraguard” is set to True. Close the License Manager. You are now prompted to run the Gateway Wizard. Ignore this step at this time as much of the information needed by the Gateway Wizard will be included in the converted database.
| 7.0 | Downloading and Installing SQL Studio Manager |
For a new installation onto a new PC, the Doors.NET installer will install the SQL Express database engine but it does not install SQL Studio Express which is used for managing databases.
- Open License Manager again (From Windows Start menu go to Doors.NET >> License Manager).
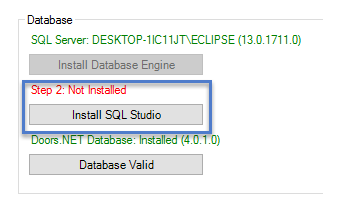
On the right, you will see the 'Database' section - The red text above the Install SQL Studio button should state: 'Not Installed'.
- Click the Install SQL Studio Button.
- First the installation files will be downloaded.
- Once downloaded, click the install SQL Studio button again to perform the installation.
- Installation of SQL Studio Manager should take just a few minutes.
- Once complete, close then re-open License Manager.
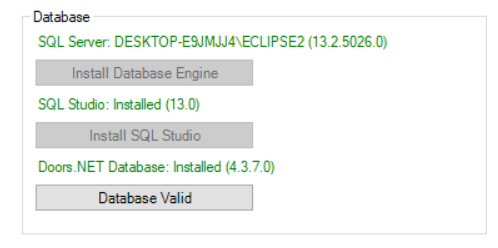
- Select Application Server again and SQL Studio should be indicated as installed.
- You can now close the License Manager.
| 8.0 | Installing the Converted Doors.NET Database |
In order to install the converted Doors32 to Doors.NET database you must detach the existing, default database and attach the newly converted database.
| 8.1 | Retrieve the Converted Database Files |
Retrieve the converted database files using the database file upload link provided by Keri Tech Support via email.
If your Doors32 system has badging, there will be a Photos folder and a templates folder included with the converted database with all converted badging photos and card templates.
| 8.2 | Remove the Default Doors.NET Database |
Use Microsoft SQL Server Management Studio Express to detach the database that is created during the installation. If you are running this program for the first time you will also see a message stating it is configuring the environment for first time use.
1. Stop all Doors.NET related Windows services. Open the Services window by clicking on Start > Administrative Tools > Services. Scroll down the list of service names. Right-click on any service name beginning with Doors .NET and select Stop.
2. Open the SQL Server Management Studio program. Perform one of the following depending upon Operating System and SQL version installed:
- Go to Start > All Programs > Microsoft SQL Server 2012 > SQL Server Management Studio Express.
- Go to Start > All Programs > Microsoft SQL Server 2016 > SQL Server Management Studio Express.
- Go to Start > All Programs > Microsoft SQL Server 2019 > SQL Server Management Studio Express.
3. Logon using Windows Authentication then click on Connect.
4. Expand “Databases” in the left hand pane, right click on “DHS_MAIN,” then select “Delete”from the menu. The “Delete Object” dialog pops up.
5. In the “Delete Object” dialog, click OK. After the database files are deleted, the “Delete Object” dialog automatically closes. The files named DHS_MAIN_Data and DHS_MAIN_Log should have been deleted from the following directory (depending upon operating system type):
C:\Program Files\Microsoft SQL Server\MSSQL.1\MSSQL\Data (32-bit OS) or C:\Program Files (x86)\Microsoft SQL Server\MSSQL.1\MSSQL\Data (64-bit OS).
6. Start all Doors.NET related Windows services. Open the Services window by clicking on Start > Administrative Tools > Services. Scroll down the list of service names. Right-click on any service name beginning with Doors .NET and select Start.
| 8.3 | Attach the Converted Database |
The converted database is made up of replacement DHS_MAIN_Data and DHS_MAIN_Log files. These new files will overwrite the existing, detached database files.
1. Copy the new DHS_MAIN_Data and DHS_MAIN_Log files to the appropriate directory
(overwriting the existing files):
C:\Program Files\Microsoft SQL Server\MSSQL.1\MSSQL\Data (32-bit OS) or C:\Program Files (x86)\Microsoft SQL Server\MSSQL.1\MSSQL\Data (64-bit OS)
2. From Studio Express right-click on Databases and select “Attach” from the menu.
3. Click on the Add button and double-click on the DHS_MAIN.mdf file.
4. Click “Ok” on the “Attach Database” window and allow it to run.
5. On the lower-left of the “Attach Database” window a green progress wheel indicates the progress of the procedure.
6. When the procedure is completed, the DHS_MAIN database will now be present under “Databases.”
| 8.4 | Transfer the Badging Photos |
If your Doors32 system had badging you will need to transfer the badging photos to the new photo directory. The converted database download includes a Photos folder with all converted badging
photos.
- Copy all files within the retrieved Photos folder to the C:\Keri\DoorsNET\Photos folder.
- Copy all the badge templates from the Doors32 host PC to the C:\Keri\DoorsNET\Templates folder.
- You should also restart the Doors.NET Application Server.
| 9.0 | Run the Gateway Wizard |
Now run the Gateway Wizard to associate the PXL Gateway with the system's Application Server.
1. From the Start menu click >> All Programs > Doors .NET > Gateway Wizard.
2. From the logon window select the Keri - PXL Series gateway from the Gateway Selection dropdown list.
3. The server IP address and TCP Port value are automatically entered. This assumes the access control hardware and the host computer on which the software is installed are on the same network.
4. Enter the default username and password (admin/admin).
5. Click the “Connect” button to select the PXL gateway.
6. The PXL Gateway now appears in the “Existing Gateways” list on the left. Highlight this gateway and click on the “Next” button.
7. On the final screen of the Gateway Wizard check that the Gateway Type is correct then click the “Finish” button.
8. You will then be prompted to restart the PXL Gateway service. Select “Yes.” Shortly a confirmation message stating the service has been started appears.
| 10.0 | Verify the PXL/Entraguard Controllers are Online |
1. Login to the Doors.NET software via the Administration Client icon. You should see the icon on the desktop; it is named “Keri Systems Client.”
2. Enter the default username and password (admin/admin).
3. Click Connect and the Doors.NET program opens.
4. From the Setup tab click on the Hardware Setup icon and then go to the All tab. This takes you to the hardware tree where your PXL gateway will appear, along with a “Communications Channels” node, and then your master PXL beneath that.
5. Highlight the master controller and verify it is showing as online.
6. Open the Live Events grid and you should see online messages for all the PXL and/or EntraGuard controllers on the network. If the PXL network fails to come online refer to the troubleshooting section at the end of this document.
| 11.0 | Auto-Configuration and Initial Update |
Now you will need to auto-configure and update the network.
1. With the master PXL/Entraguard highlighted and showing as online, click the Auto-Config button.
2. Monitor the messages that appear in the Status Messages grid of the Auto-Config page. You should see “PXL Primary is searching for Secondary controllers.”
3. After 2 or 3 minutes all the detected Secondary controllers will appear in the Available Controllers list. Review the detected controller information then click the Apply button to complete the AutoConfiguration.
4. Close down the Auto-Configuration page and return to the Hardware Setup page.
5. Double-click the master controller and a list of all controllers on the network appears. To the right of each controller will be an “Update Network” indicator. A full update network is required on
each PXL/Entraguard controller to synchronize the hardware configuration with the Doors.NET software.
6. Highlight the master PXL controller then click the Update Network icon on the ribbon bar near the top of the screen. In Live Events you will see a message appear stating: “Update Network Started.”
7. Wait for the Update Network Completed message to appear a few minutes later and then the system will be fully up and running and converted over to Doors.NET.
| 12.0 | Troubleshooting |
Simple Steps:
• If the master controller does not come online then you may need to restart the PXL Gateway windows service. This can be done by selecting the Kiwi bird icon in the bottom right in the Windows Toolbar Tray and clicking the Restart All button.
• Doors.NET will not operate correctly if Doors32 is actively trying to communicate with the controllers. If the master controller does not come online and the Doors32 software is still open. Click on Operate > Net Disconnect within the Doors32 program.
Detailed Routine:
1. Stop all Doors.NET Services.
2. Run Doors32 > Setup System > SET TIME button to test the connection to the master controller. If the system connects, then the connection wiring is OK, the master controller is OK, and PC data
communications are OK.
3. Disconnect from the master controller and close Doors32.
4. Stop the PXL Gateway Service.
5. In the Doors.NET Client GUI, select the master controller.
6. Change “Connection Control” to “Manual” and SAVE the change.
7. Wait at least 60 seconds.
8. Start the PXL Gateway Service.
9. In the Doors.NET Client GUI, select PXL/Entraguard Primary, right-click, and select “Connect.”
10. Watch the “Live Events” to see if the PXL/Entraguard Primary comes online.
11. If not, in Doors.NET Client GUI, select the master controller, right-click, and select “Disconnect.”
12. Stop the PXL Gateway Service.
13. RAM reset the master controller. This forces the master controller to prepare for a new, incoming connection request.
14. Start the PXL Gateway Service.
15. In the Doors.NET Client GUI, select the master controller, right-click, and select “Connect.”
16. Call Keri Tech Support if it still will not connect.
Related Articles
Doors.NET to Borealis Database Conversion Procedure
1.0 Introduction Keri Systems White Glove Conversion procedure will handle the complete conversion of your Doors.NET database to Borealis. The White Glove Conversion procedure will be completed entirely by Keri Systems conversion experts so you will ...Doors32 to Doors.NET Conversion Procedure
Doors32 to Doors.NET Conversion Procedure - Standalone Document (attached)Doors32 to Doors.NET Database Installation Troubleshooting
Doors32 to Doors.NET Database Installation Troubleshooting - Standalone Document (attached)Doors.NET Standalone Technical Documents
Here you can download various Doors.NET technical documentation in PDF format: Doors.NET Setup and Installation Guides Doors32 and PXL Controller Upgrade Data Sheet Recommended PC and Operating System Information Doors.NET Ethernet Communication ...Doors.NET FAQs
Doors.NET Software Questions Where can I download the latest version of the Doors.NET software? Note: To download the latest version of Doors.NET from the Kerisys.com website you will need to first register an account and then log into the site with ...