Lockout Doors
Lockout - From the Doors.NET Software

The Lockout feature can be set from the software or from the hardware (from an input designated as a Global Lock input).
What is Lockout?
Lockout (or sometimes referred to as Emergency Lockout) is used to instantly lockout all doors or certain doors within a facility. The Lockout setting prevents access using card/credentials but still allows exit using push buttons or Request To Exit Switches. Any doors with are automatically unlocked will also automatically be locked.
To provide added flexibility, the system can be configured to exclude certain doors from participation, and selected credentials can be designated to override the lockout condition, such as those cards held by law enforcement personnel.
Setting Lockout from the Software
There are several options available to trigger the Lockout setting for a door or selection of doors, any or all of which can be utilized.
From the Hardware Tree
- Go to Setup >> Hardware Setup >> All to locate the hardware tree.
- Expand a controller to see the readers connected to it.
- Right-click on a reader and select Mode.
- Choose Lockout from the list of available reader modes.

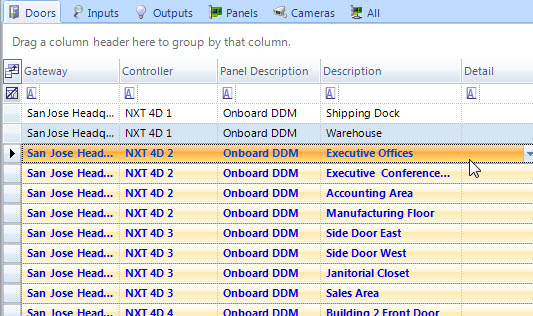
From the Doors Status Grid
- Go to Setup >> Hardware Setup >> Doors to display the doors status grid.
- Right-click one of the doors listed in the grid.
- Go to Mode then Lockout.

Note: You can select multiple readers from the doors status grid, thereby allowing you to set multiple doors to the Lockdown mode. This is done using the SHIFT or CTRL keys on the keyboard.
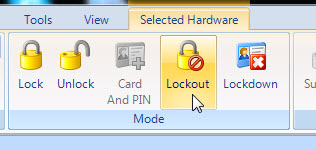
From the Hardware Ribbon
Whenever you highlight a reader in the hardware tree or the doors status grid you will see various icons highlighted in the hardware selection ribbon bar (at the top of the screen). They are divided into three distinct categories; Mode, Timed and Masking. You will see the Lockout icon within the Mode section. Click the Lockout icon while a reader is highlighted and that reader will go into Lockout mode.
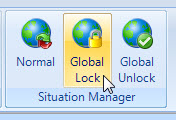
Global Lockout from the Software
You can setup Global Lockout to be activated and deactivated from the software. This feature is normally used when you want all doors in the system to go into the Lockout state, or most of the doors (you can configure certain doors to not respond to Global Lock/Lockout/Lockdown commands. When Global Lock is setup for use with the software you will see additional icons appear in the Situation Manager ribbon located via the Home tab.
Click here for information about how to set the System Global Lockout (Situation Manager Software Configuration) and other related parameters.
Related Articles
Global Lock, Lockout, Lockdown - Hardware
1.0 Introduction Doors.NET provides the ability to program any available input on the system to immediately put the system into Lock, Lockout or Lockdown status by activating the input (for example; pressing an emergency button). This feature is ...Global Lock, Lockout, Lockdown - Software
1.0 Introduction This section explains how to use the basic Situation Manager feature to set a Global Lock command via an icon in the software, allowing you to immediately lock a designated group of doors, over multiple controllers and even over ...Lockdown Doors
The Lockdown feature can be set from the software or from the hardware (from an input designated as a Global Lock input). What is Lockdown? Lockdown (or sometimes referred to as Emergency Lockdown) is used to instantly lockdown all doors or certain ...Doors.NET FAQs
Doors.NET Software Questions Where can I download the latest version of the Doors.NET software? Note: To download the latest version of Doors.NET from the Kerisys.com website you will need to first register an account and then log into the site with ...Doors.NET Data Sheet
Doors.NET Data Sheet (attached)