MR62E Controller Setup
1.0 Introduction

The following steps explain how to add an MR62E controller to Borealis. The most important thing to be aware of is the fact that you must first add an LP4502 controller to Borealis before you can add the MR62E.
2.0 Add an LP4502 and Verify it is Online
- From the Borealis main menu, go to Hardware >> Controllers.
- All controller on the system will be listed. Verify you have an LP4502 added and showing as online.

3.0 Configure the Network Protocol on the LP4502 Controller
The next step is to define a network device on the LP4502 controller.
- From the main menu, go to Hardware >> All.
- Expand the LP4502 controller.
- At the bottom of the list of controller components select Network Devices.
- Click the ADD NETWORK PROTOCOL button.

- Confirm to add the new network protocol.
- The new protocol will be added to the hardware tree and at the same time the LP4502 will be reset.
- Expand network devices on the hardware tree.
- You will see two Undefined entries. Select the second entry on the hardware tree named 'Undefined'.

- On the right side of the screen the properties for the controller port will be displayed.
- Click on the EDIT button.
- Enter a new description - such as 'MR62E Devices'.
- Set the protocol as Mercury Security.
- Save the controller port settings.

- You will now see there is an indicator against the LP4502 prompting you to memory reset the controller.

- Go ahead with the controller reset (via Hardware >> Controllers >> then use the controller's Action drop-down menu to select Reset.

Note: During the controller reset you will see the controller momentarily go offline. Once back online, the controller will be reset.
4.0 Bulk Eraze and Configure the Controller for DHCP
Before setting up a Mercury intelligent controller, a bulk eraze should be performed to remove all existing configuration.
Because Borealis operates on a DHCP network, the controller will also need to be set to DHCP using the S1 dip switch. This will configure the controller to obtain an IP address from the DHCP network that the Borealis hub is added to. The following steps explain how to perform the bulk eraze and then to set the controller to a normal operating mode (and a DHCP configuration).
- Power down the controller.
Set the DIP switches S1 and 2 to the ON position.
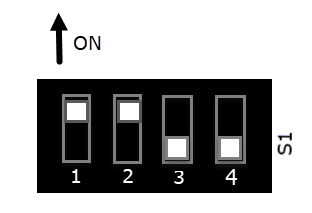
- Power-up the controller.
- LEDs 1,2,3 and 4 will start flashing alternately at a rate of 0.5 seconds.
- Wait for these 4 LEDs to stop flashing.
- Within 10 seconds of these LEDs no longer flashing, set switches 1 and 2 into the off position. All 4 switches should then be in the off position.
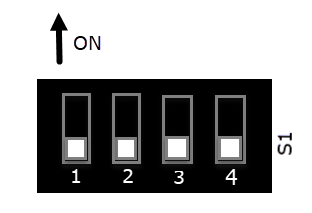
- The controller memory will now be erazed. Full memory eraze takes up to 60 seconds.
- Wait at least 2 minutes for the controller to obtain a DHCP address from the DHCP network.
5.0 Discover and Claim the MR62E
The next step is to scan for the MR62E module via the Hubs screen.
- From the Borealis main menu, click on Hubs.
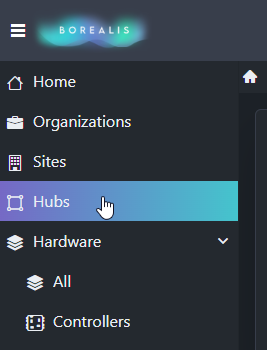
- Click the SCAN button located on the right-side of the screen.
- The hub will scan the local subnet and the MR62E should be displayed in the Scan Panels section.
- The module's assigned DHCP address will be displayed.

- Select the checkbox next to the description field to select the MR62E.
- Enter a name for the module in the Description field.

- Click the CLAIM button.
- You will see a controller select window.
- Select the LP4502 controller where the module will be added.

- Click the SAVE button.
- The module will now be added to the system.
- The MR62E module can be found via Hardware >> Panels or Hardware >> All >> then expand the LP4502 and then locate the MR62 E within the Network Devices section. Once you have selected the MR62E you will be able to view the online status and access the module properties.

Related Articles
Entraguard Controller Setup in Borealis
1.0 Introduction The following document explains how to setup an Entraguard controller in Borealis. Once a PXL (and Entraguard) hub has been claimed and auto-updated, you can then add an Entraguard primary controller or you can add the Entraguard as ...LP2500 Controller Setup
1.0 Introduction The next generation, advanced LP2500 allows you to connect to additional controllers and I/O expansion modules and the connection is protected by AES encryption. When connected to additional door control modules the LP2500 allows you ...MP2500 Controller Setup
1.0 Introduction The next generation, advanced MP2500 allows you to connect to additional controllers and I/O expansion modules and the connection is protected by AES encryption. When connected to additional door control modules the MP2500 allows you ...MP4502 Controller Setup
1.0 Introduction The MP4502 is a next generation MP series controller from Mercury - offering seamless expansion to an existing Mercury hardware system. The MP series Mercury controllers are completely interchangeable and backwards compatible with ...LP4502 Controller Setup
1.0 Introduction The new Authentic Mercury LP Series Intelligent Controllers are Mercury Security’s next generation advanced access control platform that runs on embedded Linux. The enhanced platform offers an improved processor and increased memory, ...