Setup an NXT Controller
Introduction
When adding NXT controller you use the Auto Configuration process - by which Doors.NET polls the network seeking NXT controllers and the devices connected to those controllers. It then inserts all collected information into the hardware section of the program database for assignment by the installer/user.
NOTE: The DoorsNXTProxy.exe service must be allowed to communicate through any firewall installed on the computer running the NXT Gateway service. The DoorsNXTProxy Service is added to the list of exceptions in the Windows Firewall during installation, however if another firewall is being used, it may prevent auto configuration from finding the controllers on the Local LAN. The table below lists the Port Numbers used for Doors.NET communication. These Port Numbers must be allowed to pass through a firewall.
11434 | 10020 |
11435 | 10030 |
11000 | |
11015 | |
11435 | |
NOTE: The Greater I/O Board (GIOX) can only be configured through Auto Configuration. This is due to the mix-and-match nature of the input and output boards for this product.
Adding an NXT Controller to the NXT Gateway
NXT controllers are typically added to Doors.NET using the auto-configuration feature, however they can be manually added to the hardware tree, or replaced (if you know the controller's MAC and IP address).
This section details the Auto-configuration process, which polls the local subnet and NXT gateway, and automatically returns a list of all NXT controllers it finds.
- Ensure all NXT controllers are connected to the network and are powered ON.
- Open the Doors.NET login window by clicking on the client icon on the desktop.
![]()
- Login to the software using the default user name and password of admin / admin, then click Connect.
- Go to Setup >> Hardware Setup >> All.
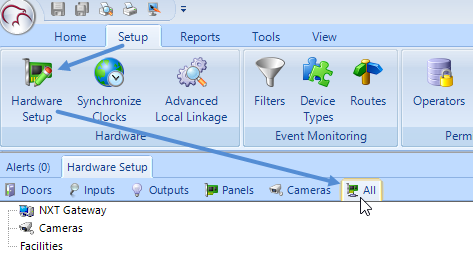
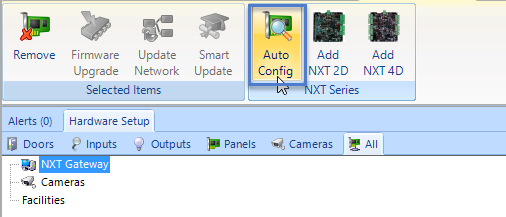
- Click the NXT gateway (listed at the top of the hardware tree).

- With the NXT gateway highlighted, click the Auto Config icon. The NXT proxy service then searches for NXT controllers on the network.
- The Auto Config Results tab appears and all detected controllers are listed in the Available Controllers section.
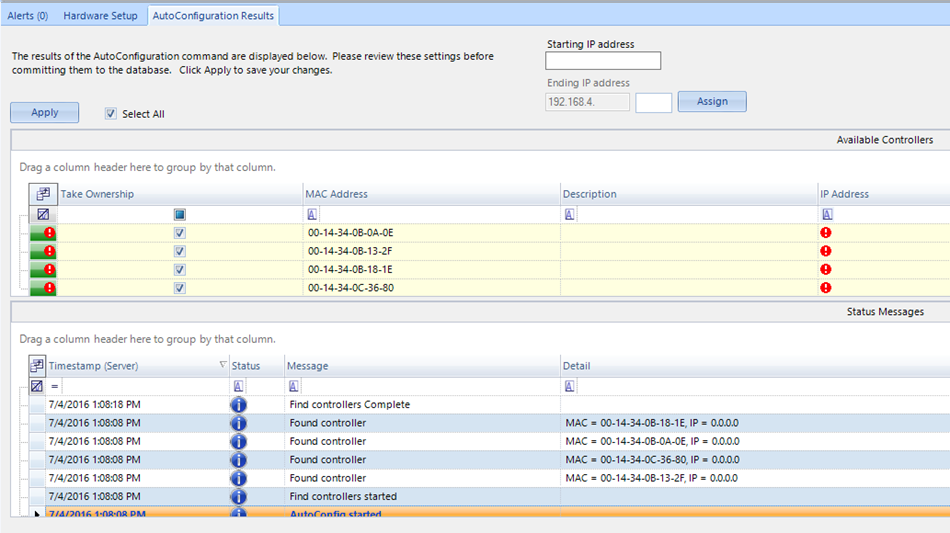
- By default, all controllers are selected. An IP address must be assigned to each controller.
- Enter an IP address for each controller either manually per controller, or if the IP address range is consecutive, by entering an IP address range in the Starting and Ending IP address fields at the top of the AutoConfiguration screen.
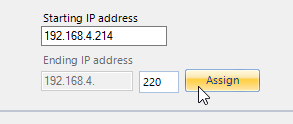
- Click Apply after entering and assigning the IP addresses. The controllers are assigned their IP addresses and are added to the NXT gateway.
- Wait for the Auto Config Complete message, then close the Auto Config window.
- A controller firmware revision check is then performed.
- An “Incorrect Firmware” message appears in the Live Events grid if the detected firmware is below the required revision. A firmware upgrade must be performed for any controllers with this message.

- If a firmware upgrade is needed, the required revision, as you can see, is listed.
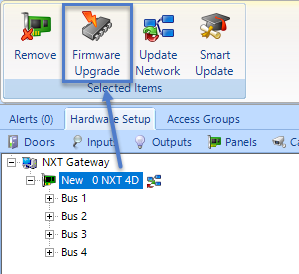
- To upgrade the firmware on an NXT controller: Highlight the controller in the hardware tree, then click the Firmware Upgrade icon in the ribbon bar.
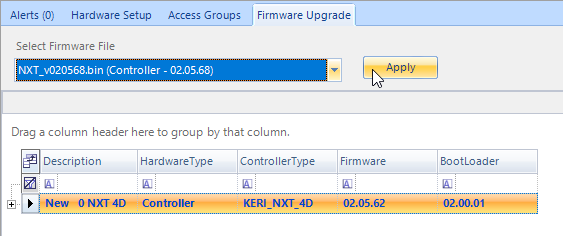
- Highlight the controller in the list and then select the required new firmware revision from the pull-down menu at the top of the window.
- Click Apply and the updating begins.
- A green progress bar appears to the right of the controller information providing a visual indication of upgrade progress.

- Once complete, the controller is ready for configuration and operation.
NXT Controller Configuration
Controllers and other hardware are configured in Hardware Setup.
![]()
- Hardware setup has six tabs; Doors, Inputs, Outputs, Panels, Cameras, and All. When you highlight an item in any of the trees under a tab the associated properties will appear in the grid on the right. Note that some hardware properties are only visible when 'Advanced View' is enabled. Refer to the online help for enabling Advanced View.
- The All tab is the easiest place for configuring hardware, as this hardware tree provides a very useful graphical hierarchical display with all the hardware objects listed on one screen.

- On the hardware tree, click the controller you wish to configure and the controller properties
will be on the right. - When you have made changes to the hardware, click the blue save icon at the top of the properties frame and the changes will be automatically updated to the network. In many cases you will see update events in Live Events indicating when updates automatically start and complete.
Standard NXT Auto-Config
Related Articles
Setup an NXT-MSC Controller
1.0 Introduction Doors.NET installation and configuration is a three step process. Each of these steps is covered separately in the help file and there are also separate standalone documents available: Doors.NET Software Installation (document P/N: ...NXT 4x4 Module Setup
Basic NXT 4x4 Setup and Configuration 1.0 Using Standard NXT Controllers The NXT 4x4 module is added to standard NXT controllers using Auto-configuration. The 4x4 module is connected to the controller via one of the available RS-485 ports (these are ...NXT Exit Reader Setup
NXT Exit Reader Setup Keri NXT controllers with Mercury Firmware now provide an Entrance/Exit reader door control feature/configuration. This Entrance/Exit feature allows two readers to be wired into one bus on the NXT controller to control entrance ...Setup Anti-Passback (Using NXT-MSC Controllers)
1.0 Introduction The Anti Passback (APB) feature provides one-way card access into and out of a secure area. It prevents a cardholder from using their card and then passing that card back to someone in order for them to gain unauthorized access. ...Mercury MP Controller Full Setup Guide
1.0 Introduction This section explains how to setup and configure all controller settings and advanced options. All these settings can be found either by logging into the controller via a web browser or by accessing the controller's 'internal ...