Telepathy - Icon Editor
Viewing and Editing Existing Icons
The icons which exist in the icon library can all be viewed and edited within Icon Editor >> Icon settings.
- From the home screen, click on Icon Editor tile.

- The icon library will be on the left and the icon settings will be on the right.
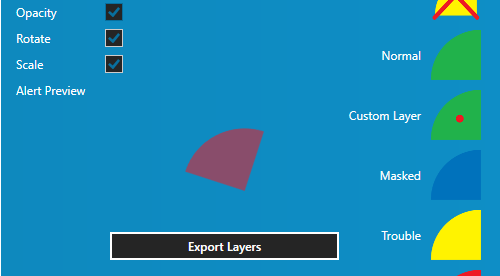
- Select any of the existing icons and you will see the settings on the right. Each icon has a different appearance to represent different conditions that are supported by the hardware.
- For example; select one of the door icons and you will see that 'Normal' is green (when the door is closed/secured), offline is yellow and a red-cross through it (NOTE: reader online/offline status events are only generated by NXT reader types), Alert is red (examples of alert states are when the door is forced or held open). Masked is blue (this is when door held/forced or both are masked).
- The alert preview gives you an animated representation of how the icon will appear if the reader is set up to generate alerts (covered in a different chapter). You can slightly modify the alert state by selecting/deselecting the Opacity, Rotate and Scale options.
- You can also double-click any of the seven status icons. Windows Explorer will then allow you to locate and select a replacement image.
- Click the Save Icon button once you have finished editing.
Related Articles
Telepathy - Adding Sensor Icons
The sensor icons are the dynamic images that will represent your doors and other security access points, or inputs/outputs. They are dragged onto your floor map diagrams to represent their physical locations within your facility. Sensor icons are ...Telepathy - Monitoring your Facility
Once you have linked your map diagrams together and then linked your hardware to the diagrams you will then be ready to monitor your access control system in real-time. General Monitoring From the home screen, click on the Maps tile. If your ...Telepathy - Map Editor
For setting up a typical system, the first place to go to is the Map Editor. But before setting up your Telepathy map client, you should have images of your building(s) and your building floor plans, which you will import. Once imported into ...Telepathy Data Sheet
Telepathy Data Sheet (attached)Telepathy Installation
The Telepathy map client is installed by performing a 'custom installation' of Doors.NET. Then ensure Map Client and Map Editor is selected from the list of available clients to install. Following installation, you will need to activate your ...