Cardholder Presentation Enrollment
How Do I Presentation Enroll Credentials In Doors.NET?
1.0 Introduction
The Doors.NET software offers presentation enrollment functionality from any reader on the system. Presentation enrollment allows you to enroll a card from a card read (simply by presenting the card at the reader). The imprint, facility code (where applicable) and the internal card number are detected automatically. This feature is very useful when you have a random, non-sequential block of cards to enroll or where you don't know what the card facility number is.
2.0 Configure the Enrollment Reader
2.1 Set the Correct Manufacturer Model
The first step is to set the correct manufacturer model for the reader. This will ensure that the correct format will be automatically selected on the Cardholders screen.
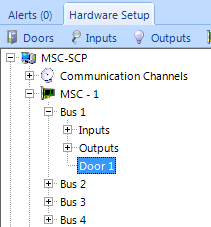
- From the Doors.NET admin client click on Setup >> Hardware Setup >> All.
- The hardware tree will be displayed.
- The communications gateway will be at the top of the hardware tree and the controllers will be listed under the gateway.
- Expand a controller and navigate to the reader that will be used as an enrollment reader.
- Select the reader and the reader properties will appear on the right.
- In the General properties, select the specific reader manufacturer model from the drop-down list.
Note: If you are presentation enrolling NXT credentials then you can use the default model of NXT-3R. You will only need to change the manufacturer model for NXT credentials if you are using an NXT-6RK keypad. - When the correct manufacturer model is selected save the reader settings.
2.2 Configure the Reader as an Enrollment Reader
The next thing to do is to set the desired reader up as an enrollment reader.
- Log into the client and click on Setup >> Hardware Setup >> All.
- Double-click the controller in the hardware tree to view the readers.
- Highlight the reader you wish to setup as an enrollment reader.
- In the reader properties on the right, locate options >> Enrollment Reader and set it to Yes.
- Save the reader settings
.
3.0 NXT Credential Presentation Enrollment
- Click on Home >> Cardholders.
- Click the Add icon.
- Enter a first name and last name.
- Click the Save or Save All icon in the upper-left of the admin client.
- On the right side of the screen, select the enrollment reader from the drop-down list.

- Present the credential to the Enrollment Reader.
- The unique cardnumber will be detected and will appear in the Cardnumber field.

- Set the status to Active.
- Click the Add Card button. The credential is now added and the Cardnumber will appear in the white box.
- The new cardholder is now ready to be assigned access rights.
4.0 Keri MS or 26-Bit Wiegand Presentation Enrollment
- Click on Home >> Cardholders.
- Click the Add icon.
- Enter a first name and last name.
- Click the Save or Save All icon in the upper-left of the admin client.
- Select the enrollment reader from the drop-down list.
- The correct credential format will be automatically selected (providing the correct manufacturer model has been set - as explained in section 2.1).

- Present the credential to the selected enrollment reader.
- The detected credential information will be displayed in the relevant fields.

- Set the credential status as Active.

- Click the the ADD CARD button and the unique cardnumber will appear in the white box.
- The new cardholder is now ready to be assigned access rights.
MS Card Enrollment Video
Related Articles
Cardholder Enrollment - USB Enrollment Reader
USB Enrollment Reader Enrollment 1.0 Introduction Keri Part Number - RDR-ENR1 The RDR-EN1 is a multi-technology USB enrollment reader that is capable of reading both 125KHz proximity cards and 13.56MHz contactless cards and is compatible with the ...RDR-ENR1 USB Enrollment Reader - Installation Guide
USB Enrollment Reader Setup Guide 1.0 Introduction Keri Part Number - RDR-ENR1 The RDR-EN1 is a multi-technology USB enrollment reader that is capable of reading both 125KHz proximity cards and 13.56MHz contactless cards and is compatible with the ...Cardholder Enrollment - Block Enrollment
Introduction Block Enrollment allows an Operator to create a generic set of credentials (using consecutive credential numbers) that can be, in turn, issued on an as-needed basis. Enable the Advanced View feature set to perform Block Enrollment. If ...Cardholder Enrollment - Manual Enrollment
How Do I Manually Enroll Credentials in Doors.NET? NXT, MS and 26-bit Wiegand credentials can be manually enrolled by entering the card's imprint (the number printed on the outside of the card), MS and Wiegand cards also require a facility code. The ...Cardholder Enrollment - Using Live Events
How Do I Perform Live Events Enrollment? 1.0 Introduction It is also possible to enroll cards/cardholders through the Live events grid. Note: This method only detects the card 'internal number' - the unique number that is processed by the controllers ...