Telepathy - Operate the Hardware
This section assumes you have already followed the appropriate instructions for adding and linking hardware to your map diagrams.
Controlling Outputs
- From the Telepathy home screen, click on the Maps icon.
- Right-click on a sensor icon that represents an output on the system.
- You will see there are three options for operating the output (Pulse, On or Off).
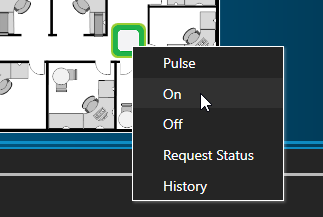
- The appearance of the icon will change when the output relay changes state.
Controlling Doors
- From the Telepathy home screen, click on the Maps icon.
- Right-click on a sensor icon that represents a door.
- You will be able to choose from various unlock and lock options.
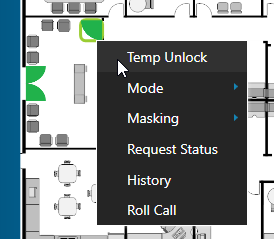
- Temp Unlock - Unlocks the door for the programmed unlock time (default unlock time is 5 seconds). - Select Mode from the menu and you will see Lock, Unlock, Lockout and Lockdown.
- Lock - Will put the door into its locked state (if it is unlocked).
- Unlock - Will unlock the door (if it is locked).
- Lockout - The door will be locked (if it was unlocked), card access will not longer work but the RTE will work.
- Lockdown - The door will be locked (if it was unlocked), card access will no longer work and neither will the RTE.
Related Articles
Telepathy Introduction
Introduction to Telepathy The Telepathy map client provides you with a graphical representation of your integrated security system. Know when a door has been held or forced open. Know if an input on the system goes active (motion detection, fire ...Telepathy - Maps
The Maps are from where you monitor your system. They are the combination of building images, floor plans and sensor icons and the Maps section is where you graphically monitor you access control system in real-time. The Maps screen is also where you ...Telepathy - Enable the Hardware
To display the available hardware (controllers, readers, inputs and outputs) the controllers must first be enabled within the Doors.NET software. This is a security enhancement because otherwise the Telepathy client would immediately give the user ...Telepathy - Link the Hardware
Once the hardware has been enabled in the Doors.NET software it becomes available to select in Visual Doors. Open one of your floor plan diagrams. Click the Link Device icon in the upper right-corner. You will see a list of all the hardware that has ...Telepathy - Alerts and Alert Acknowledgement
You can use alerts in the map client to provide enhancements to the system event monitoring. When a hardware object (for example: a reader or input) is setup, as an alert, the icon on the map will be more clearly identified (it might be constantly ...